zieg72 209 #1 Posted April 11, 2009 Kind of stumped trying to install my 36 in tiller. I am looking for help with the lift cable routing. There is no way with the 07-36TL01 parts. Can anyone shed some light on maybe a newer tiller model # so I can look up the right parts I need. Share this post Link to post Share on other sites
KyBlue 655 #2 Posted April 12, 2009 I dunno how much this will help Here is the back side Your tiller Chain attaches to the second bar coming down... the lift cable, well you can see how its attached and where it comes out. Hope this helps a bit... Share this post Link to post Share on other sites
zieg72 209 #3 Posted April 12, 2009 Scott, is yours a 520H? That is exactly what the pictures show but there is not an opening big enough to snake the cable through on mine unless I am blind. Share this post Link to post Share on other sites
KyBlue 655 #4 Posted April 12, 2009 Ah, well thats not mine. I just borrowed one of Eldons redo pictures. Thats off a C120. I wish I had a 520!! haha One of the members who has a 520 will have to field this question.... Share this post Link to post Share on other sites
zieg72 209 #5 Posted April 12, 2009 I appreciate you trying to help, the manual that came with it has a similar picture in B&W showing the lift cable. I can't see anyway to get the cable through mine to the lift mechanism. Share this post Link to post Share on other sites
jtmoyer 1 #6 Posted April 12, 2009 if you take off the seat and fender pan and look at the bottom of the fill tube for the hydro you should see the lift tube bolted down. there may be years of crud that you have to scrape away to find it. also you may not be a tube, when i picked up one of my 520's it did not have the lift tube. here is a photo never mind that the cable is connected to the arm in the wrong spot, it should be connected to the bottom of the arm. Share this post Link to post Share on other sites
zieg72 209 #7 Posted April 12, 2009 if you take off the seat and fender pan and look at the bottom of the fill tube for the hydro you should see the lift tube bolted down. there may be years of crud that you have to scrape away to find it. also you may not be a tube, when i picked up one of my 520's it did not have the lift tube. here is a photo never mind that the cable is connected to the arm in the wrong spot, it should be connected to the bottom of the arm. I don't have the tube, I checked both of my 520H's. The tube I have looks the the one pictured in 4StarCstms post. Share this post Link to post Share on other sites
92Pony 1 #8 Posted April 13, 2009 If I can remember this evening, I'll run out and take a shot or two of mine. I have a 520, and actually have my tiller hooked to it now (as I did some tilling this-past week). Wade Share this post Link to post Share on other sites
kpinnc 12,943 #9 Posted April 13, 2009 Zeig, if I remember correctly, the Eaton transaxle has a "snaked" tube instead of the straight one found on most other trannies. If you don't have one, let me know. I have one somewhere around all of my junk.... The 520 and other Eaton-equipped machines use part #51 in the pic below for a lift tube. All others use part #30: Kevin Share this post Link to post Share on other sites
Bow_Extreme 544 #10 Posted April 13, 2009 I would say most 520's dont come equipped with any of the lifting hardware. If I have time I will pull the wheel off my 520 and the seat pan again and take some pics of everything. The lift bar pictured in the previous posts can take on many different variations all of which work the same. The one you really want gives you the adjustability of depth and lift height. This is only a total height. The picture of the C series is a little different than the 520 but essentially the same. The info I sent you earlier should help you out alot. I will see if I can post some kind of drawing for you on how this works. Share this post Link to post Share on other sites
zieg72 209 #11 Posted April 13, 2009 I would say most 520's dont come equipped with any of the lifting hardware. If I have time I will pull the wheel off my 520 and the seat pan again and take some pics of everything. The lift bar pictured in the previous posts can take on many different variations all of which work the same. The one you really want gives you the adjustability of depth and lift height. This is only a total height. The picture of the C series is a little different than the 520 but essentially the same. The info I sent you earlier should help you out alot. I will see if I can post some kind of drawing for you on how this works. Bow, thanks for the offer but hold off for now. Randy "49r Operator" is kind enough to send me an extra tube he has off a 520H. I am hoping my part 31 which looks just like the picture works with the 520H tube now in the mail. If anyone needs the #30 style tube let me know. Thanks again to all who have replied. This is one of the most helpful forums out there. Carl Share this post Link to post Share on other sites
Operator 7 #12 Posted April 14, 2009 Yup 51 on the way! No. 31 you could make if your a little handy with a welder. A strap and a 1/2 pipe welded together could do it. Randy Share this post Link to post Share on other sites
zieg72 209 #13 Posted April 17, 2009 Got my tube in and machined an addition to my 2" clevis that came part of the cable. Can anyone give me a picture and size-description of the belt tensioner spring for the tiller? Toro part #6135 I believe. Also if anyone has the guard spring part # 108646 description that would be appreciated as well. Share this post Link to post Share on other sites
KyBlue 655 #14 Posted April 17, 2009 I can measure mine in a couple days (sunday) But I think youll do okay with any spring maybe 5" or so long... You can see it here You can see it installed too Share this post Link to post Share on other sites
zieg72 209 #15 Posted April 17, 2009 My Manual shows that set up. My problem is the 520 uses the bottom side cover bolt which a spring that size is to long. Any 520 owners with an older tiller set up out there can shed some light? Share this post Link to post Share on other sites
Operator 7 #16 Posted April 17, 2009 Hey Zieg right up under the belt gaurd/cover by the foot pad there is a notch , that is where I hook my spring . I don't use the bolt , never got one with tiller and didn't know how it hooked up at the time either, trial and error thing. I also put the tiller on my GT 1848 , C-160 and my Babe the 520 and I use the same belt and spring on them all. Randy Share this post Link to post Share on other sites
WheelHorse_of_course 99 #17 Posted April 17, 2009 Moderator Please archive this somewhere in the FAQ. :omg: Share this post Link to post Share on other sites
KyBlue 655 #18 Posted April 17, 2009 Randy - I didnt get the bolt either. Thats just a Bolt with two Washers and Nuts...Run one Nut up the threads on the bolt...add a washer, pass it thru the Hole on the frame, add the other washer, and nut and tighten and its good to go. I just leave it on all the time and unclip the spring.. Just a How I did it for those who didnt get a bolt with their tiller setup... Share this post Link to post Share on other sites
zieg72 209 #19 Posted April 17, 2009 Tiller is now all set and working great. I utilized a GM brake return for the tensioner and attached to a 5/16" x 1 1/2" bolt/nut through the proper spot in the lower side cover bolt hole. I used a GM carb return spring for the cover. I am really pleased the way it works, thanks for all the help, suggestions and especially the tube Randy. Share this post Link to post Share on other sites
KyBlue 655 #20 Posted April 17, 2009 Any Pictures?? Share this post Link to post Share on other sites
zieg72 209 #21 Posted April 18, 2009 Picture of the Cover spring Attached Image Share this post Link to post Share on other sites
zieg72 209 #22 Posted April 18, 2009 Belt tensioner spring set up. Attached Image Share this post Link to post Share on other sites
zieg72 209 #23 Posted April 18, 2009 My cable that came with the tiller, the 2" clevis was not removable. I drilled a 9/32" hole and created a slot so I could remove the cable. This had to be done in order to put the lift cable through the tube. I then made extensions that were offset to make the required clevis length. Attached Image Share this post Link to post Share on other sites
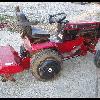
zieg72 209 #24 Posted April 18, 2009 Ready for battle, with the new foot control obtained from Doc in KY. Attached Image Share this post Link to post Share on other sites
92Pony 1 #25 Posted April 18, 2009 Not that it will add a whole lot to the discussion at this point, but here is my tensioner spring location on my 520; Wade Share this post Link to post Share on other sites