Jump to content
Ed Kennell

Commando 8 gets a cleaning

Recommended Posts

Geno

Nothing better than a BFH.  :laughing-rolling:

Share this post


Link to post
Share on other sites
 
Jparkes43

thats nice. pretty dirty but it will look lovely once done 


james

Share this post


Link to post
Share on other sites
 
Ed Kennell

Made a little more progress on the steering.  The hole in the aluminum steering support was elongated ~ 1/16 allowing the wheel to move up and down. I removed the 3/4 X 7/8 nylon bushing, rebored the hole to 1" and installed a 3/4 X 1 bronze bushing.  Also drilled and tapped for a set screw so the bushing can not  move in the aluminum housing.

Now need to get the hood stand painted so I can reassemble the steering. The aluminum  casting cleaned up and polished so nice, I am considering leaving it unpainted...just polish and wax.  It appears the dash plate was never painted,  maybe a plating that totally rusted and pitted real deep. I'm thinking flat black paint on the dash.  I assume there were no decals on the dash as Terry does not show any in the kit.

Is this the correct position for the steering wheel, i.e. spokes at 2,6,and 10 at center steering?


post-7208-0-09536600-1415297038_thumb.jp post-7208-0-66447400-1415297068_thumb.jp post-7208-0-02336500-1415297091_thumb.jp


  • Like 1

Share this post


Link to post
Share on other sites
 
Geno

Looking good Ed.  :handgestures-thumbsup:    I guess I will let out one of my secrets in process.  :eusa-whistle:


Terry (Vinylguy) and I are working on a new dash panel project.  It will be a replica like yours but without the bump in the middle, Terry says it gives some people fits installing the decal.  Scott has a a few of my dash panels and is working up a quote on them.  The new panels will be the same gauge as original.  They may also come black satin powder coated with the decal already applied or not, this could be left up to you guys.  They could also be done in stainless, bronze, etc.  This is still in the works and cost is not estimated yet.  We actually started on it last week and should know the deal in a few weeks or so.  Once the panel is done I will need to send one to Terry so he can adjust the decal for it.  :)

Edited by Geno
  • Like 1

Share this post


Link to post
Share on other sites
 
Ed Kennell

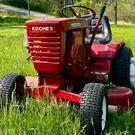
Not finished yet, but She is a little cleaner.  

  Put in some fuel and a battery yesterday and the K181 couldn't wait to take a test run around the yard.

    Really pleased with the steering...the rebuild really tightened things up.

      Gotta get this seat rebuilt though, those ags were brushing my rear end.

        Had these 3 bars left over,  any clues where they go.

         Even managed to get the throttle cable lock to work without the POs vice grip.


  post-7208-0-79662300-1419261310_thumb.jppost-7208-0-30113300-1419261337_thumb.jppost-7208-0-82025700-1419261371_thumb.jppost-7208-0-04449000-1419261391_thumb.jp

  • Like 1

Share this post


Link to post
Share on other sites
 
AJ_Thanatos

Looking Good Ed!! 


Keep it up. 

Share this post


Link to post
Share on other sites
 
 
Ed Kennell

The original plan was to clean her up and save the PATINA, but I had to do too much welding and grinding, so I ended up repainting most parts.

I just couldn't bear to lose the old decals and color of the hood,  so I gently coaxed out the dings and dents and gave her an oil finish.

 Now, I guess  she looks like a multi-colored appaloosa pony.  Now just need a warm day to paint the belt guard and fender pan.  Then decide If I want to spend 40-50 hours saving the seat.


post-7208-0-58890400-1421205681_thumb.jppost-7208-0-63393100-1421205698_thumb.jppost-7208-0-45741000-1421205717_thumb.jp

  • Like 2

Share this post


Link to post
Share on other sites
 
slammer302

I have a multi colored commando 8 too!e1c35d371f0b37f45a71141aa1c2806f.jpg

  • Like 2

Share this post


Link to post
Share on other sites
 
slammer302

Is hard to see in the picture but the back fender and belt guard has been powder coated a dark maroon and the rest is original paint that I have scrubbed with sos pad and then rubbed down with 10w-30

  • Like 1

Share this post


Link to post
Share on other sites
 
Ed Kennell

It got warm enough yesterday to lay the final coat on and put them on the dryer.

Now to sit back, watch the paint dry while waiting for the 2015 blizzard.

post-7208-0-67901100-1422280688_thumb.jp

Share this post


Link to post
Share on other sites
 
David81

Looks good and great way to dry the paint 

Share this post


Link to post
Share on other sites
 
Ed Kennell

Finally got the seat finished today thanks to Mrs K.

This is what we started with.

post-7208-0-42795800-1423348524_thumb.jp

Had to weld the seat pan back together.

post-7208-0-79773200-1423348718_thumb.jp

Then made a new bottom cushion.

post-7208-0-31381200-1423348829_thumb.jp

post-7208-0-16426900-1423349061_thumb.jp

post-7208-0-70588800-1423348992_thumb.jp

We saved the back cushion w/the WH emblem by adding a new edge.

post-7208-0-54795800-1423349243_thumb.jp

Then put it all together.

post-7208-0-53781500-1423349350_thumb.jp

post-7208-0-03751800-1423349392_thumb.jp

It's no museum piece, but she looks happier than when I found her. The tractor that is.

post-7208-0-52808500-1423349704_thumb.jp

  • Like 3

Share this post


Link to post
Share on other sites
 
Racinbob

Beautiful job!! Saving that seat back was a great idea. :handgestures-thumbsup:

Share this post


Link to post
Share on other sites
 
popsgarage

   Great job on the commando 8     I have had mine for 30 years what an awesome tractor it is my go-to tractor for 90% of my needs.  Is that a fisher wood stove in the drying area??  I also

 have one of them

                                Bob

Share this post


Link to post
Share on other sites
 
Ed Kennell

I haven't decided what I'll do with this one.  I have a deck for it that needs a lot of work, a snow plow that I could put on and a mid mount small disc that would work nice also. Problem is , I don't need any of these and I'm running out of space and time to work on them.

The wood burner is actually an ALASKA.  I have been heating my house with it for  40 years and it has served me well. 

It is really heavy...the box is 3/8" welded boiler plate and the doors are cast iron. The bottom and sides are lined with fire brick. It takes 20" firewood.


BTW  welcome to the  :rs:

Share this post


Link to post
Share on other sites
 
Ed Kennell

Flushing the tranny with kerosene before refilling with 90w gear oil.   So I took her for a romp in the snow to wash the bearings and gears.


post-7208-0-88930700-1425134619_thumb.jp


  • Like 2

Share this post


Link to post
Share on other sites
 
slammer302

Looks good

Share this post


Link to post
Share on other sites
 
19richie66

She looks happy now Ed. Nice work on the seat. The Mrs. Did a great job.

  • Like 1

Share this post


Link to post
Share on other sites
 

Create an account or sign in to comment

You need to be a member in order to leave a comment

Create an account

Sign up for a new account in our community. It's easy!

Register a new account

Sign in

Already have an account? Sign in here.

Sign In Now

  • Similar Content

    • tractorboy79
      By tractorboy79
      Hello, I have a gt14 and a old brinly cultivator but I need the correct hitch to put on my tractor (clevis hitch) would clevis hitch fit on the back of a gt14 the same way as a another tractor or will I need to make adjustments? Anything helps? thanks!
    • BrianKoch
      By BrianKoch
      Hello gentleman, 
       
      Problem: will not crank on its own, will crank with jump box—but still not fire
       
      Recent things I did prior to this issue: cleaned fuel filter, replaced battery cables, replaced cable from ignition to starter
       
      I have my test light out and am probing around. 
       
      There is no power at ignition/magneto wire or the ignition/starter wire
       
      There is power everywhere else


    • BPjunk
      By BPjunk
      A commemerative Wheel Horse model for the Indianapolis 500 car race. The engine is a recoil only start Tecumseh model H-60, three speed Uni-Drive, 6x12 rear tires.
      Bill in Richmond, Va.
       
    • bob54
      By bob54
      How do I get this pin out,  I've tried heat, rust penetrate, and an air hammer, and just rust penetrate and the air hammer.    I can't get it to move, no matter what I do,,and yes I removed the clips from both ends.  I knew you were thinking about that


×
×
  • Create New...