Jump to content
Ed Kennell

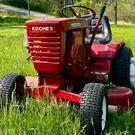
Commando 8 gets a cleaning

Recommended Posts

19richie66

I have one just like this thats going on the table for a restore for the wife. Thanks for the pics.

  • Like 1

Share this post


Link to post
Share on other sites
 
Ed Kennell

Well, though I would cut the hitch off and drill the pin  while waiting for the PB to soak.


post-7208-0-56943500-1411177854.jpg


post-7208-0-95747600-1411177872.jpg


Still could not budge the pin, so thought I would pull the hub and replace the seal on that side as it was leaking.   Bad news in the keyway.


post-7208-0-74039500-1411177892.jpg


Has anyone had any luck using steel Devcon to rebuild a keyway. Using a new key coated with mold release as a mold ?


I have another 3 sp on the shelf, but would like to save this one as the bearings really feel good..

Share this post


Link to post
Share on other sites
 
Trouty56

That pin has to let go....damn.....I have read about using an epoxy type material on keyways......

Share this post


Link to post
Share on other sites
 
Ed Kennell

Not to worry Bob...I will get that pin out.  If the PB doesn't free it up till Monday, I'll drill it out to 5/8" and fire up the torch.

Share this post


Link to post
Share on other sites
 
Save Old Iron


Has anyone had any luck using steel Devcon to rebuild a keyway. Using a new key coated with mold release as a mold ?


I have witnessed a keyway repaired by someone fashioning a "key" out of a carbon rod, inserting it into the axle and welding around the carbon key. Worked great but (obviously) melted the axle seal .

  • Like 1

Share this post


Link to post
Share on other sites
 
Ed Kennell

I thought about rebuilding the keyway with the MIG using a copper key  for a mold.   Any opinions on using copper?   The seal needs replaced anyway, that's why I pulled the hub off.


I have read some successful reports on using Devcon , Metalite, and JB weld.

  • Like 1

Share this post


Link to post
Share on other sites
 
Molon_Labe

Ed a copper mold would be a great idea. I've used copper sleeves when butt welding cocking tubes on a couple of H&K's and it worked perfectly.

  • Like 1

Share this post


Link to post
Share on other sites
 
Ed Kennell

Well , that gives me several options. Have to find some carbon or copper bar to make the woodruff mold.

Share this post


Link to post
Share on other sites
 
Ed Kennell

Well, I finally found a few hours to work on the Commando 8.  I don't know how I got everything done before I retired.  Seems like I have less and less time.


Anyway to move ahead, I for now,  shelved the tranny with the frozen hitch pin and the wallowed out axle keyways. It was also like Craigs... full of chocolate milk . I'll rebuild it another day.


I had a good 3 speed on the shelf so I cleaned it up and prepped for paint.  Got some other parts ready to paint, then started working on the belt guard. 


Had to rediuld the bolt tab on the front and remove some kinks along the bottom.  Then I noticed these two tabs the look like they are broken.


  Does anyone have  pic to show me what they should look like or should the be connected?   Are they for belt support when the clutch is disengaged?


post-7208-0-72844800-1412991729_thumb.jp

post-7208-0-83560700-1412991752_thumb.jp

post-7208-0-03059400-1412991772_thumb.jp


Oh, BTW I have given up on trying to preserve this one without painting. I just can not bring myself to putting  it back together without removing all the rust and repainting.


Share this post


Link to post
Share on other sites
 
slammer302

Those tabs should be welded to the frame

Share this post


Link to post
Share on other sites
 
Ed Kennell

OK, thanks Slammer.  I'll look for the remains on the frame tomorrow.  If their  purpose is to support the belt guard, I can see why they broke. I think they  are only  1/8 x 1/4" bar.


I may just weld  sleeves  inside the belt guard and tap holes in the frame and bolt the guard to the frame.

Share this post


Link to post
Share on other sites
 
slammer302

Yeah I had to reweld the ones on my commando 8

Share this post


Link to post
Share on other sites
 
Ed Kennell

That's probably why the front tab that bolts to the block was broken off also.   These two little tabs in the back broke, then the front one was supporting the whole guard.


Definitely  needs some reengineering in that area.  Just need to make sure these tabs are not part of the belt braking system when declutching.

Share this post


Link to post
Share on other sites
 
Ed Kennell

Yep, I see where the tabs were welded to  the frame.  Think I will just grind them off and drill and tap holes  in the frame to match the two in the belt guard, then cut two spacers.

  • Like 1

Share this post


Link to post
Share on other sites
 
squonk

If you rebuild that trans someday. either get another axle from Biser or have a machine shop cut another keyway and smooth out the old one so it can't hurt anybody.

Share this post


Link to post
Share on other sites
 
Ed Kennell

That might be a project this winter Mike.  I  would still like to try to try welding up the old keyways abound a mold.  I have a piece   of 3/16 brass to make a mold key.

  • Like 1

Share this post


Link to post
Share on other sites
 
AMC RULES

I'm hoping you'll photo document that process for us Ed.

Share this post


Link to post
Share on other sites
 
Ed Kennell

Got a little time on the 8 today. They sure do make a pile of parts. I found a lot of wear resulting in excessive clearance in the steering shaft bushings. The front end did not have a bolted on bearing although the holes are there. I'll need to find or make a bearing for the front. The rear end has a brass bushing in the block so I can replace that one. Hoping to get the frame and front end painted before it gets too cold so I can get her back to rolling.

post-7208-0-21900400-1413852646_thumb.jppost-7208-0-30365200-1413852729_thumb.jppost-7208-0-46448000-1413852761_thumb.jppost-7208-0-77056500-1413852779_thumb.jppost-7208-0-18482400-1413852802_thumb.jppost-7208-0-89385600-1413852855_thumb.jppost-7208-0-87975500-1413852877_thumb.jppost-7208-0-51516300-1413852894_thumb.jp

  • Like 2

Share this post


Link to post
Share on other sites
 
19richie66

They do make a pile. I have parts laying all over the place myself.Watching closely.As far as the front steering bearing,I was looking at this one.Not sure if the outer holes are the right spacing.


http://www.speedwaymotors.com/Firewall-Mount-Flanged-Bearing-for-Steering-Shaft,2044.html

  • Like 1

Share this post


Link to post
Share on other sites
 
Ed Kennell

The bolt spacing is OK...2.25".

The 1.9" width would interfere with the bottom of the motor pan though as I have only 0.75" from top of frame to hole CL

I will need to grind 0.2" off the top side of the bearing housing which I think I could do without weakening the housing too much. The motor pan does have 1/16" raised feet on the bottom so that will help.

post-7208-0-25213300-1413895870_thumb.jppost-7208-0-26974600-1413895895_thumb.jppost-7208-0-41553200-1413895927_thumb.jppost-7208-0-48608200-1413895952_thumb.jp

  • Like 1

Share this post


Link to post
Share on other sites
 
Geno

I think you may be doing a little more than cleaning.  :laughing-rolling:    Sure is gonna get fixed right!  :text-+1:

Share this post


Link to post
Share on other sites
 
Ed Kennell

It won't be the prettiest Queen around Geno, but I want it to run as good as new, or maybe better.

I was afraid I would have to grind away too much of the housing on the spherical bearing Richie. So I bought a 3/4 X 7/8 flanged bronze bushing at ACE for 4 bucks and made a housing for it. I have about 3X the bearing surface now and it is bz on steel not st on st like the factory. Oh, BTW if you do buy one online, two day shipping was $7 and one day was $63. Don't hit the wrong button.

post-7208-0-83441600-1413920290_thumb.jp

  • Like 1

Share this post


Link to post
Share on other sites
 
KyBlue

Looks like it'll work just fine 


Coming along nicely

Share this post


Link to post
Share on other sites
 
Ed Kennell

Finally got her rolling again. New/spare tranny in place. Picked up a pair of mounted Deerstone AGs for $75.

Yeah, the wheels need repainted.

post-7208-0-53117500-1414429875_thumb.jp

Shimmed and bushed the steering gear and made new pivot pin for the axle.

post-7208-0-34634800-1414429904_thumb.jppost-7208-0-93942600-1414429929_thumb.jp

This really tightened up the steering. Also straightened the arm on the left spindle. It was bent up about a 1/2" and had actually worn a groove in the axle.

Pulled the covers off the engine to get ready for paint. Found the points looked new and right on 0.020".

Took the fuel pump off for cleaning and was surprised when I didn't find an operating arm. This is my first experience with a K181, so I'm on the steep side of the learning curve. Now understand the pulse fuel pump.

Took the breather cover off to clean and check valve clearances. Another surprise...no clearance adjustment. Back to the manual for more learning.

The exhaust is OK @0.016 and intake OK @ 0.008"

post-7208-0-30776000-1414430096_thumb.jp

Edited by ekennell
  • Like 1

Share this post


Link to post
Share on other sites
 
Ed Kennell

Got tired of waiting for the PB to loosen that frozen hitch pin...It's been soaking since Sept 17.

I opened the hole to 11/16, got a 5/8 bar, and beat it with the BFH. It surrendered. There was evidence the PB had soaked the pin on the side where I drilled the two 1/8" holes, but the other side was still dry.

In case you were wondering. I did have it supported under the lug when I beat on the pin.

So there ya go TROUTY..it worked.

post-7208-0-03477800-1414439479_thumb.jp

  • Like 2

Share this post


Link to post
Share on other sites
 

Create an account or sign in to comment

You need to be a member in order to leave a comment

Create an account

Sign up for a new account in our community. It's easy!

Register a new account

Sign in

Already have an account? Sign in here.

Sign In Now

  • Similar Content

    • tractorboy79
      By tractorboy79
      Hello, I have a gt14 and a old brinly cultivator but I need the correct hitch to put on my tractor (clevis hitch) would clevis hitch fit on the back of a gt14 the same way as a another tractor or will I need to make adjustments? Anything helps? thanks!
    • BrianKoch
      By BrianKoch
      Hello gentleman, 
       
      Problem: will not crank on its own, will crank with jump box—but still not fire
       
      Recent things I did prior to this issue: cleaned fuel filter, replaced battery cables, replaced cable from ignition to starter
       
      I have my test light out and am probing around. 
       
      There is no power at ignition/magneto wire or the ignition/starter wire
       
      There is power everywhere else


    • BPjunk
      By BPjunk
      A commemerative Wheel Horse model for the Indianapolis 500 car race. The engine is a recoil only start Tecumseh model H-60, three speed Uni-Drive, 6x12 rear tires.
      Bill in Richmond, Va.
       
    • bob54
      By bob54
      How do I get this pin out,  I've tried heat, rust penetrate, and an air hammer, and just rust penetrate and the air hammer.    I can't get it to move, no matter what I do,,and yes I removed the clips from both ends.  I knew you were thinking about that


×
×
  • Create New...