cleat 6,945 #51 Posted May 25, 2024 7 hours ago, oliver2-44 said: I’ve never had a 520; but I though you had to have the gear reduction steering for the 60” deck to fit. If I off base just say so. Did that P.O. mod some how make the deck hang slightly farther back? You need the forward swept front axle but not necessarily the reduction steering. The 520HC has the swept axle and standard steering. I believe the 1990 520H is the same way. 2 Share this post Link to post Share on other sites
Handy Don 13,336 #52 Posted May 25, 2024 1 hour ago, cleat said: You need the forward swept front axle but not necessarily the reduction steering. The 520HC has the swept axle and standard steering. I believe the 1990 520H is the same way. By ’95, the 520-H had both and the -HC was, I believe, out of production Share this post Link to post Share on other sites
Mister_520H 58 #53 Posted May 25, 2024 9 hours ago, Handy Don said: If your skills are up to it, you could remove that pin and replace it with a new piece of rod. Probably less work than my original suggestion! WH tended to weld these types of things on only the “back” side of the bar so with care, you could get that piece off and put in a new one! this sounds like another good fall project. I’m going to have to get my tractor back in operation ASAP as my grass waits for no man. as for the drive belt replacement. Any thoughts on what appears to be an oem vs heavy duty aramid belt? It looks like the new lift arm parts will be here today. I’m planning to pick up a clevis to fit the larger diameter hole snugly and then turn down the opposite end to match the ID of the smaller hole. Probably overkill but that’s my middle name. Share this post Link to post Share on other sites
peter lena 9,075 #54 Posted May 25, 2024 @Handy Don more than agree with the lack of functional detailing on that lift arm set up , makes me think of an adaptive flange bearing set up , gorrect polyurea grease , personally think its way out out of its comfort zone , with loading , and activity . deck weight and rotational drag , field cutting etc . would be towing a self powered , flail mower , guy up the road from me recently was field cutting , that rear flail mower , made quick work of 4 ft field work , regularly look over a problem spot for a cure , often a simple detail function issue , you can also paint a change red , and hardly notice it , go greasy pete Share this post Link to post Share on other sites
Handy Don 13,336 #55 Posted May 25, 2024 17 minutes ago, Mister_520H said: drive belt replacement. I’ve had good luck (so far) with all of the D&D Aramid covered belts I’ve installed. Others here strongly favor OEMs The cover is the key--they resist wear longer and, on clutched tractors, give much smoother engagement Share this post Link to post Share on other sites
Ed Kennell 40,402 #56 Posted May 25, 2024 They work great for me on decks, blowers, hydro and gear drive trannys. And when building customs, I buy several lengths, use the one that fits best, and return the rest. I always record the date and file the sleeve. 1 Share this post Link to post Share on other sites
Lee1977 7,027 #57 Posted May 25, 2024 (edited) This is the belt I put on my 520-H about three years ago. The 5/8" x 82" like Ed posted above I have on a couple of my 8 speeds. Edited May 25, 2024 by Lee1977 1 Share this post Link to post Share on other sites
Handy Don 13,336 #58 Posted May 25, 2024 Wow, you guys with dating and keeping belt sleeves are really impressing me! Share this post Link to post Share on other sites
Mister_520H 58 #59 Posted May 25, 2024 12 minutes ago, Lee1977 said: This is the belt I put on my 520-H about three years ago. The 5/8" x 82" like Ed posted above I have on a couple of my 8 speeds. 5/8 x 83 matches what I’ve found elsewhere. Aesthetically I’m not thrilled about putting a blue belt on this thing so I’ll just go OEM. 1 Share this post Link to post Share on other sites
Handy Don 13,336 #60 Posted May 25, 2024 1 minute ago, Mister_520H said: Aesthetically I’m not thrilled about putting a blue belt on this thing We each have our own priorities! Share this post Link to post Share on other sites
Lee1977 7,027 #61 Posted May 25, 2024 The last Wheel Horse belt I bought was made in Mexico. That's when I stopped buying belts from Toro. 1 Share this post Link to post Share on other sites
Mister_520H 58 #62 Posted May 25, 2024 The new (used) lift assembly arrived this afternoon and a big storm blew in so I put my barn project on hold and switched back to tractor service. I’m re-cladding my workshop/barn and spent the day cutting battens until the weather took a turn. Here are some side by side photos of my old lift and the new parts. Notable differences are the length of the hydraulic cylinder arm. I’ll definitely be using my original shaft. The rest of the parts are essentially identical with the exception of the shouldered clevis which I hadn’t noticed in the photos and solves my issue of mounting perfectly. Good news! Share this post Link to post Share on other sites
Mister_520H 58 #63 Posted May 25, 2024 Shouldered clevis sandwiched better the two arms. This design is confidence inspiring! 2 Share this post Link to post Share on other sites
Handy Don 13,336 #64 Posted May 26, 2024 (edited) 5 hours ago, Mister_520H said: Shouldered clevis sandwiched better the two arms. This design is confidence inspiring! Now that we have THAT settled! I can see how by not looking closely I assumed that the holes were equal-sized. And, with no head on the clevis on the outside, it avoids clearance problems. You look set to get to work! Edited May 26, 2024 by Handy Don Share this post Link to post Share on other sites
kpinnc 13,659 #65 Posted May 26, 2024 (edited) 11 hours ago, Mister_520H said: Aesthetically I’m not thrilled about putting a blue belt on this thing so I’ll just go OEM. Can't see it under the PTO bell anyway. Edited May 26, 2024 by kpinnc Share this post Link to post Share on other sites
Mister_520H 58 #66 Posted May 27, 2024 Went ahead and installed the new lift parts onto my old shaft assembly today. Very straight-forward install. For those who were concerned, I dressed the entire interior of the lift mechanism with anti-sieze where it mates with the shaft. After a light honing it slid on like butter. Went through my manual and verified the setup for my 60” deck and got that installed. Final trunnion adjustment to set the max deck height to stop short of maxing it out like I had it previous to keep unnecessary tension off the lift arm when in the lifted position. While watching the lift actuate I was somewhat concerned to observe that my hydraulic lift shaft at least visually appears to be slightly bent toward the end where the clevis attaches to the arm of the lift shaft assembly. I find it unlikely that it’s designed that way intentionally and even though the lift functions normally, I’m curious what you guys think about this. How it could have happened and what effect it might have. Hard to photograph but I tried. The hydraulic cylinder swivels so I’m wondering what could account for the force necessary to bend the shaft. With the deck in the lowered position the angle of both shaft and cylinder are neutral and in the extended listed position they are still neutral. 1 Share this post Link to post Share on other sites
Handy Don 13,336 #67 Posted May 27, 2024 (edited) 28 minutes ago, Mister_520H said: anti-sieze where it mates with the shaft - Yay! Final trunnion adjustment to set the max deck height to stop short of maxing it out Yay! While watching the lift actuate I was somewhat concerned to observe that my hydraulic lift shaft at least visually appears to be slightly bent toward the end where the clevis attaches to the arm of the lift shaft assembly. . The hydraulic cylinder can exert about 700 lbs of extend force (yeah, a lot). Less on retract, of course. I’ll bet that the PO's “mods” managed at some point to bring that force against an immovable object and the rod was the weakest point so it bent. These are not high-precision, high pressure units, but In time, it’ll probably put some extra wear on the seal and you’ll see seepage. Bending it back is a fools errand and I, for one, wouldn’t try it. Me? I’d run it and also get and keep a spare cylinder planning for the day when replacement is the easiest option. Edited May 27, 2024 by Handy Don Share this post Link to post Share on other sites
kpinnc 13,659 #68 Posted May 27, 2024 The cylinder lifts on the pull stroke, so it was likely bent because someone used a solid link in an attempt to place down pressure on either a grader or plow blade. 1 Share this post Link to post Share on other sites
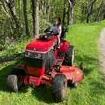
Mister_520H 58 #69 Posted May 27, 2024 Handy, That sounds like a good approach. I saw a few on eBay so I’ll grab one and add it to my parts stash. Kpinnc, I can’t speak to the tractors’s early life but it only came to me with a 60” deck and a snow thrower. I assume the thrower was used regularly as the PO saw fit to buy a cab to keep warm in the winter. Could the snow thrower have cause the damage? It’s possible that other implements were used in the past as well. I’ve only been the owner for about 7 years now and she lived a long life prior to that. Below.. a few photos after the lift arm install. Ready for action! Is it just me, or is re-installing the seat a real PITA? No part of tearing the tractor down for this job or putting it back together was difficult but getting that dang seat back on is a real nuisance. If it weren’t for the springs.. Also, I spent a good 10 minutes searching my shop for two footrest brackets and bolts assuming each side should have three but only having a total of 4 in my magnetic tray where all the hardware was organized. I finally examined the footrest and it was clear that though a square carriage style hole was present on the rear inner side, the rear surface showed no evidence of one being there on either side. Can anyone confirm? Share this post Link to post Share on other sites
Handy Don 13,336 #70 Posted May 27, 2024 11 hours ago, Mister_520H said: I saw a few on eBay so I’ll grab one and add it to my parts stash. As noted with the arm it connects too, there have been a few versions of that cylinder--both throw and overall length. With no urgency, and if you are coming to the Big Show, bring detailed measurements (both open and closed length to clevises, end pin diameters, overall diameter, hose connection positions) of yours with you and look for one there. 11 hours ago, Mister_520H said: Can anyone confirm? I do vaguely remember thinking there was an unused hole, but I may well have thought someone earlier has simply left it out added the “missing” bolts from my stash! 😄 Share this post Link to post Share on other sites
Mister_520H 58 #71 Posted May 27, 2024 Handy, What is this “big show” you speak of and where is it held? That sounds like a good idea. Share this post Link to post Share on other sites
Handy Don 13,336 #72 Posted May 27, 2024 (edited) Not a Red Square event but a lot us participate. Run by the Wheel Horse Collectors Club the Thursday-Sunday after Fathers’ Day, June 20-23. It's at the South Mountain Fairgrounds in Biglerville, PA. If you do a search here on this site you’ll find lots of posts--including this thread Lots of vendors and folks just socializing The club never updated their website with this year’s info but except for the date, this is it. https://wheelhorseclub.com Wheel horse stuff only! Leave your green, white, orange and other tractors at home, I plan to be there and will be bringing a tractor to cruise around on. Edited May 27, 2024 by Handy Don 1 Share this post Link to post Share on other sites
lynnmor 7,554 #73 Posted May 27, 2024 13 hours ago, Mister_520H said: I can’t speak to the tractors’s early life but it only came to me with a 60” deck and a snow thrower. I assume the thrower was used regularly as the PO saw fit to buy a cab to keep warm in the winter. Could the snow thrower have cause the damage? It’s possible that other implements were used in the past as well. I’ve only been the owner for about 7 years now and she lived a long life prior to that. Is it just me, or is re-installing the seat a real PITA? No part of tearing the tractor down for this job or putting it back together was difficult but getting that dang seat back on is a real nuisance. If it weren’t for the springs.. Many don't use the heavy lift assist spring and depend on the cylinder to do all of the work, use that spring and check that it lifts a bit in all of the travel. My thought is that traveling over bumps would put excessive forces as the snowblower bounces. I have little issue installing the seat, I keep the springs bolted to the assembly and the seat tilted forward so it rests on the steering wheel. It is a good idea to cover the painted surfaces to prevent damage. Share this post Link to post Share on other sites
Mister_520H 58 #74 Posted May 27, 2024 56 minutes ago, Handy Don said: Not a Red Square event but a lot us participate. Run by the Wheel Horse Collectors Club the Thursday-Saturday after Fathers’ Day, June 25-27. It's at the South Mountain Fairgrounds in Biglerville, PA. If you do a search here on this site you’ll find lots of posts--including this thread Lots of vendors and folks just socializing The club never updated their website with this year’s info but except for the date, this is it. https://wheelhorseclub.com Wheel horse stuff only! Leave your green, white, orange and other tractors at home, I plan to be there and will be bringing a tractor to cruise around on. Ah okay. Looks like it’s south of Harrisburg. Gorgeous country. I’m about 4 hours west in western PA farm country about an hour plus north of Pittsburgh. I’d like to make it down. Would be fun to get my grandpa’s old wheel horse running and haul that down in the pick up. It’s a 50’s model I believe. Share this post Link to post Share on other sites
Mister_520H 58 #75 Posted May 27, 2024 32 minutes ago, lynnmor said: Many don't use the heavy lift assist spring and depend on the cylinder to do all of the work, use that spring and check that it lifts a bit in all of the travel. My thought is that traveling over bumps would put excessive forces as the snowblower bounces. I have little issue installing the seat, I keep the springs bolted to the assembly and the seat tilted forward so it rests on the steering wheel. It is a good idea to cover the painted surfaces to prevent damage. Hmm. Perhaps flipping the seat forward as you said would help. Do you leave the forward brackets installed or remove them with the seat bracket? I always leave the springs mounted. Share this post Link to post Share on other sites