Search the Community
Showing results for tags 'vertical-shaft'.
Found 20 results
-
Hello all, I recently acquired a "new" B-115, and with the help of @ohiofarmer, I will be fixing her up, first with a engine he is trading me for my old Kohler engine off my '77 B-80 that I trashed when I was 13. I haven't been in the Wheel horse game long, as I am 16 now, I hopefully will be able to keep this project updated on here, especially in the spring when I will be completely repainting it! I am super excited for this project, and am ready for all the challenges that lay ahead with it. if you have any helpful information you are willing to share about my newly acquired project, please share! I haven't had tons of luck finding tons of information about it.
-
We tend to be a bit low on active restoration projects in the Euro section so I thought I'd start a thread here rather than in the main section. Back in May last year I think it was a newbie raised the question ' Why no love for the A-800? which attracted a predictable response from some. Sure it is a vertical shaft tractor, it doesn't have a Kohler engine or Unidrive tranny, and worst of all (apparently) it has a Tecumseh engine but this little guy has cut grass for almost 40 years which must say something for the quality. So what attracted me to this as a resto project? (photos in this post are from the 'aution site' by the vendor so they're what made me go for it) The guy I bought it from was the second owner and had used it for fifteen years at his house in France to mow the orchard there. He got it from the original owner who by a bit of math must have mowed with it for about 24 years. He was only selling because one day it wouldn't start. He brought it back to the UK but couldn't work out why having checked and done the obvious things. My first ever WH resto was a C-120 Auto and it was the overall look of the early 1970s C-100, C-120 tractors that drew me in to WHs. The A-800 is by design a scaled down version in the same style as it's bigger brothers, Smaller wheels, narrower foot rests, shortened hood and ,despite their size, the rear wheels bolt onto hubs; to my mind the design team got it right. Obviously the fender is standard though in a way it's a pity that they didn't press out a narrower one so that the wheels extend beyond it like the Cs. It's tempting to do a 'cut and shut' to achieve this though it would go beyond 'resto' (I might yet be tempted though!) Its little two blade SD deck looks better in the photo than it actually is but has had new bearings, pulleys and belts fitted in the no too distant past and works but there's more plating than original metal in the shell though. It's not a priority for now but I can see that steel from a 42" shell I kept from a scrap deck could well come in handy in making good. Obviously there was a risk that there was something terminal with the engine but my experience with a Tecumseh 2 cycle engine on a 1972 19" flymo that I have been using to mow my lawn since the early 80s is that they made very good engines if you treat them well so it was a case of PO had cleaned the carb, checked wiring and I guess checked for a spark which I found tended to be there when you cranked the engine but stopped as soon as it fired and tried to run. Using a test meter on the points (by connecting it to the ignition stop wire) indicated the points were opening / shutting when you turned the flywheel by hand but putting a xenon timing strobe on the HT lead showed clearly that it was intermittent when cranked on the starter. It could of course have been a dodgy coil, condenser, or the points but I had other suspicions based on the symptoms that turned out to be the case.Took the flywheel off today to get to the points and found the prob. The post that the moving contact that rides the cam has to pivot on had dried up though lack of lube over the years. It hadn't seized but was stiff so although the points opened and closed when the engine was turned slowly they couldn't keep up once the engine started to run. Got it cleaned, lubed and back on then ran out of time but I'm 99% sure it will run tomorrow which will be interesting as it's in the workshop now (best open the windows methinks) I'll update the thread from time to time as I make progress but I'm not going to be able to work onthe tractor everyday. I'll be aiming to finish it for Ardingly though (famous last words) I suppose that I should have photographed it alongside the C-120 but it's in the shop now and I've started taking bits off so that will have to wait till it's finished. The photo's don't really do it's inherent charm justice and you really have to see it in the flesh to fully appreciate that it's a feisty little horse with attitude! WH actually made a snow blade for these which says a lot I think. Andy
-
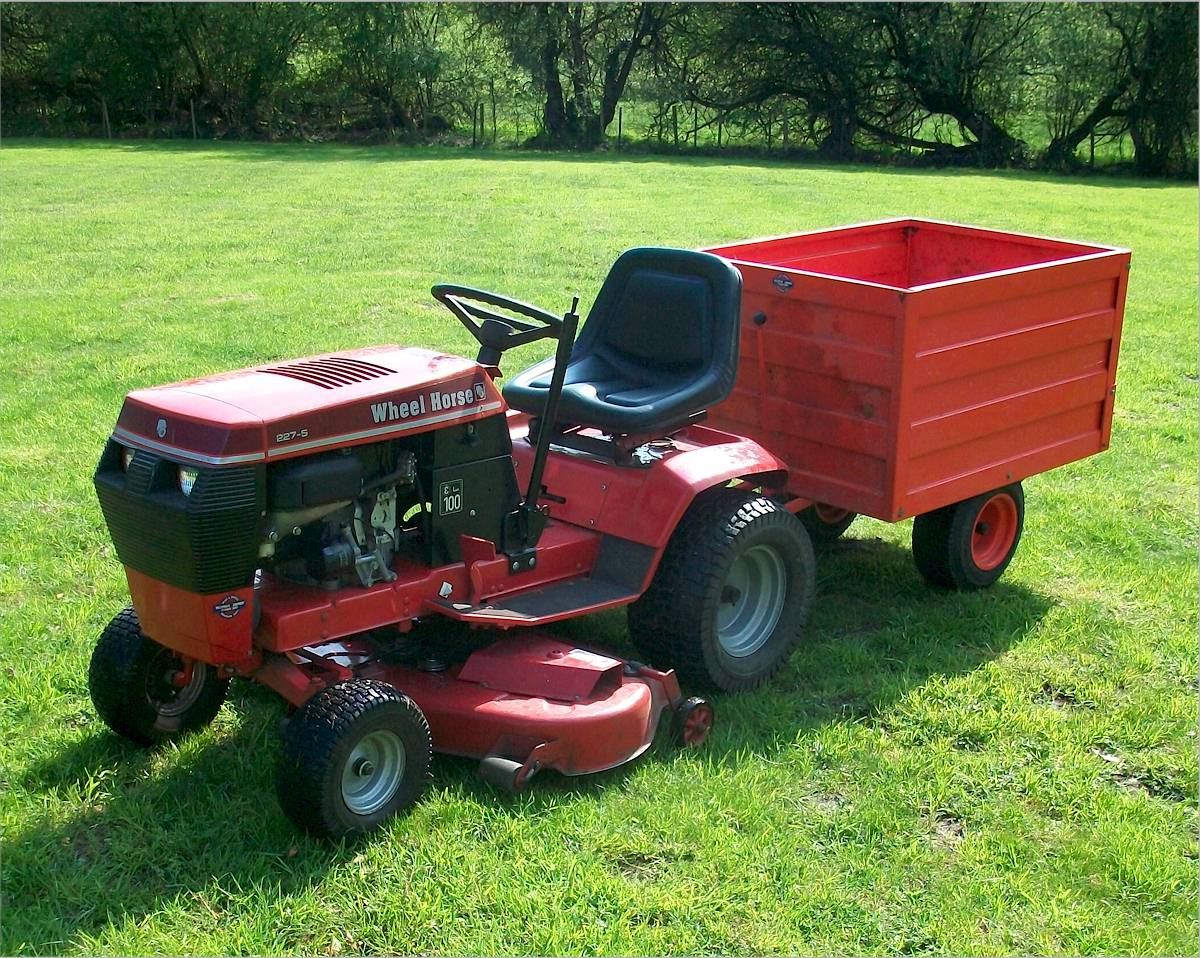
I'm pretty sure many (most?) here ignore or even turn their noses up when they see a vertical shaft tractor, even if it's a Wheel Horse. I know I always have. After owning a 264-H for awhile, and finally getting around to mounting the deck and mowing a couple times I must say that I can't tell which way the crankshaft is spinning! Looks and feels like a good old Wheel Horse to me! I've never found the need for more than 14hp using a 48" deck but more is better when it comes to snow blowing so there's still up to 6 more horses available up to and including the 270. I LOVE the forward/backward foot control! Makes me think I'm on one of my xi's until I notice there's no power steering! Man if this tractor had PS it would be the cat's meow! Manual lift but I see little need for hydraulic lift for the deck and I would NOT want it for dozer blade use though I would for a snowblower. Mine came with a nice blower but I'd rather have a dozer blade with this. Never used a hydro, especially with foot motion control with a blade but I think I would like that a lot! However! I find that they command a pretty good price compared to the Classics. Perhaps because they are newer and the paint is still shiny? Don't know... I got mine for cheap because the owner didn't change the air filter that was so plugged that it would seldom start and if it did it belched out black smoke. New filter and plugs and she starts right up, runs great and with no smoke. So if you have a chance to grab a big 200 series I'd suggest looking at it. As long as it's not near ME!
-
170 downloads
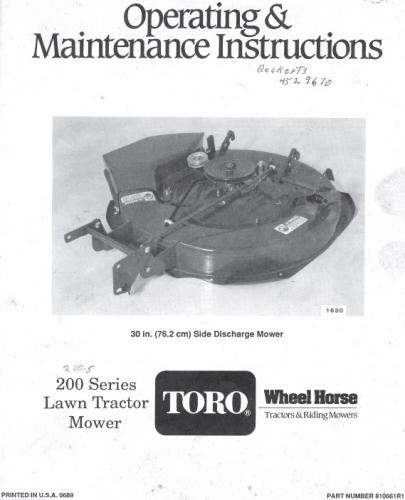
Operator manual #810661R1 Part 1 - 3 pages 4.39MB Part 2 - 4 pages 3.59MB Dated 06/89 Fits some 200-Series lawn tractors Power grass collector 07-31PS01 available for this deck. This is a better copy than the one that can be downloaded from Toro. See product service bulletin "WH89-90 #T28 216-H 30in Mower Belt" Mower 35-30SL01 serial # 20987 and lower requires longer belt # 114421 if used on a 216-H tractor Mower Rotary 1990 30in SD model 35-30SL01 1990 serial numbers that have shown up for the 35-30SL010020987 - Shown in PSB #T-28 0022777 - Build date 1990 0005 January 05 Friday0023367 - Build date 1990 0078 March 19 Monday0023422 - Build date 1990 0078 March 19 Monday0023423 - Build date 1990 0078 March 19 MondayFree
-
I just got a CG7. I was wondering if anyone has tried anything to raise the mower deck height. The mower is adjusted as much as possible. The only thing that I see to help is to put taller tires on it. Does anybody have any suggestions.
-
-
Customized,Rare,Weird,Diffrent,Unique Wheel Horses
Charlie Smith posted a topic in Wheel Horse Tractors
Hello All. I have been looking around in my spare time. For rare, unique, coustimized, Different, coloured etc wheel horses. I've found some great ones out there. I was wondering do any of you have any pictures. Here's the ones I've found.....- 71 replies
-
- d-series
- 345-series
-
(and 8 more)
Tagged with:
-
I’m posting this in the hope it may be useful to somebody somewhere, if not to RS members who seem to be generally able to turn their hand to pretty much anything, perhaps for the many out there that trawl the net looking for basic information to give them the confidence to do a job. After all, it’s from the ‘guests’ that a forum’s membership often grows. Having just finished overhauling my 216-5 ready for the new season which included fixing the brake it was time to overhaul the 227-5. The 200 series rarely seem to feature on RS, possibly because they are vertical shaft and considered to be ‘lawn’ rather than ‘garden’ tractors. Anyway, on with the job in hand – sorting out the brake which was poor in that it just about operated with the pedal fully down and the parking brake lever ratchet wouldn’t stay locked in the ‘on’ position. The 200 series are fitted with the ubiquitous Peerless transaxle found on many makes of garden tractor from the 80s era and which have with a transmission disc brake. The rod from the brake pedal applies force to the calliper operating lever via the larger strong spring with the result that you can control the degree of braking action by the amount the pedal is depressed. Adjustment to compensate for the brake pads wearing down is made by tightening locking nut securing the lever to the calliper. If this adjustment is not maintained then eventually the brake only just works at full pedal depression and there isn’t enough tension in the big spring to hold the parking brake ratchet engaged. So it’s simple, just adjust the nut eh? Well, having just overhauled the brake on my 216-5, I would say that having got this far always take the whole assembly apart unless you are certain it’s in good order as you’ve done it in fairly recent years. Removing the lever revealed the first sign that dismantling was indeed required. The disc must be able to move on the shaft and those splines looked ominously rusty to me so continue on. The two ‘plungers’ (for want of a better word) that transfer force through to the pad can be removed at this point. These were clean and still shiny; those on the 216 were a bit rusty but still came out and cleaned up ok. On removing the housing, the brake pad it retains dropped out in two pieces! Be careful to locate and put aside the metal plate that sits between the pad and housing to take the force of the ‘plungers’. So now to the brake disc which when new would have simply slid off the splined shaft. A bit of wiggling and it came off (just) by hand. The problem here is that the disc sits very close to the transaxle casing making the use of a proprietary puller difficult if not impossible. With the 216 it was stuck firm and even penetrating fluid left overnight didn’t help so I had to resort to some tapping. There’s a bit of end float in the shaft so I made wedges from scrap steel sheet of various thicknesses that would just fit either side of the shaft between the disc and casing. A few taps with a copper mallet and it moved a bit allowing a couple more thin ‘wedges’ to be inserted and so on. The idea was to bring it far enough forward to use a puller but by the time it had moved that far I managed to pull it by hand. The second brake pad sits in a recess in the transaxle casing and was part worn but intact. There appears to be a thin fibre shim between the casing and the pad, possibly it was used to hold the pad in place during assembly or possibly it provides a smooth surface. On the 216 it had pretty much disintegrated so I cleaned what remained of it out. It was time now to remove the grass debris, and clean the splines on the shaft and the disc. When the splines on each are clean of the rust and solidified grease mix the disc should move easily on the shaft – almost a tad loose in fact. The disc on the 216 cleaned up well and was pretty much perfect but this one was pitted. Looking at the pad surfaces they seem to have broken up a bit and developed pockets that held moisture causing the pits during winter storage year on year but hey, ho – it’s a tractor not an automobile so it’s going back for now and I’ll keep my eye open for a better one. The pads however, needed replacing. Re-assembly, as they so often say, is pretty much the reverse of disassembly but here are a few points: Grease the splines and wipe off any excess. Remember to install the rear pad before putting on the disc. Remember the metal plate that sits behind the outer pad in the calliper housing. Remember also that the bolts securing the calliper casting go into ally – don’t over tighten! Some Peerless diagrams show a coil spring that sits on the adjuster thread before the lever is installed but I didn’t find one of these on either tractor. I think it must have been an anti-rattle device so I’ve added one to each tractor but I guess it’s not that important. I greased the surface of the lever that actuates the plungers and the reverse face that moves against the washer. Now it’s time to adjust the brake calliper by tightening the lock nut. I’m not sure what the OEM guide for this is but I tightened it till there was just a little forwards / backwards movement left i.e. in the ‘off’ position the lever isn’t touching the ‘plungers’ but starts exerting pressure through to the pads as soon as it is pulled forward slightly. Having reconnected the brake rod to the lever and also attached the return spring to it one can check the operation of the brake and the parking brake ratchet – they both worked well. I’m sure someone will chip in and correct me if I’ve done something drastically wrong here but it seems to have worked ok on both tractors now. I've used tags for this post and images uploaded to the forum gallery! As I said, hope this is useful to someone out there. Andy
- 9 replies
-
- 4
-

-

-
- 200-series
- vertical-shaft
-
(and 1 more)
Tagged with:
-
Hey everyone. As you know I'm hot and heavy into wheel horses now and many of you have answered many of my questions and helped me TREMENDOUSLY. But I've finally decided to give my horse a paint job and I thought I'd post pictures along the way. Here's the engine cleaned,sanded, prepped and primed. This is the first thing I've done. :)
- 240 replies
-
- 3
-

-
- vertical-shaft
- engine
-
(and 6 more)
Tagged with:
-
Hello I have a Wheel-Horse 227-5 with the 17hp kawasaki single cylinder engine and was interested in putting a tachometer on it (just because i won't too) but i need a step by step guide as I'm not sure what exactly i need to do, also if anyone could advise on a good tach to use that would help a lot, while I'm at i thought that i might put a oil pressure/temperature gauge on it. thank you James
- 10 replies
-
- 200-series
- vertical-shaft
-
(and 2 more)
Tagged with:
-
Hello on my kawasaki 227-5 17 hp single cylinder i was thinking about putting a straight through pipe on it and people time and time again were mentioning burnt or warped exhaust valves and i have no idea how bad this is or how common it is so i just want to know if i should or shouldn't straight pipe the engine thank you James see my other thread about tachometer gauges
- 5 replies
-
- d-series
- 200-series
-
(and 4 more)
Tagged with:
-
I made the decision two days ago to give my tractor a paint job. I'm taking lots of pictures and I'll hopefully post them on here soon. But my question is about the lever that has the small wire linkage that goes to the carb. I removed the lever off the little shaft and then I took the 3/4" nut off and tried to removed the shaft. Is whatever that's on the other side (inside the engine) supposed to be turned a certain way? I hope I didn't get anything out of adjustment :/
- 32 replies
-
- vertical-shaft
- engine
-
(and 5 more)
Tagged with:
-
Ive decided I'm putting a new vertical muffler on my tractor. Has anyone had any experience with Stanley or nelson mufflers? Those are the two I'm interested in. Thanks
- 4 replies
-
- vertical-shaft
- engine
-
(and 5 more)
Tagged with:
-
Hey again everyone. My 753 has a vertical muffler on it. Ive seen one other one like this on another 753 but I didn't know if it was a coincidence or if it was original and just not very common. Any answers are appreciated! Thanks guys. Zane
- 2 replies
-
- vertical-shaft
- engine
-
(and 3 more)
Tagged with:
-
Does anyone know where I can get a Routing Diagram for an LT-1100 3-Speed Drive Belt. I'm looking for the routing diagram for the drive belt that runs from the engine to the transmission. Any help would be appreciated.
- 3 replies
-
- 345-series
- vertical-shaft
-
(and 2 more)
Tagged with:
-

Commando V7 plastic "Plate-Cover-Instructions"
tombones49 posted a topic in Restorations, Modifications, & Customizations
The 1969 Comando V7 has what the parts manual calls a "Plate-Cover- Instructions", (identifier#211, pn 8497). This is a plastic plate 5.25" x 9" in size. I want to replace the one I have, photo attached. Does anyone have a source??? I prefer NOS ( New Old Stock), but a replica or cherry original would be fine as well. tombones49@gmail.com -
A bit of help / advice appreciated here guys..... Picked up another project at the weekend - a 1974 A-800 Ranger with Tecumseh VM80-150056A engine. PO used it for 15 years then one day it wouldn't start. I've been through the easy stuff, compression is good, tried new plug, cleaned carb (obvious that PO had been there before me), disconnected the engine kill lead with no success. The issue seems to be with the ignition - there's a really good spark there (sometimes) and the engine will fire up briefly then die. So, I need to remove the flywheel to get at the points, condenser etc. The nut came off easily and there's no sign of any corrosion to speak of but using a home made puller acting on the outer edge of the flywheel and giving but a few sharp taps with a hammer won't break the flywheel from the shaft. It's on a taper I guess? It's been soaked in penetrating fluid but it's not likely to achieve a lot with a taper fit. So any hints or tips here guys? With so much diecast about I'm trying to avoid being too brutal. I'm thinking about getting a genuine Tecumseh puller - are they any good? There's a twist though.... Yes the flywheel has the three holes to take one but the holes have never been threaded. I've looked closely and it's not a case that the threads have been stripped out, they were never cut. Any one found the same? Do you have to cut your own threads before using the puller - seems strange. Andy
-
I've had a NOS 6-3251 snow blower sitting in the back of my shop that I really don't have any use for. I have no idea what it is worth, or if it is still a collectable idem. The manual says it fits a 1969-70 Lawn Ranger. It's pretty much complete, may be missing some of the hardware to assemble. It could be made to if a different vertical shaft model with some creative help. Can anybody give me some advice as to what I have. I hate to see it get mount on something other than Wheel Horse. bobwithm
-
-
hi i have a 76 b-111 old school well after 30+ yrs the tires need changed the current size is 22x7.5-12 can i swap them with a 23x8.5-12 without alot of hassle thank u guys


