
Leaderboard


Popular Content
Showing content with the highest reputation on 12/23/2024 in all areas
-
12 pointsA few other years mixed in. The first one is more recent of my 76 but the others were taken late 70's-early 80"s. Some of the 76 before it became a 'B'160 and as it was off Chandlers salesfloor.
-
12 pointsPossibly this is a plethora of pictures...
-
11 points
-
11 points1977 C-120 Bought from the original owner. Didn't look like this when I got it. Cleaned it up a bit. Nice solid tractor.
-
11 pointsMy 1971 Bronco, and my FILs 1972 Charger.
-
10 points
-
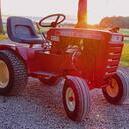
10 pointsMy first C-120
-
10 points
-
10 pointsThe 70s were the golden years for the Wheel Horse factory in Belgium. Most tractors you see around here are from that era. I have 2, looking for a third 1970 Raider 10 with a color matched magnum 12, the one that started it all for me. And my 1976 C141 currently getting a Lombardini 14hp diesel
-
10 pointsHere is my 74 C-100. Not the prettiest but full of character and a fun worker
-
9 pointsMan this thread is right down my alley haha I will go in order of what I bought first This is by the serial tag a 1973 14hp 8 speed It's decaled as a C120 and has a 12hp engine on it. This next one is a 1974 B100 auto I bought as a non-running tractor, engine ended up running great. The transaxle was junk, and I got that switched out, and only repainted what I needed to. Which was the frame, rims, and a few spots here and there. Also changed out the rear tires from 22" to the 23" wheelhorse branded ones from the 73' wheelhorse. And my latest purchase also a non-runner is a 1972 Raider 14, I have gotten it running, but haven't gotten around to restoring it yet.
-
9 points
-
9 pointsMy 1977 B-100
-
9 pointsI have said for many years that I am not actively looking for any more tractors to buy. But should there ever cross my path a C-161 8-speed… I will be in a tough spot. Those late 70s C-1x1 models were about the best lookers they ever made in my opinion.
-
9 points1976 B140 dual hydraulics
-
8 pointsI was given 4 Craftsman snow blades. Three were 42”, and one 48”. Only one had any of the mounting brackets. I had an itch to make a mid-mount grader blade. I started by cutting the 48” blade length ways just above the mounting plate. Then overlapped that piece onto the lower part. Welded it together. That reduced the height from 14” to 9.5”. Then I made a framework to attach to the rear axle. Test fitted to the tractor a few times for functionality before welding solid. Made up a lever to release the pivot lock. It comes out just above the floorboard on the left side. I can easily reach it and pivot the blade with my feet.Got it all painted and reassembled. Drove it outside for a few pictures. (Damn few, its cold out there.) Thought I would share with you all.
-
8 pointsThe moles had overtaken my back yard and over several years I had tried traps, poison, road flares, and acetylene gas. Nothing worked. After 4 hours of three Wheel Horse tractor pumping exhaust into the tunnels, the moles left and have not been seen for over ten years. It worked.
-
8 points1970 Commando V8 (aka; "Bessy" ) Beside 1971 MTD Wizard (aka;" The Wiz") Dad bought this brand new in 1971 from Western Auto when it was in town . The other is my 1971 Charger 12 Automatic.
-
8 points'76 C-120 work in progress
-
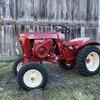
7 points1974 C120
-
6 pointsRarest one perhaps... Circa 1975
-
6 pointsBefore and after refurb pics. Free delivery in the bucket.
-
6 points
-
6 pointsMy unfinished 76 B80
-
6 pointsMy C81
-
5 pointsOne like this?
-
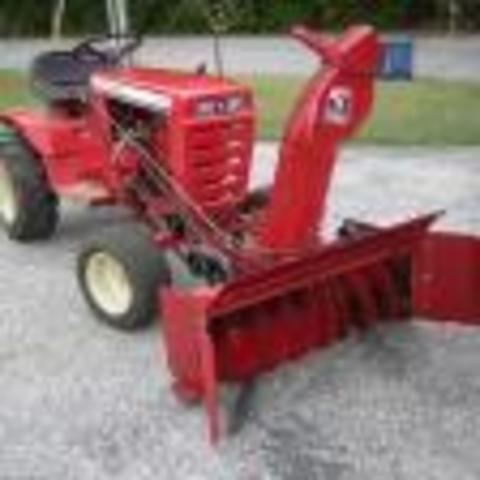
5 pointsGot the snow blower mounted on the big tractor then did a full service on it. Tractor was fully serviced a few weeks ago. The Wheel horse is ready to plow as well. There is a big storm forecast for tonight so I am now ready.
-
5 pointsAll mighty fine looking tractors Eric.
-
4 points
-
4 pointsThis stuff makes carbs look nice...
-
4 pointsBusty is a '76 and Alice is a '74
-
4 pointsI've had good success with that method.
-
4 points@c-series don would be happy to hear you say that. Personally I like the next earlier generation. The angled steering tower makes it.
-
4 pointsDoggone it! Now you made me order a set!
-
4 pointsI always thought he was such a good sport to come out to the show and put up with all of us. He was one heck of a nice fella! He just said “good luck” on my copy. Made me wonder if he knew more about me than he said. As you said Don, a prized part of my collection!
-
4 pointsI buy my tires from a couple of brothers who run their independent tire shop. They're only three miles down the road and started their shop when the one they worked for was sold out to a chain. I bought Michelins for my pickup from them. They rotate for free, They replaced tires on my mower. The have patched several tires for me-for free. I've always gave them something. This past week James swapped out three rubber valve stems for brass ones on my camper after a neighbor gave me a tire pressure system from their camper they sold. When I asked James how much, "Nothing, Phil, you'll be back." I laid $20 on the work bench. These fellows provide a service to our community. There is almost always a tractor tire ready for mounting. They rented their shop when a tractor business closed after the owner retired. I've bought tires from the internet but I do my best to help out my neighbors.
-
4 pointsI got mine for my birthday too! On my birthday as a matter of fact! Signed by Cecil himself ! I’ve got all three, two signed to me by Cecil and Mike, and the last one signed by Mike.Pictures to document as well. It’s part of my collection that I’m honored and proud of own.
-
4 pointsFor a show and neighborhood cruiser those gears will be excellent. I've got a rebuilt 5010 with gears that look a lot worse. take a file or sand paper wrapped around a piece of flat steel and gently take any high burrs of the teeth. But don't try to file them smooth, just remove LITTLE high spots.
-
3 pointsI had a Kohler #30 carb for my own C160-8 Cinnamon Horse on the bench today. This one's been soaking in the lacquer thinner for several weeks along with quite a few sessions in the ultrasonic cleaner. Here's a couple "before" pics. I use a combination of the above soak & ultrasonic cleaner intermixed with wire brushing by hand and machine. VERY.... CAREFUL.... USAGE.... of the machine spun brush. I also use a small pick and/or screwdriver and/or whatever's to hand for cleaning the grit and muck from orifices and corners. After the greatest part of the grime is gone I use a series of drills in the Dremel tool to bore a 1/8" hole in the welch plug on the side. Pop that out with whatever levering tool is close and works. More cleaning. More scraping. More brushing. Repeat. Repeat. Intermix as needed. Be sure to get in the area behind the welch plug and clean carefully. Also clean the tiny holes the feed fuel to the main bore. I use a tiny drill bit. Carefully. All the small pieces also need de-grubbing and anti tarnish treatment. I use a 3-48 tap to clean the threads of all 4 holes from the throttle and choke shafts. Once the body is clean.. I start reassembly. Here's the complete exploded parts assortment sans the 3/8" welch plug I forgot to set there. Welch plug hole shown empty. Plug setting in but not driven/flattened. Post flatten. I use the bit that's on the carb to indent the plug. Anything roundish and 1/4" or so diameter can be used. The larger bar in my hand is the "hammer/ hammah". Procedure for driving in the upper throttle shaft bore repair washer is similar. One of two in place. Both set in. Here's a closeup. You can see the two washers stacked and stuffed. Now I move to installing the throttle and choke shafts and blades. I use Blue Loctite. Brand name only. Four new screws. These are usually 3-48. Just the tiniest little dab of Loctite on each screw. Get the screws in place loosely then verify proper movement and placement of the blades. Each blade will usually need a little coaxing to set just right. Once that's satisfactory, tighten the screws. Now I install the 3 exterior screws. 1. Idle speed control. Small silver colored one. I always start high and adjust the RPM down later. 2. Upper RPM mixture. Coincidentally that's also the uppermost positioned screw. 3. Low RPM or idle air mixture screw. Be sure to set the above screws to the factory settings before starting the engine. The fuel inlet seat is threaded in next. I have a special nut driver I've modified by grinding down the circumference so it fits in the limited space. Drop the needle in and slide the float pin through. Check the adjustment. I set floats for these carbs about parallel with the body. Install the bowl gasket, then the fuel baffle. Center the bowl. Install the gasket and bowl retaining nut. Snug that up well but use caution to not overtighten particularly on original aluminum bowls. I most often replace the bowl with a Briggs and Stratton steel bowl. The older aluminum bowls are almost always crushed and deformed around the bolt hole. A few more pictures as completed.
-
3 pointsConscious me - Got out of the body and paint business in 1995 at the age of 34. Never regretted it. I've only pulled my spray gun out once or twice since, and only because the projects were too large for a spray bomb. Also conscious me - I bought this old Wheel Horse for a couple specific uses only. Decided there's no reason to waste the time and money to repaint it. Subconscious me - sees a rebuild kit for my favoritest old spray gun and immediately clicks "Buy Now"
-
3 pointsI prefer to use a side Sickle bar cutter for those "Up close & Personal" moments.....
-
3 pointsThe BBT won't work on another 78 or later if she can help it at all
-
3 pointsAre you executing moles or gophers? Did it work?
-
3 pointsI've also been using that on my aluminum heads and plan to use it on some block cylinder fins.
-
3 pointsAgreed.
-
3 pointsThe sole thing that could possibly make this excellent post any better would be a video with narration. Thanks!
-
3 pointsThe crate is MIL-SPEC hardware. Special stuff. I can relate to the mosquitoes thing. We’ve spent enough time fishing in the Minnesota northwoods in the BWCA to know they mean business. Their hum sounds like a De Havilland Beaver that is constantly overhead and when they descend on your fishing boat not even the Red Cross can outpace their blood letting. How those things survive your winters is a mystery. Steve
-
3 pointsDay 21 SUCCESSSSSSSSS WOOHOOOO We finally figured out the wiring gremlins. All we had was 2 wires backwards on the kill relay. Swapped those and she purrs like a kitten! IMG_0040.mov
-
2 pointsFinding someone you trust for anything related to vehicle maintenance is a big deal. I have a friend who runs a shop, and he does all my maintenance on every vehicle we have. Many years ago my wife found a very good deal for tires at a big box store that had a garage. When she got the car home, she said it really drove strange and asked me to look at it. All four tires were different sizes! Largest was a 235/70, smallest was a 185/75. Of course they were the same make, and those differences weren’t really clear to the naked eye. Her truck got a much nicer set of tires and a lengthy apology after she went back, but had we not looked it might have been weeks before we found it. Since then, nobody touches my vehicles that I don’t trust.
-
2 pointsDay 19 Success! If you haven’t seen my electrical post with the tractor here it is. Didnt hook up the brake pedal safety so the last 2 weeks of troubleshooting was for no reason 😂. Finally today got it to crank over! Tommorow will hopefully hear it run for the first time! 🤞 IMG_2506.mov


This leaderboard is set to New York/GMT-04:00