
Leaderboard


Popular Content
Showing content with the highest reputation on 06/13/2022 in Posts
-
25 pointsI built our grandsons a Lawn Ranger a few years ago so when our granddaughters came along they needed a Ranger of their own.
-
13 pointsThe past few weekends we - replanted the raised flower beds, thatched and reseeded the lawn, swept the property, got a good tan, oh and of course gave the old girl a nice bath.
-
9 pointsSome years back I was at a ploughing match talking with a group of men. Parked up not far away was a little MF 35 painted pink. "Who the heck has a pink tractor"? I said. From behind me a voice said, "Me!" I turned and there stood a chap built like a brick out house. "Nice!", said I. He then added with a grin, "It's my daughters."
-
9 pointsDidn't take a whole lot of pictures but I did get a few. Roof palomino. Nice Oliver. Our friend Pat was having fun playing in the mud. I thought that adding some extra cleats to his tires might help him out. My family's line up of little farm tractors.
-
9 pointsThis was cool tho ... immaculate restoration and didn't get to talk with the owner about specifics. Dan was busy showing one of our buddy's girls the finer points of running Big Betty. The guy with the half track also had these honorable mentions. Same guy.... supposedly the paint on the cab and sleeper was 25k on the bandit special. No matter the guy has gotta have some serious coin in this rig. Wondered if he has the trailer? Ton of hit & miss stuff. Pics do not do a spark show justice.
-
7 pointsThe trays were so nasty, they just didn't look good with the newly finished chest, so I went and cleaned and finished the trays also. Here is a before picture and then a few of the cleaned up trays.
-
7 pointsHood bolted on. No decals, hood latches, lights etc yet.
-
7 pointsBoiled linseed oil cut 50/50 with mineral spirits will soak into the wood and dry in a day. A second coat will take a few days to cure but holds up well. Letting it dry in the sunshine speeds up the curing.
-
7 pointsAssembly has begun trying to get it back together quickly hood and fender pan still need paint. The plate welded to fix has become a problem with the parking brake lever... now need to add a bend to those brackets. Need to get the wheel weights off still and want to test the trans before tearing apart it seemed to start to fail but I did not have the correct belt on it... Inspector is in bed and couldn't give his approval yet.
-
6 pointsMy wife taught in the same school and school room for over 35 years. This slave clock was there all of those years ticking away. In her last year they decided to change the system so it was removed . She asked for it and brought it home. It’s been here for quite a few years now A short time ago finally got a movement for it and it’s working again in the shop. It’s got a date inside of 1923. We are quite fond of it.
-
6 pointsWas a great show as usual spite the rain on Saturday. Pulls got cancelled so that was no good. Nothin horendous but enough to keep the crowds supporting th club away. I got a few pics but not what I should have.... @Achto ? I had four ther and Dan had four. Bad news was the tub got on the hauler under her own power but her pre show bath must have gotten moisture on the points which of course are under the flywheel. Worst part I had her running like a Swiss watch.
-
6 pointsPut all new tires on and cleaned up my 416H a little bit. Used the card method to paint rims. Worked well overall although putting the cards on the rear rims was tougher as the slightest wind blew them over. On the front, they were very secure and stood more upright. Which is why I taped the front tires and painted the rears by the doors of the shed to avoid fumes. This machine is prob not going to be used much mowing anymore which is why I went with black rims.
-
5 pointsDon't know if this is considered mandatory, but seems like the polite thing to do. I'm in NW Ohio and have several 300's that I use for lawn work and tree farming. Was on another forum that I think is now defunct, and have been to the PA show (and others) a couple times. I've been busy, but now semi-retired and working my way back into some hobbies. Have WH experience to share and some spare parts that I might try to re-home. I'll try to get some photos up as I find time. Looking forward to interacting with y'all... - Rick
-
5 pointsNumber 3 grandson called round yesterday. He's really into fitness training as he's hoping to join the marines when his apprenticeship is finished. He does quite a bit of mountain biking and said he would like a road bike. We got my 30yr old touring bike out, blew the tyres up and he went for a spin on it. Today I thought I'd have a ride round the block, about 3 miles. Do my ailing legs good thought I. Now I've not ridden the bike for about 3yrs and it showed when I got back. My legs felt a bit like I'd just disembarked from a sail ship on a rough sea.
-
5 pointsAs mentioned before, the best thing to use is boiled linseed oil diluted with mineral spirits or paint thinner. It will show the woods character and will totally dry. The drying part is accomplished quicker by the diluting with spirits. The mixture will also allow oil to penetrate deeper into wood. The reason for an oil rather than a coating over the wood is that the oil penetrates a little into wood and will let it breathe. A coating such as a varnish for example will crack or breach allowing moisture to penetrate wood and not dry out. That is evidenced by the dark gray stains around breached areas in many handles. A natural handle without any varnish coatings on it is also better on your hands and feels better. I actually scrape off the finish on any handle that comes to me and oil it. Extremely important is to saturate ends of handle with oil if end of handle is exposed. For handles that can be removed from tool I have a long pvc pipe capped at one end and with a threaded end on the other. It is filled to a point with the linseed oil mixture. Before winter I clean handle and insert it in tube for a day removing then wiping and storing it. This is done yearly. If tool cannot be removed I simply insert it up to the metal part as far as I can. In the case of tools with handles in “ sockets” such as a shovel, it is particular important to make sure oil gets into socket. Moisture always gets in there and it is trapped not allowing end of handle to dry. That is the reason why those handles always break in that area in that type of tool. It is because wood there is weakened by rot.
-
5 pointsDid some mowing with the GT-1848 with the recently repaired and mostly repainted 48" deck, but then I blew the bearings on the drive belt idler pulley, so I finished mowing with the 312-A and 42" deck. I had been away so the grass was about a foot tall in many places - gotta go over it all again in a few days. Here are the 2 tractors mentioned, resting in the garage last night: I won't have the new idler pulley till Tuesday but got a new belt already at Rural King. Took things apart and found that the whole compartment under the shifter plate had been filled up with bedding by mice. What's in the shovel was about 2/3 of what came out, the rest was sucked up by the shop vac: Gave the GT a power wash next, mainly to get the crud out of the cooling fins on the hydro pump:
-
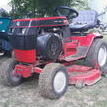
4 pointsI just bought this and would like a manual but i dont know what model it is. Can anyone help me?
-
4 pointsWe have one of Denny‘s earlier lawn ranger creations and it is perfect for anyone from two years old to 102 years old. With that hi/lo transmission you can putt along at less than 1 mile an hour and that is great for the kids when they start driving. However, they quickly want to go faster, ha ha. Fantastic job as always, @dclarke
-
4 pointsFinished up the power dump cart today got decals in and painted the rims. Now just got to make a tailgate someday down the road. Also got my red square stickers in and added one to my 314!
-
4 pointsExcellent Denny !!! I like the looks of the grey with the pink.
-
4 pointsRedid linkage, put grease fittings, made some parts, put in some bushings
-
4 pointsHere I will describe on how to use , maintain and care for the whetstones to make the most out of them . The actual sharpening process I will address on a separate thread. First hand let me clarify some of the terms used which can be confusing. Wether one uses the terms , sharpening stone, honing stone, or whetstones one is speaking of the same thing. I guess the more appropriate technical term is whetstone. All sharpening/honing stones are whetstones. A whetstone will require care and maintenance through out its life. It is most of the times just thrown together with tools in a haphazard way and totally neglected. It is in reality a precision instrument and to treat it in any other manner but as such will in fact render it useless for its real function . Sadly many carpenters are unable to have sharp tools and most times along with the lack of knowledge on how to achieve it , the condition of their whetstones is the culprit. It is also an investment for many such as myself where the price of a premium stone can be as much as $300.00. Nothing but good reasons to know how to take care of them. First they should always have some type of enclosure to keep them from hitting other things and getting chipped or broken. Dust collecting on them is also not a good thing. Caked up dust will clog them preventing them from cutting. Most stones are rectangular in shape but some will be round. A whetstone is a precision tool and a reference for the tools it sharpens specially chisels and plane blades. It must be absolutely flat and straight both across and throughout its length. Corners must be sharp and free of chips . Undoubtedly many of you have come across or own stones that are hollowed out along its length from wear. This is prevalent with man made stones which are always softer. Such a stone will actually ruin a chisel or plane blade by creating a rounded edge and worst ruining the back of a chisel which is the most important part if it. Said stone needs to be flattened out by grinding it on a flat steel or glass plate using compounds or some specialized sandpapers. That condition can actually be avoided by concentrating substantial more time on edges of stone while using it rather than in the middle of it. There are specific techniques while using them to maintain them flat. I will speak about that later. Stones must be used with a lubricant wether it is a light oil, water or my favorite ,kerosene. Surface must always be totally wet with it. If not quickly the metal particles and stone particles will embed themselves in stone and reduce or eliminate its efficiency. After every use they should be totally cleaned and put in their boxes. Some I actually keep in a kerosene bath when not in use. Do not let the lubricant dry on stone after use. Wipe it clean. Some will say to use a figure 8 motion while sharpening others straight back and forth and others in circles. The truth of the matter is all of these methods have to do with preserving the stone flat rather than the actual sharpening process although some benefit the tool more than others. Actually I use them all simultaneously during sharpening. The idea is to use all of the stone’s surface evenly and keeping it flat. Good idea but somewhat incorrect. The center of stone will always tend to wear more because as one approaches edges we naturally reduce pressure in the fear of slipping off ends. So I stay on the ends probably 75% of the time. I also flip stone end for end frequently so I don’t favor the closer end. Keep in mind stone also has two sides. When sharpening narrow tools such as a 1/4” chisel for example there is always the possibility of rocking the tool and gouging the stone. Narrow tools like that can and should be done on the edge of stone if possible. That is where the 1” thick stone comes in real handy. Also when doing a carving gouge which will be rocked side to side it is best to use edge of stone. Edges of stones are important. They should be sharp and crisp without nicks or chips. There are a few tools suck as 45 degrees parting tools and corner chisels that have to be honed riding with one wing off stone . A sharp edge will permit honing it right up to the very corner of tool. Examples of badly used, maintained and kept stones; Stone cupped in both directions. Chipped stone from improper storage Clogged-stone from dust and letting lubricant dry on it. Examples of properly used, maintained, and stored stones. The “newest” ones have now been used for over 25 years and used several times per week. Important to keep them wet while in use and not just a little wet. Narrow tools or tools that are rocked while honing best done on edges Importance of flawless edges
-
4 pointsBrought another C-81 home yesterday...
-
3 pointsTook me a minute to find that bell! I sure hope that was the starter crank and not a PTO. Having that bell swinging around would sure scare me. My association with cowbells? During my very young years we lived in a very rural part of PA and we kids would roam far and wide in search of adventures (a terrific childhood). Mom rang a big cowbell from the back porch when it was time for us to head home for dinner. The sound carried for at least a half a mile! One of my sisters still has the bell.
-
3 pointsLittle pick up is coming along. Finished the floor boards and front fenders. Started the hood mod today.
-
3 pointsLucky kids… Lucky Grandpa…!
-
3 pointsChain to hold first lid was proving troublesome after new compartments addition since there was no longer much space for it with lid closed. Decided to resort to a simple tried and true method used in the late 1700s. Old methods never fail.
-
3 pointsHere is what was available
-
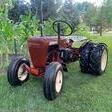
3 pointsI was heading out to pick up some 6-12 tires from a guy in Ct. And we went buy and saw this. Pretty cool, I think. It is welded on a pole I believe he was using this tractor as advertising for his dealer ship. Hope you enjoy the picks.
-
3 pointsWelcome!! Very active forum with a bunch of great people!!
-
3 pointsFair amount done again today. Since I installed the Mackissic chipper shredder the left side of the bracket has seriously impeded the axle tilt to that direction. Today I ground the nub of the casting of the axle flat. Much better. We also finished moving the rest of the 10 yds of loam we'd had delivered a few weeks ago. I moved 4 loads of around 15 - 17 cu feet each so well over 2 cu yds. All hand shovel loaded. 90% hand shovel unloaded too. Damn good workout. Part of it is now a path from the pallet bridge to the garden gate. The rest is now in a spare loam pile. While I started getting my head wrapped around what needs to be done to move the truck and it's portable garage, Trina and her mom moved and stacked more firewood.
-
3 pointsYeah even ^^^^ that guy!!
-
3 pointsNo it's not and yes it is. Rick Great bunch of folks here.
-
3 pointsRepaired the wiring connections to the PTO safety switches on the 520-H. And removed the ty wrap that someone had previously installed. Only had to put new connections on 2 of the wires.
-
3 pointsPut some weights on the 160.
-
2 pointsWe have several garden tools with long wooden handles that need to be refinished. Some of them are very high quality like a locally made Peavey Manufacturing log cant hooks. Others are later model medium quality pieces. All deserve to be treated equally and maintained well. I'm figuring on giving each one of them a light sanding? And then coating them with..... something..... I'd prefer to use something see through so we can maintain the natural character of the wood. I would just as soon have something that would dry completely and not leave a residue I can feel, if possible. What would you use, and why?
-
2 pointsYes, made from a battery tray.
-
2 pointsI'm putting sleigh bells on mine this winter! Thanks for the inspiration!
-
2 pointsFolks I'd like to bring it your attention that this here new member Denny has the "favorite tractor" as... All of them. Excellent.
-
2 pointsOnly picture I could find.
-
2 pointsI picked up a GT1142 with a Kohler command swapped in. I made a plate to mount to the block and used the original GT1142 drive pulley with a new thrust bearing from NAPA to mimic the original Briggs thrust bearing setup. Worked great. If someone had the ability to machine the backside of the drive pulleys for a thrust bearing, it would be easy to copy. The GT1800/1848 pulley and clutch setup would be the ideal starting point for hydro tractors.
-
2 pointsInstalled and wired headlights. Mark below headlights on inside is just a bit of dirt that is now wiped clean.
-
2 pointsPersonally, I think it is more so what the tractor is used for.... (i.e. what the owner wants to use it for) Most of the threads that I see in which the owners repower and don't put the PTO on... didn't have a mowing deck on it with the old engine... Don
-
2 pointsMany of these repowers seem to not be used for mowing... lots of them don't have PTO installed!
-
2 pointsUPDATE on clacking noise.....I took the nuts off of the cylinder jug which had the piston angling in the bore and slid it carefully off.....Guess what I found....Piston pin clip missing, pin not even in the one side of the piston.. No rod issues ..., but going to need a piston, Std. bore....also rings and cylinder jug...Std. bore. Where might I find any of this stuff??? Anyone here with good used M18 parts??? isave tractors has some stuff, but no Std. bore pistons or jugs John
-
2 pointsPretty sure it was this one I used on my 48" deck... https://www.tractorsupply.com/tsc/product/weasler-pulley-flat-belt-idler-5-8-in-bore-od-4-in?cm_vc=-10005#
-
2 pointsAfter several unsuccessful attempts to remove steering wheels, I have resigned to cutting the shafts and reconnecting with a 3/4" shaft connector.
-
2 points@WHX?? Jimbo ya see that?? Oh... I got this poor Mike fella buffaloed ain't I .... Seriously though.... Good to see you tear right into this thing and get the actual issues figured out before a serious mushrooming of catastrophic events.
-
2 pointsOk :: Damage report. So i got off very lucky. The case, the diff and the mushroom gears are not damaged at all. No serious part failures. Failures - 2 bearings. 1) Left side inner axle bearing 1533 Partial failure / full on failure in progress. 2) Right side mushroom gear needle bearing.
-
2 pointsWell, Lets do this. If it ever stops raining, I will pull it out and split the case. Bearings gaskets and seals i can get from Lowell. My big concern is damaged gears anywhere in that unit. If that happens maybe i will get you to part it out. It would be cheaper to ship a few parts, rather than the whole thing. Although I would be over the moon to have a spare. We'll do a Radar O'Reilly and Mail an entire Jeep home from Korea ..... one part at a time. Cheers


(800x673).jpg.cc3aefcd170c6bab1f22408014a1eb53.thumb.jpg.37c62115dec7a1fc65b8e86afd6af643.jpg)


This leaderboard is set to New York/GMT-04:00