
Leaderboard


Popular Content
Showing content with the highest reputation on 03/25/2018 in Posts
-
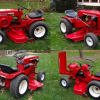
17 pointsCleared two driveways today with my 1967 Wheel Horse LawnRanger with the 30 inch snowblower ! I have enjoyed using this for about ten years. This six hp Tecumseh was purchased new by me when i redid this tractor in 2008! 720436BB-5D6E-43C2-9835-346C90493962.MOV 154.MOV
-
8 pointsI agree - really nice tractor! For some reason seems they are more fun to drive than my other horses! Love my ranger, even though I look like an elephant riding an ant!
-
7 pointsEvery spring... it's not unusual to find a W-H nut on most all of the tractors I have here too.
-
6 pointsI was liking how my weights were turning out but I did not like the fact that mounting nuts would be sticking way out in front of them. I was discussing this fact with my friend Bob (owner of the motorcycle shop in town) and said it would be nice if I had a way to counter sink the nuts into the blocks. " Well" he says, "I don't have a cutting tool big enough to do what you want but, if you want to come down Sat I'll let you play with the rotary table on the mill". I had no idea what a rotary table was or how it would help me out but I was anxious to learn. I thought that some here would enjoy a little walk through my experience with this new to me tool. As with any machining process set up is very important. First step was to find center on the rotary table. To do this you move the table until it looks close to center by eye, then I used a coaxial indicator to find exact center. The indicator is chucked into the quill and the gauge part is held still with catch bars. With this set up you then turn the mill on and adjust your X (left / right) & Y (in / out) axis until the needle on the gauge holds perfectly still. Then the X & Y axis's get locked. Now that the rotary table was centered I chucked a drill bit into the quill that was the same size as the hole in my weight and used it to line the part up while I clamped it down. Close enough right? NOPE. Now install the indicator back into the mill and use a hammer to tap the block around until the needle on the meter stops moving again. Now the hole in my part was perfectly aligned with the quill. Now it's almost time to cut a counter sunk hole. I wanted my hole to be 1 1/8", my cutting tool was 1/2". I did the math and figured out how far I would need to move the X axis on the mill to achieve this size hole. Then moved the Y axis ( up / down) and then rotated the table to make a light cut so I could check my hole size. Once I was happy with the O.D. measurement of the hole then it was just a matter of moving the Y axis to make deeper cuts then rotate the table, then repeat, repeat, etc. until I had achieve the depth that I wanted. After the hole was cut I used a round off bit to chamfer the edge on the hole. After one hole was done the entire process was repeated to cut the second hole. Hope you didn't mind my little walk through. Here's the finished part. With this part done I bolted the weights to the bracket and the welded the mounting bolts to the bracket. This way I won't have to try to hold the bolts while I mounting the weights. Counter sinking the holes may have been unnecessary but I sure had fun learning & I think that it looks much better with the mounting nuts recessed. Now I just need to figure out what I'm going to do with the large holes in the rear weight. Today while I was assembling I came to a point where my motorcycle jack kept getting in my way. The lift arms are wider than the tractor frame and interfere when install some parts. This was an issue that I was going to address after my last build but didn't. Well today I had enough of dealing with it so I took some scraps and made a Wheel Horse adapter for my motorcycle jack. It turned out pretty well plus it gave me another 3" of lift. Tabs on the side hold it from moving on the jack, tabs on top hold the tractor from falling off of the adapter. For now I laid rags over it to protect the paint until I get a chance to glue some rubber down on it. Enough machining and fab for this post, I did actually make some progress on my tractor also. I chose to stop at this point because I want to do some wiring before I continue farther. Need to pick up a 22NF battery so that I can get my cables made.
-
5 pointsGot some tear down done, and a gas tank fixed. (Thank you to Attorney Barnabas Collins from Mytractorforum.com for the gas tank fix)
-
5 pointsI just recently finished two sea doo lifts for the founder of our company. Replacement parts were not available so he asked me if I would build them for him. He gave me the rusted out parts to use as a template. Mounting plates drilled. Tubes cut. Plates and tubes tacked up. I forgot to take pictures of the uprights. I delivered them to the hot dip galvanizing plant. Both have been delivered and one reassembled.
-
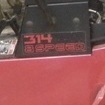
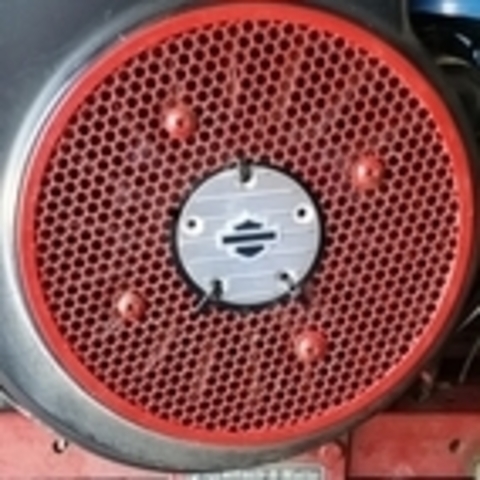
4 pointsI've had my 314-8 for about a year. Last summer, with the hood up and the engine running, I would occasionally see some grass and fluffy stuff blow out from under the engine covering near the spark plug area. I finally decided to take care of it and took the engine cover off today. It was BAD! I got it cleaned up to the point you see below by just picking stuff off and using a stick to scrape between the air fins. The little pests chewed through the insulation on the spark plug cable, and completely removed a section of a wire that leads into the ignition coil connector. Questions: - I'm going to have to splice in a new length of wire going to the ignition coil. It has white insulation. Anyone know the gauge of that wire? - I've gone to my local Toro dealer for filters and stuff. Is that the best place to go for ignition coil (& plug wire) and more, or is there a great place on-line to order parts? - To finish cleaning the engine (fuel & electrical connections, various metals, plastic, and rubber), what is a good mild cleaning solution?
-
4 pointsI took advantage of the heated wood workshop and built a Walnut TV stand/curio.
-
4 pointsAlright @WVHillbilly520H, @wheelhorseman, @elcamino/wheelhorse, to do my diligence, here are the finished rims with 7515 aluminium rustoleum. Little bright so will have to paint front rims too when time comes for tires.
-
4 pointsHi thanks, yes just like the example in the first photo, the rest of the thread just about answers all my questions. I wish I had not read all of it though, as your standard of work makes me down-hearted, especially the welding......I will not be posting pics of mine. I slap the odd bit of red paint on now and again, but it lives outside and has a tendency to go green all over in between the rusty bits. I love it when I have to help out my john Deere owning neighbour when his stops working...............again, the look on his face says it all.
-
4 pointsThe Convention ended Friday night. Caleb ended up with 3 first place medals and 3 third place medals. The only thing that he didn’t place in was his pen and ink drawing because he was facing some really strong competition. However, I was very proud of his work on it and am planning to display it in my office so I can enjoy it every day. He did a good job overall, especially for his first year in this competition. He was asked to do a command performance of His FDR speech. I will be posting a video of that soon. After a fun filled but hectic week, it’s back to work for Kelli and I and back to school for Caleb! Thanks for following along on this journey and all the encouraging words guys...
-
4 pointsWix 51410
-
4 pointsLane that's a real beauty there. I've got a 67 also and it's so much fun to drive. I'll be looking for a snow plow and maybe a blower for it this year. I want to take all the bad paint job off that the PO did to it.
-
4 pointsSimple Green or Purple Power are 2 good degreasers that are biodegradable as well, I prefer the Purple Power you can buy it pre-mixed or in concentrate from Walmart ect spray it on let soak brush in rinse with water blow/air dry repeat as necessary.
-
4 pointsA welders wire brush will clean up the cooling fins.
-
4 pointsLookin' really sharp!! and you don't have to worry 'bout your thumb rustin' up on ya!
-
3 pointsI actually think that the one on the left is heavier. The whole rim mounting surface is the thickness of the star on the other one. The thickness around the axle hole is also heavier on the one on the left.
-
3 pointsOut freaking standing Dan!
-
3 pointsUsing the A terminal for lights and voltmeter. Well unplugged the regulator and no more poppie. Ran second new line for today, back to poppie. I was using this regulator because the housing had a hole for it. Changed the hookup to the factory regulator and all is happy in the valley. That smaller regulator must be bad. It's now a blower housing ornament. Thanks Richard. You got me in the right direction. Much appreciated!
-
3 pointsAny ideas what type of nut this is...... butternut , cashew?
-
3 pointsOr Napa 1410. Same filter.
-
3 pointsAin’t doing anything to them but I am working them. Got the girls out for some sunshine. Putting up 115’ of chain link fence. Skittles engine is getting a coat of red this week. Several parts hanging in the sun cooking now. Nice low humidity 85* here.
-
3 pointsBeautiful machine. I love my L107 also. Great for chores, easy on and off for us older guys. I have a blower for mine but my snow is usually deep and she can't really go slow enough on the initial pass to avoid choking on the snow and I do not like to have to slip the clutch for an extended period. You have a 3 spoke wheel and a recess for the LR decal on the belt guard mine doesn't have either.
-
3 points
-
3 pointsThose flowers all look like they are bending closer to either smell or get a closer look at the exceedingly rare NOS WHclearSTYLE-"noseeum" OSHA approved steel toe boots...Only made them one year...Didn't work out to good...users never knew when they had them on or off...
-
3 pointsForget the snake skins John. Bring home the whole family from the reptile store.
-
3 pointsWear a dust mask if you blow it out. Don’t want to breathe that stuff.
-
3 points
-
3 pointsThat's looking really nice, I like the black accents.
-
3 pointsI was planning on using the old carb instead of the one that came with my engine kit, but when i tore it down today i found it was damaged so i will give the new one a try. Im a little skeptical about how well a cheap carb will perform, but i will give it a chance. Motor is in! This thing is starting to look like a tractor again! I used some bondo to fill the holes in the bottom of the shroud. Still need a fuel pump rebuild kit and exhaust but im close. I want to use a stack if anyone has any suggestions I also picked up a fuse block and starter solenoid. Might try to put them in if i can find a spot when i start to rewire everything.
-
3 pointsMy nephew with his new buddy “Tractor Mac Jr.” From the look on his face I think he is hooked on Garden tractors.
-
2 pointsIt's some work to change those outer needle bearings but not real bad. The case has to get split and just changing seals won't get you much. You would have plenty of tutorials from us if you decide to tackle the job. You really won't hurt much to run with leaking seals if you don't have the time to tie into it now just keep the fluid up. I have ran tractors for years with leaking seals and bad outboard bearings. Big thing is to not work it real hard and watch for walking hubs.
-
2 pointsIf you have to use a 'puller' to remove a hub from its axle, the hub with the star pattern is more prone to breaking under pressure. Jim
-
2 pointsThat repair advice was actually available here in the Red Square forum.........you just need to learn to do searches about specific topics. Most answers are right here, believe it or not. Compliments of @Aldon http://www.wheelhorseforum.com/topic/61942-another-gt14-tank-repair/?tab=comments#comment-578153
-
2 pointsPrior to replacing the seal you should jack the rear end up a bit and check for any play (up/down or front to rear) to be sure there isn't a bad bearing causing the seal to leak. If you have 1" axles the seal would be a SKF 9815.
-
2 points@Goldann520, FYI next time you want a close match to TORO grey for the wheels, Dupicolor "Argent Grey" wheel paint (at Advance/AutoZone) I used on my Cub weights, I also used Rustoleum self etching primer before topcoating, Jeff.
-
2 pointsIf you have a problem with the large 2 legged pests, you could put in an alarm system.
-
2 pointsPrevious post refers to discussion about these roller bearings. Click away
-
2 points
-
2 pointsSun did a nice job today too! After three hours drive is clear! The LawnRanger never choked and died once today! Tecumseh ran great! Just take a third of the snowblower width of the heavy, wet snow ! Even cleared up the front of propert where the city plowed! And worked tractor for an hour just sipping the gas! Amazing what a 50 year old machine will do!
-
2 pointsWell, a month has gone by - a lot of research and shopping. I settled on a pair of Hi-Run 4-ply Turf Tires 23.5x10.5-12 from Tractor Supply. They were a little pricey - $95/per - but I’m really happy with them. The old tires were 36 year old originals 22.5x7.5-12. Worked a couple hours to change them myself - couldn’t even break the bead. Took them to our local tire place. They did them both in 30 minutes for $20. I want to thank everyone for the advice. Like I said, I am really happy with the outcome!
-
2 pointsI have 2 Lawn Rangers. Always underrated as solid work tractors. Of course not plowing a field but just today plowed ice off of my drive like hot butter. I would put mine up against any stock 6 horse in a pulling contest. Let me know of any small stock pulling events around Indy.
-
2 pointsI always harvest the wiring off an electric stove or a dryer. Many times you get pre crimped clips on at least one end, and that wire is really built to carry the load and resist the heat. Tenants leave them behind, but the scrappers are hot after them if left at the curb. Take out what you want and leave them out at the curb and the scrappers will take them away for you, but be cheesed off when they discover that the copper is gone. heh heh heh My next little project is to make a tiny but powerful shop heater from the fan and heating unit from a clothes dryer. Just the ticket for curing painted parts...
-
2 pointsI recently upgraded my original wheelhorse 48 inch snow plow with a Warn ProVantage 54 inch snow plow. Due to the increased weight from the warn snow plow, the hand lift mechanism became very tiring. I decided to fabricate a snow plow lift off the front of the tractor with a linear actuator to mechanically lift the snow plow with the press of a button. The pictures below show the finished product. Two days ago I put it to the test when a nor'easter dumped a foot of snow and the tractor/ plow setup worked perfectly.
-
2 pointshttps://www.homedepot.com/p/Gardner-Bender-14-AWG-18-ft-Primary-Wire-Spool-White-AMW-334/300689781
-
2 pointsApparently , a squirrel has forgotten where he / she buried the Snowdrop bulbs that he / she stole from a neighbor and buried in my hedges .
-
2 pointsPrimary wire to the ignition coil is typically 16 or 14 gauge. You can get the good stuff (pre-tinned) at any marine supply store or on eBay or from Amazon. But the stuff you can buy from Home Depot works just as well.
-
2 pointsYep...Them's mice!!! Looks like you evicted them just in time! I'd hit it with the air compressor and let the air do the final clean...
-
2 pointsThat's a great looking tractor no matter which angle it's at
-
2 pointsIf I had a bigger trailer I really could have gotten in trouble in Polo!


This leaderboard is set to New York/GMT-04:00