
Leaderboard


Popular Content
Showing content with the highest reputation on 07/21/2014 in all areas
-
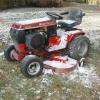
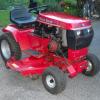
11 pointsHi all, Picked up a c175 at an estate sale a couple of weeks ago. Has always been kept inside, and has 885 hrs. In really nice shape besides the hood, no rust pits, or dents in anything else. Runs perfect, and the hydro is good and strong. Was not running when i bought it, but just took a battery and a shot of starting fluid and it purred to life. Came with a blower, 48" deck, and weights/chains. The sale it was at was a really cool place. The guy used to run a wheel horse dealer, but sold all his stuff about 10 yrs ago, this was his personal tractor. He did still have a few engine parts left over that I picked up, but nothing really special. There were 3 barns packed with stuff, you could hardly walk through, it was fun to dig through everything. Anyways, here's my tractor, never thought I would buy a horse this new, but this one is a keeper and I really like it. It will be my new blower tractor. Someday I might even do a quick repaint on it, as it would be an easy one to do. Also, I believe it is brand new in this picture of it at the dealer....
-
3 pointsUH OH!!! Another bonafied 400-A-HOLIC I just did a report from my data base and the 3 and 400 series decals took a significate jump in the past year. I have had a number of customers asking about the infamous Onan as well. I just tell them to go to RedSquare and search for on an threads. The 312s still are the biggest seller but the 400s are quickly going traction. 500s have been steady for the past three years. About 3 orders a Month. My favorite of course is the 416-h. Only because I've had a couple of them and a 520. I think they will be strong for the next several years. Can't wait to see your pictures.
-
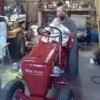
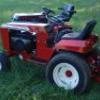
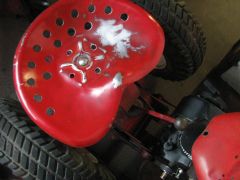
3 pointsHad a better day today. Really needed it. Did one rear wheel and hub. Can you ever see the difference just a little WD40 and steel wool makes. A toothbrush is my new best friend. Can't wait to work my way around to the hood. I'm saving that for last. I'll post an update when I've finished. Everyone must be getting tired of all the photos. I'll tackle the engine - Kohler K-90? - when she's finally clean. John
-
2 pointsI have been curious about having a tractor with a loader on it. I decided that what I really wanted was a four wheel drive unit with a loader so I passed on a number of Wheel Horse tractors with loaders. Then, this Kwik-Way loader showed up on eBay and not too far from me. I bid on it and won the auction for $869.03. I figured I could find out how well they work without having to lay out a lot more money. I have a 1997 520H with the heavy duty swept front axle and gear reduction steering that it will eventually go on. In the mean time I mounted it one of my C-175 Automatics just to see if it even worked. Well it does work and it is a nice set up. Things I ran into are the following. 1. The tolerances are very tight and a little extra paint made it hard to install. I had to scrape some excess paint off to get the front loader support piece to fit into the front tachmatic unit. The tight fit is a good thing since there will be no slop when using the loader. The fit to the tractor is excellent and the weigh box attaches to the rear of the loader frame under the tractor. 2. The pump belt runs very close to the PTO harp and I had to use a bungee cord to keep it from rubbing. I may be able adjust the pump to get a little more clearance. 3. The top hinge points are worn but that is not a problem for now. I may have the holes redone over the winter. 4. The pistons all leak down a little but not bad enough to interfere with getting some serious work done. 5. The traction of the rear turf tires and the lack of differential lock did give me some problems backing up a small incline with a load in the bucket. 6. The steering is not the easiest with the standard C-175 front end. The 520H with gear reduction should be much better. If I were to do it again I would pay more for a unit in a little better condition. It also has a lousy paint job on it. Now that I have this loader I will use it and hold out for a four wheel drive unit at a later date. Here are some pics.
-
2 pointsBack in the 80's I had my black 79 Z-28 and the jacket. I was all set! (My wife was sittin next to me when I opened this thread and at first she thought that guy was me!)
-
2 pointsSound like you're on a roll... don't stop now.
-
2 pointsnice old picture! looks like a Members only jacket all the rage in the mid-80's!
-
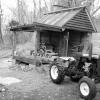
2 pointsStarted getting the Round Hoods ready for the 54th New York Pageant of Steam in a couple of weeks. A little touch up here a little cleaning there. A few adjustments. Putting the show ag's on the 704 (It's still a worker) Gettin the dust of the plow. Great way to spend a Sunday! What's not to like.
-
2 pointsI line the inside of the hood where it meets the dash with the fuzzy side of self-adhesive Velcro.
-
2 pointsKohler painted their engines at the factor with a color that was close to, but not exactly like Wheel Horse red. If you notice, the color on the engines tend to stay red longer than the sheet metal on the tractor. Kohler also used gray primer under the paint on the sheet metal. Wheel Horse did not use primer at all. Most restorers just paint the engine with the same paint as the tractor, at least I do.
-
2 pointsWow Martin, Those look awesome. I know how difficult it was to get them applied. The thinner the decal the harder to apply without getting air pockets. I meant to work on the new hood decals to have them for you this weekend but somehow something seems to always come up. The good news is Lola and I got caught up with online orders and I will be able to work on the fun stuff this week. Thank you for all your insight and technical verification of dimensions. I found it interesting how the originals on the lower dash were not designed to fit properly so they simply applied the PTO decal over the right edge of the ignition switch and light switch decal? kind of sloppy for an expensive Garden tractor. Your work amazes me and your trouble shooting ability has been invaluable to me in development and improvement of the decals we make. Learning more and more about the differences in graphics from one year to the next on the 90s era Wheel horse tractors. These 3 and 400 series from the 90s are drawing more and more attention which is to be expected. Will contact you soon and get the last decals done so you can finish this awesome restore.
-
1 pointJust sold another yard tractor and got a good price so I went back to Craig's List but they are all out of decant Wheel Horse's. If I had a grand-daughter young enough, I might buy her a smaller Wheel Horse and paint it pink, but never would I do that to a 400 series tractor. That's an abomination and should be punishable by death.
-
1 pointYeah - what AMC says!
-
1 pointSort of related - belt storage Garry
-
1 pointWon't be long now, you'll be in the 520 club too.
-
1 pointCongrats! You'll like, even if its newer.
-
1 pointJake (from State Farm), I just can't believe you went newer!!! What were you thinking??? The next thing that is going to happen is girls and a fast car. Better those black stripes were on a louvered hood on an old Mustang. To your Dad...Doug don't you hate to see them grow up?? BTW...nice looking horse...just don't bring it to a show.
-
1 pointSend a PM to "racinfool40" (Mike)...not sure he is into the "D" trannys, but it would be a good start.
-
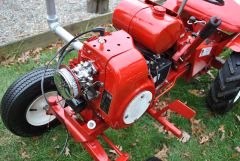
1 pointJust finished this up lastnight for the tiller, push mower, and trimmer. And a fresh shot of my old man. Pull start is removed because I need to replace the 3 prongs that engage the flywheel. Been rope starting in the mean time.
-
1 pointGreat tip Steve. And I guess I'll keep the photos coming. Can anyone identify the engine from the pics posted? Not showing , not attached, it came with one of those oil bath air cleaners. John
-
1 pointDon't base assumptions of power on horse power alone. Especially with newer tractors. The manufacturers way over-rated the horsepower on mowers for years plus the cast iron Kohlers, Briggs and Tecky's were probably under-rated in their stated horsepower. Try this...........get on the 10 horse garden tractor and pull something, anything in both high and low range. Now try to pull the same with the vertical shaft 16 horse. I think you'll figure out where I'm coming from!
-
1 pointVery nice work! The 3/8" reinforcement rod on the footrests is a great idea! Goin' to get Terry's decals? The working Horse needs 'em!
-
1 pointMartin, boy o boy have I enjoyed following this along. Your very well thought out on your planning and the steps you take. But more important is " you have the touch". Top notch skills in all aspects of the restoration. A tip of the hat to you. Glenn
-
1 pointGood attention to detail Mike! You were productive, and stayed out of trouble today! Win Win
-
1 point
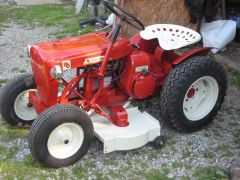
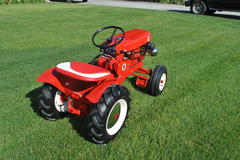
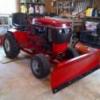
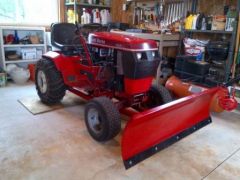
 my save from the scrap yard 4 years ago restored for my little girl shes fixing to be 3yr old this year boy time just fly by
 -
1 pointIT WAS A ESTATE AUCTION. LOTS OF GARDEN TRACTORS FOR SALE. NONE OF THEM WERE VERY NICE BUT THEY DID RUN AND HAD MOWER DECKS., CASE 220 $500 -1986 312-8 42"SD DECK $500 - JD 210 $225 - CUB 124 $310 - CUB 123 $100. 42" WH BLADE $55 --36" TILLER I BOUGHT FOR $85. IT WAS USED ON THE 1986 312-8.. MODEL NUMBER WAS 7-1211-6 . WHICH MAKES IT 1971 PRODUCTION DATE AND THE WHEEL HORSE ADAPTOR KIT WAS ADDED TO BE USED ON 1974 AND NEWER MODELS.. IT CAME WITH BELT/PULLEY SHIELD AND A VERY LONG BELT 134" ?. I WILL BE SELLING THE TILLER SOON, THANKS
-
1 pointBeautiful, perfection, classic. Thanks for showing us those well groomed Stallions. I do keep my Horses, clean 'n ready to work but, yours are "Showtime!"
-
1 pointI stayed home so I could install a new hot water heater, which I wound up not doing. I just wasn't feeling it yesterday. I wound up doing it today, it took me all of an hour..
-
1 point"Well I did not check the tractor model number. Since it's a manual I guess I am out in left field with that answer." Me too. Saw the '1100' in the title and I just 'assumed' the topic was about hydros.
-
1 pointWelcome to Red Square. Check the manual section for manuals for those horses...they will give you all the numbers for all the parts. TORO should have most of what you are looking for, but they can be pricey...but they are the right part. Use the want ads section for any attachments you are looking for. And above all...enjoy this sight and your new horses.
-
1 pointAlright, having a hard time finishing up all the little things on this one. residing the house and work is getting in the way of working on it. got a few hours this morning to finally get the dash all back together. i wanted all the fasteners to be 'hidden' on the dash so i powder coated all the screws matt black that hold it all together, also the nut that holds the ignition switch on and i found a boot to cover the light switch. i am happy, its the look i was after and all the decals blend with the black and i think it turned out great..... i also added a new throttle knob and slip over cover for the brake release....... thanks for all your extra time on the decals Terry, you gave me exactly the look i was after.....
-
1 pointFunny you should mention about the axle pivot pin on a diesel Wh.. I was contacted yesterday by a chap looking for help.. He has a Raider fitted with a diesel that his son decided to drop the clutch in 3rd gear at full revs!! 5 sec's later he had rammed the poor Raider into a tree resulting in a busted axle pin, but he also managed to really bend the inner mount for the axle pin!! This has also got me thinking on how wise it is for me to use the original axle and pin on Project "Why Not"!!
-
1 pointI had some TSC rubber mat left over from the rear discharge deck modification. Hopefully the right rear rim/tire won't be all grassed up! plus it it will flex if I hit that tree!
-
1 pointMaking a something, from nothing... priceless.
-
1 pointInstalled the new belt after I got in from work this morning at around 2 AM (I must be a Wheel Horse nut to be slinging wrenches at 3 in the morning). The old belt, as previously stated, looks perfect. But when compared to the new belt, it felt stiffer, and was actually somewhat shorter. The numbers on the back of both belts were the same, so it is the correct size (also printed with "Wheel Horse" on the back). Hmmm. In addition to the bouncing, I had noticed that the clutch had to be almost fully depressed to prevent clashing of gears. After putting the belt on, and before attaching the guard, I started the tractor. The new belt barely vibrated as it rode around the sheaves. The idler oscillations had virtually ceased, and the rattle was gone. After I put the foot rest and guard back on, I tested the clutch operation. The pedal now only needs to be depressed about 1/3 to 1/2 way to completely disengage the transmission. Too, the operation of the pedal and clutch is very smooth. Findings: Since both belts carried the same numbers, and were marked as "Wheel Horse", it is a fair bet bet to say they are the same, just separated by almost three decades in age. When compared to the new belt, the old belt had not only developed hard spots, but had shrunken in length. This makes sense, since we all know that rubber will shrink with time. Therefore, if you have a bouncy, rattling pedal, and the idler and all else appears good, replace the damned belt, regardless of appearance. Keeping it till it completely dies isn't worth the aggravation. Problem solved.
-
1 pointHere are some pics of a couple WH's that I have used WD40 and 4 ott- 0000 steel wool on for paint restoration. The first one is a 1967 Model #857 that I cleaned half of the hood to demonstrate how much paint is hiding under the rust. The 2nd machine is my early production 1955 RJ35 that was pretty much totally fried with rust. I couldn't see any red paint no where on this old girl. The after pics are quite amazing to see how much red paint is underneath the rust! So just spray the machine with WD40 and lightly rub it down with 4-0000 steel wool, that is the finest abrasiveness they make and I don't use any other size! So I hope this will help out guys who don't want to restore a nice original condition WH but just leave it in as found condition!! I think they look just fine the way they turn out with just a good cleaning. You can keep the oiled look on it year round with a few shots of WD40 later in the year too. I usually wipe it down with a towel type of rag just to keep it dry to the touch.
-
1 pointWell I've alway's wanted the post hole auger for the GT14.
-
1 pointSounds like you may have internal leakage in your hydraulic valves. SO that when you are shifting the valve the the contract position some fluid is leaking into the extend end of the cylinders and fighting against you. A couple of tests to confirm this would be to change the hoses so that they are backwards and see if the problem reverses itself or stays the same. One could also put a pressure guage on each line and record the differences between the two modes of operation. They should read nearly the same. It may also be that there is a restriction in the return line to tank (marked T on the valve) not letting fluid out fast enough.
-
1 pointReverse would be nice to have.. Toying with the idea of an electric reverse using the motor from a mobility scooter.. If it can be made to work remains to be seen! So with the drive train plan now changed a bit I needed the swing arm and mountings from the Honda's frame.. So I chopped this large lump of metal from the frame which also has the engine mounts making life a little easier er.. Mounting the engine While I was in the shed lookiing for a cardboard box I found a pair of "deep dish" late C series front wheels.. These should widen the front wheel base a bit Some more mocking-up, but this time a bit more serious so I could start taking lot's of measurements.. The front of the chassis is 4 inches off the deck, the rear 4 1/2 which gives it a nice little bit of stance. Throw it in a pile and work it out from there I also had a flash of inspiration about the steering.. With a new mounting plate made this right angled drive box thingy that was going to be used as part of the drive train, can be bolted to the chassis and run the steering shaft under the engine.. The UJ's will come in handy for connecting it to the steering coloum And then just as I thought the plan was coming along quite well I hit rather a large problem.... I just could not find a kart axle or the like that was A - Strong enough.. B - Within my price range... And C - Not hollow! I even started looking into using a car IRS setup, at least the axles could be narrowed to get the with I wanted!! And then while looking through Fleabay I found the answer... A shaft drive Qwackasaki quad rear end It solves a lot of problems in one hit as it comes with brakes built in and as an added bonus it also has a diff lock So currently somewhere between Scotland and Hawkhurst, Kent is a truck with a large parcel containing the back half of a quad including prop shaft Once the parcel arrives I can really get into this build rather than just piling bits together on the bench and grinning at the beast I will be creating To give you a few more photo's to look at I went in search of metal to use as chassis extensions etc.. Buried in nettles and only on one wheel was the filming trailer I built quite a while ago! As it has never been used since it was built, I decided it's time was up... And I needed the steel I might have a use for the wheel hubs as well. Now available in kit form
-
1 pointHere's what you've all been waiting for: VIDEO ! ! !
-
1 pointNo words needed, the photo's say it all
-
1 pointpretty well every horse I've had has either a sticky solenoid or sticky start bendix. They've all had dings in the cowl where someone has used a hammer!!!! It's only a 10 minute job to fix too
-
1 pointYou might oil the shaft or use a dry lubricant to see if that helps. I think the drive engages with centrifugal force as the starter motor turns.
-
1 pointThreatened to, if provoked... then was left to putz in peace.
-
1 pointDid you run it there?
-
1 pointThat reminds me, here's one of Mrs Rules favorites.
-
1 point
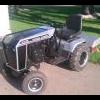
My custom 1964 604 with a nice Kohler 8hp electric start. Also has a custom dash with a indicator light, a cigar lighter and a amp meter. Had to move the engine forward an inch so the electric starter would fit next to the battery. Also had to make a custom air filter so the hood will fit.
-
1 point
-
1 point
-
1 point


This leaderboard is set to New York/GMT-04:00