
Leaderboard


Popular Content
Showing content with the highest reputation on 07/16/2014 in all areas
-
3 pointsI finally got a chance to rebuild a transmission with a hi/low mechanism. This is a 6 speed #5060 transmission with the 10 pinion limited slip differential. Notice the brake shaft comes out the hole closest to the axle housing. The 8 speeds brake shaft comes out of the cluster shaft hole. I did a series of videos for this thread along with some pictures. The videos are split up between different phases of rebuilding...ie...the differential, the hi/low shift mechanism, the rest of the gears 1 & 2 (my batteries died in the camera). Most of the information will be in the videos...be advised that I did some struggling while doing these videos and I left them as is because it is not always easy. Hope this helps you guys. correction... According to the manual the bolts that hold the differential together are in backwards in the video. The nuts should be on the input shaft side (right side) of the transmission. Sorry, I missed that. Just got the trans split. I use a 1" old wood chisel to start and then work the case apart with a pry bar. A couple shots after getting the case half off...trans is in neutral. The trans case works as a work bench for the differential...very cool Here is the reason the trans needed to be opened. An axle gear lost it's teeth and the pieces were lodged in the pinions. Finished and back together. The rest are the videos...1st on is the differential... Next 2 are dealing with the hi/low mechanism...1st one taking apart and the 2nd on putting together...be nice...it was my first time. Now, 2 videos putting the rest of the trans together...batteries died just before I finished the first video. Thanks for looking
-
3 pointsI just picked up this 1960 Suburban 400 off of Craigslist. My trucks starter decided to take the day off and I got stranded a hour away from home in Green Bay Wisconsin in the shadow of Lambeau field with my daughter but we got some help from family and got home with our prize. Now I have the transmission torn down and need a spider gear and a shift lever collar. Does any one know if the axle has too much wear to re-use? Any help would be very appreciated. The break lever gear on the shaft seems to have a little more wear on a couple spots than I would have liked to see but I think it is ok overall. (can't seem to get a good picture)
-
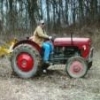
3 pointsEveryone Photos below. Just this came across this on local classified here in Toronto. Any chance it could be as ad claims - a 1947-49 Wheel Horse. And what model is it ? I'm assuming the owner is blowing smoke about the age. Asking price Is $950.00. Not running. Tires look sketchy John
-
3 pointsThese are more designed for the guys doing it the first time...not so much for the guys that have done them before. I just know that some members have been looking for videos involving the hi/low mechanism...while not the same as an 8 speed...the principle is the same and will work. r356c, I hope you are right and it gives someone the confidence to tackle these transmissions and fix them...rather then just melt them down. It really is pretty simple to fix up and give a horse another 40 years. This is what is crazy...if you add up the minutes that I spent doing the videos...it comes to just over 40 minutes to rebuild this trans. Without the camera and the explanations, this can be done in about 20 to 30 minutes. You do not need any special tools and fixing this horse costs like $65 and you got a clean, good trans. I replaced the outer axle bearings, all the seals, the trans gasket, the one axle gear and picked up an input pulley, a new dog point set screw, and new nuts on the differential bolts. A definite feel good.
-
3 pointsI thought I'd throw this idea out. If the outer ends (where the hubs were) of the axles (say about 2") look good and the axle gears will fit snugly on them reverse the axles. All you'd have to do is drill new holes for the drive pins inside the differential that hold the gears on. It looks like that would put the worn area floating inside the transmission where it wouldn't be riding on anything. Feasible Steve?
-
3 pointsI have a early three blade deck for a RJ35
-
3 pointsOk, here's what you do. You need to go outside in front of garage, take three steps back and yell "DINO" where are you? More than likely you'll have an answer on your tranny. Stevasaurus does this stuff in his sleep. He's like a resident tractor doctor amongst several others that also know what they are doing. Gonna give you a heads up though, He is also a Bears fan, I don't think he plays well with Cheeseheads enter at your own risk. No it's not all that, I'm, sure he'll wake up sooner or later
-
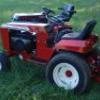
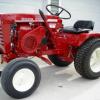
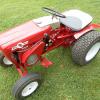
3 pointsYes that is a rare 1957 Wheel Horse Model # RJ35 with a Kohler engine! It is an early production 1957 with black rims. This is in really good original condition and should be left like it is and not restored. So I will start the arguments about the " to restore or not to restore" a rare original condition WH.The paint can be cleaned up well with some WD40 and four OOOO steel wool. The rims appear to be painted black and they only did that in 1956. So it is probably built in late 1956 or early 1957. The engine serial numbers can help identify it, if Clay jumps on board this thread. It also has the rare brake option on it. The tires all look pretty good, just don't over inflate them or they will get ruined. Like Stevasaurus said the rear tires are on backwards, just switch them from one side to the other and that will fix that problem. Hope you get this rare machine. The price is a little high but it is worth it, just hate to pay that much for it. What a good looking old girl!
-
2 pointsThis is my little old dog, she has degenerative nerve disease and her back legs stopped working. I decided she needed some wheels so after searching the interwebs and seeing prices around the $375 mark I built this one.
-
2 pointsMy sister is out of town so I decided to mow her lawn. Its a short video, had a run in with a lilac bush near the end and thought it better to drive with both hands,too many things to steer around. Mark
-
2 pointsI'd rather fix an Onan with a broken rod than one with a loose valve seat. The engine in my 520 was just that, I too had expected to find a loose seat but instead found a broken rod. There are several different Onan rods, use a matched pair to retain balance in the engine. Mine was a very budget rebuild, I bought another engine (that did have a bad seat) and used the rods and pistons from that. I mixed and matched a few other bits from the two engines to find the best bits that I could. New rings and gaskets. I think I had a little over $300 in the motor. 5 years later it now is starting to use a little oil, but I think I got my moneys worth. Coincidentally I also have a 518 with an Eaton 1100, Its a good tractor.
-
2 pointsProof positive that even a blind squirrel can find a nut once in a while. Question. Why not on the 2 piece. Are the axles splined on the gear end?
-
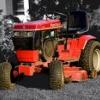
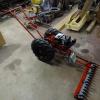
2 pointsEven though I should be getting on with welding my 6x6 back together for a show early next month, I just had to spend a day playing with "Why Not" and working things out a bit more, like how to get 5 bolt Wheel Horse wheels onto this 4 bolt hub! The two options are make an adapter ring thingy that will convert 4 bolt to a 5 bolt pattern or make the Wh wheels a 4 bolt pattern.. Not sure which way to go yet! After what felt like ages battling with bolts that had rusted solid into bushes all the old quad suspension arms came off! Time to flip the axle over, so the 6 bolt's holding the narrower side came out.. But only 3 of the 6 bolt holes lined up!! Why Qwakasaki couldn't space the 6 holes evenly apart I just don't know! Plan B it is then.. Off came the brake drum, the first one I've ever seen with an oil/dirt seal on the outside diameter! A bit dusty inside but not too bad.. But the good news is the 4 bolts that hold the brake assembly are evenly spaced apart Which meant I could rotate the brakes each side by 180 degrees to get the breather pipes up top and then flip the whole axle over which not only get's the drive the right way around but also help the prop shaft line up with the bike engines gearbox much better. The diff drain plug can easily have a hold drilled through the center to fit a breather pipe to So there you go, all up to date I should be cracking on with getting the 6x6 done today, but instead if plans come together I will be buying a rather handy tool that will change the ways I do my builds by opening up a whole new ways of doing things... But more on that later
-
2 pointsWell done! Looks like its full speed ahead for your best friend! Mike...........
-
2 pointsReally there can be so many qualifiers... do you want Wheel Horse branded implements, or include allied attachments (like the Danuser Forklift for GT14?), or include additional aftermarket non-allied attachments (like the Bachtold Fenceline Mower?) I would say let's just get some posted up and see where it goes from there. These are pretty hard to come by. It's far from the rarest though. I know of about 5 including mine. PTO-66 belly mounted Farm PTO.
-
2 pointsSaw this at a local show this weekend it has the RJ35 channel frame with unidrive tranny,I was told or read it somewhere that W.H. made a conversion kit,thought it was a pretty cool tractor....
-
1 pointI have been singing the praises of a Napa 1410 Hydro filter for a couple of years. I am not badmouthing OEM Toro, but not all of the members here have a Toro dealer nearby. Plus not all dealers (including mine) stock the Toro filter. It gives members another option and there will be no need to hesitate to buy a Napa (Wix) filter. My local Napa stocks the 1410 or can get it within hours if needed as opposed to over a week from the dealer. I cut open the Toro once. Wish I had pics.If I remember right the Toro had less pleats and a piece of tin (Like Fram) as opposed to the real spring in the Napa 1410. If another member removes a Toro filter maybe they can cut it open and post pics. If I ever run across another one I'll cut it open and post them here.
-
1 pointI saw this Charger 12 with the rare white wall tires at a show here in Ohio a few years ago,,,thought I'd share the photo..
-
1 pointTitle says it all. My intent when I first bought the 312, was to do all the maintenance items, fix anything obviously broken or missing, and use the tractor till this fall/winter when I would do some serious restoration. But these damn things have a nasty habit of growing on you. Slowly but surely, I have repaired, replaced, re-worked, or otherwise restored a significant number of items. And I just can't seem to stop. All I have to do, is walk past the tractor, and notice some little less-than-perfect part, and I begin planning of fixing it. Just this week, I bought and installed a drive belt idler. This is covered in a separate thread under Transmissions. The other undertaking this week was the stripping and repainting of the seat frame. After picking up a new seat at the Big Show and installing it the day I got back, I have been seriously irked by the rusty frame and springs it was attached to. So...last Monday I dismantled the seat, frame, and springs, took them to work, and sandblasted everything. Applied a coat of primer, and painted the parts semi-gloss black. Most all the hardware was wire brushed and painted. Was pleased to note that there was almost no wear on the hinge, and even the rubber bumper caps were like new, no cracking or checking. Pretty pleased with how the seat frame came out. Maybe now I'll just leave the tractor alone till winter..... but probably not. Noticed that most of the paint is gone from the PTO pulley, and the muffler has some rust on it. The Rodent (granddaughter) gave the tractor her seal of approval by making me ride her around the yard.
-
1 pointEmptied the Workshop out for a clean and reshuffle, so drove the Horses around onto the Lawn for a Sunbathe and see how things are growing fast now- Look's like they won't have much work to do this year, so I'll just have to ride around on them
-
1 pointGreat Vids Steve!!!!..Told ya they wern't to Bad!!!!...
-
1 pointjust watched the differential video, Steve. nicely done. i like the fact that you didn't edit it in anyway, it shows us through your work what to look out for and what problems we may come across while assembling. going to watch the others now!! so does this mean that you have now joined the hi/lo rebuilders club?
-
1 point
-
1 pointKelly has that rare front sickle bar for a 70? I think Very few known to exist. Can't find the pic I had of it.
-
1 pointnice find on that horse, the diff looks pretty worn tho yes, the axle's on the 2piece are splined where the diff gear goes. Koen
-
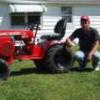
1 pointActually the horse is mine. My sister lives just down the street from me so I just drive it down to her house. I guess I should have videoed that instead might have been safer. If my sisters two boys (5&8) were home there might have been some shooting from the cabin with squirt guns of course. I did take a branch to the ear, if I ever mow her lawn again a helmet might be a nice addition.
-
1 pointThe post hole digger is the best so far I think....
-
1 pointWell I've alway's wanted the post hole auger for the GT14.
-
1 pointDamn, Now I have to go take a look. The thing holding me back was that I have neither the time nor money to restore an older horse. Oh, and did I mention ability. I've never restored anything so there was no way I was going to "learn" on such a find. Going to try and get out today. john
-
1 pointGlenn/Ken- I never realized I used to own this tractor too... It came out of a dealer collection in northern CT. I bought it along with my 701. Very nice tractor for sure and you and the boys are doing a great job.
-
1 pointX 2 Sent from my tractor seat.
-
1 pointVery cool.
-
1 pointNew looks great... might need to start looking for another set of axles though.
-
1 pointAwesome! Now you have proof... the lilac was still standing when you left.
-
1 pointFor me, the seat has to be able to dampen out the direct vibrations and bumps transmitted to the spine. Before changing to the spring arrangement shown in the attached picture of my two work horses, I had the miseries. Now, with these reworked JD springs (Ebay) two hours of mowing produce no discomfort.
-
1 pointRear tires are on backwards... Sheet metal looks good.
-
1 pointNice.....I was waiting for a cowboy to take a shot at ya as you rolled up on that log cabin.. . Mike.........
-
1 pointMark, much appreciated. you knew you had to get on that horse didnt you. Glenn
-
1 pointya the tape is just a temporary fix. i'll check with the local jd dealer thanks. just got done mowing the pasture with it and it ran and cut great.
-
1 pointIt is probably impossible to say, but the very early Ride-Away Jr.'s twenty four inch snow plow would be high on the list. The push bar is flat and looks just like the LMR30 flat push bar, however shorter. The Ride-Away Sr. cultivator and the first variation of the 1948 Pond walk behind cultivator with adjustable hitch pin is a difficult find as well.
-
1 pointI have good used axle's if needed...I wish ya luck finding new ones..They are almost impossible to find for the 10-pinion differential which you should have in your trans....PM me if interested.
-
1 pointThis should be the original transmission Garry
-
1 pointgot the Poineer mounted on a DB test bed, until I find another Pond. Put a lawn roller on the tractor and it pulled me around the yard without any trouble, so It looks like its going to be a good one. I have the orginal fuel tank, but it was full of crud and i'll have to get it cleaned up way better before using it. Lucky for me the petcock was shut off and the gunk didn't make it down into the carb.
-
1 pointThanks for coming Terry! I was glad you were able to make it. This is a pretty small show that is really in it's early stages, but is growing fast. They said the Friday turnout was at least double the prior year and Saturday was even bigger. I had a great time. Here's a few of my pictures... Panorama of show Strunk Chipmunk Hiller Yardhand [ A view down one of the many rows Colt, Case and Ingersoll had a very large showing... A few Gravely's... love that wood handled Model D! A few of you have seen this collection before.... another collector from Minnesota. Nice little Bantam with Honda repower. There were several Bantams at this show.. I think I saw four or five... a good showing for a fairly rare tractor! There were quite a few of all the Jacobsen-made brands there. Minneapolis-Moline... White Town & Country and Oliver There were also quite a showing of Allis Chalmers tractors. Including theses customs..... a 36V electric And this beefy looking machine. This guy also reproduces the Ganon Earthcavator on the rear of the machine. He had several of them on display. And of course... what multi-branded show wouldn't be complete without a big collection of JD? I didn't mind him being there.... see that little gray bin on the ground by the tent? it was a good portion of a Suburban 5010 trans that found its way home with me! Several paperweights, but enough good spare parts to be worthwhile. All in all a good time at the show... already looking forward to making this a regular addition to my summer calendar. Having not been there I didn't promote it much beforehand... but now, having been there, and seeing/hearing how much it's growing... hopefully we can get the word out more next year and get a larger Wheel Horse showing!
-
1 pointA picture (or 2) is worth a thousand words.
-
1 pointDecided to check out this show with Jason and I have to say that ..It was a really nice show! A great variety of several brands of garden tractors with good food available and very friendly people . Might plan on attending this show again next year. Here are a few random pics I took.
-
1 pointThat's my biggest down fall. I can never leave well enough alone. That's why I went from 17 Wheel Horses down to 3. If I where to keep all of them I'd end up divorced and broke with what I would have to put into them.
-
1 pointWell I went this to the event today. It was really well attended. Probably one of the best bangs for the buck I have spent. Entry to spectate was 5 bucks. In addition to about 50 lawn tractors pulling, they also had another lane whioch had 4X4 trucks and I assume full size tractors if you stayed longer than I did. Already having sunburn from Fishing trip, I only lasted about 3.5 hours. I grabbed a couple horse pics and will attempt to load them. The Cubs dominated the pull by large margin in most cases.
-
1 pointThe front end bolted back together. The trimmed down steering rod thingy will gain a bearing and sprocket so I can move the steering down and run it under the engine WH style. A "Batman" camera angle of the front. As the chassis is upside down so is the front hitch/axle mount. I was going to leave these off, but some extra strength by welding them back on the right way up would be a good thing.. It will also be handy for hanging a weight box on the front as I have a feeling the front wheels may want to lift a little under hard acceleration Hood and engine plonked back on to have a look.. Not sure I like the axle so far forward! Looks like I might have to chop the base of the hood about so it will clear the steering! Rear wheels roughly in place.. It's looking a bit empty back there! So I thought I would plonk the bit of the bike frame with the engine mounts on to see how it looked... Er, it's looks like half a bike frame! The next thought was to just use the mounts and replace the bit of frame with some strong box section. The trouble was the only place both top and bottom mount are flush is here! If I welded some box in I wouldn't be able to get the starter motor out without taking the engine out! And then while relaxing with the last coffee and smoke of the day in the shack I had an idea!! If I chop this mount off about where the scratched on line is, let it drop down by 90 degrees and turn it around it will end up very close to the chassis and tucked under the engine. The top mount mount can be tied into the frame that will hold the body on. Oh, and I got the front of the hood sitting much closer to the axle.. Only a little chopping will be needed and it looks much better
-
1 pointHi all I finally got the decals on and painted the front grill and I am very happy with the results, glad I painted the grill it does look much better. I had to swap the muffler so I lost the chrome guard for now but I will get it back on it at some point. Thanks to Vinyl Guy Terry for the decals they are very nice and definitely finish off a project like this. Thanks for looking Paul


.JPG.9f2ecb26065c66527b0730084ab7fc7a.thumb.jpg.7dc8a04d9a53d44ee2b23f26ee94496f.jpg)


This leaderboard is set to New York/GMT-04:00