
Leaderboard


Popular Content
Showing content with the highest reputation on 03/06/2014 in all areas
-
3 pointsi've done this a few times on impossible to remove pipe threads and it will work, first cut the pipe off but leave enough to grap with vice grips. next, with a tig welder(you will probably have to go to a shop for this) build up some weld beads on the inside of the pipe as deep as you can get in. dont be afraid to put the weld in. when it cools, the weld will shrink,shrinking the pipe along with it, and it is amazing how much it will shrink. the piece, unless it was gaulded in the first place will turn right out. this method also works quite well to remove bearing races that were pressed in. i do this 40 or 50 times a year on all kinds of power systems. on large parts, stick welding works but this is too small for that.
-
3 pointsThe pickup truck in the photos looks like a diecast and most of those are 1/18 scale which is too big but there are plenty of potential 1/25 pickups out there. I've already built a 1934 Ford pickup but I checked and the bed is too small. Obviously, the coolest way to go would be a Studebaker truck but there aren't any kits available. The idea about tires from farm toys is interesting. I'll have to look around and see what the possibilities are. One problem is that farm tractor tires and garden tractor tires seldom have the same proportions. I made a little display base for my Horse today. It's just a display case from Hobby Lobby that's intended for softballs and hockey pucks with some model railroad landscape items added. It has a clear top so the model can be protected from dust while it's on display.
-
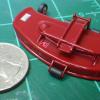
3 pointsThere's much to report on the little Electro! The progress has been slow but steady as I had some time. Here it is in the "service bay" getting ready to have the lift valve installed and plumbed. At that point it was almost complete. The hood had been prepped already complete with a decal for the headlights. The headlights that came in the kit were never going to look right so I tried this and it looks pleasing to me! Steering wheel ready to go. After adding the levers and neutral pedal she was done! Of course, it had to have a Harrison Elementary Garden Tractor Club logo on the rear fender. Go Huskies! I brought it to the Baton Rouge Scale Modelers meeting last night and the guys were floored! Nobody had ever seen anything like this built before. They enjoyed the stories about interacting with the people on Red Square, too. It's a world they didn't know about. So this has been an adventure that I wouldn't mind repeating. There are already plans in the works for another possible Wheel Horse project and I can't thank all the forum members enough. This couldn't have come out like it did without all the help and support. I will definitely keep checking back in to this really cool forum! See you soon!
-
2 pointsOn additional hint for the aligning pins...cut a slot across the unthreaded end. Lets you use a flat tip screw driver to get it out if it gets a bit bound up...ask me how I know this
-
2 pointsHere is a shot of the stud bolts I made...this does make mounting the trans much easier....
-
2 pointsLooking down the road, you'll always be remembered by these kids when they are telling their kids about who their favorite teacher was and what their favorite class was that is for sure! Nice job Scott.
-
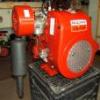
1 pointthen a little detective work does the engine HP match the decals on the hood? does the engine year match the production years of the tractor it is mounted on?
-
1 pointTo try and answer your question I would suspect that you have some blow-by from worn rings and/or your tractor is running rich and you are exhausting unburned excess oil and fuel. You could try leaning your mixture and installing a rain cap on the stack if you don't have one. Turn the cap so the hinge is toward the hood and it opens way from the tractor so it deflects the emissions away from the hood. I'm sure others will have more ideas to help. Good luck!
-
1 pointyep, I really want to work on getting the engine together to see how that looks, plus i want to get more of the hood stand together as well. AND looking forward to making up the engine harness too........ rest assured I'm really enjoying putting this one together.
-
1 pointNow thats just overkill Martin! I've never seen a Horse with a zinc plated brake band! Showoff! Those parts look amazing, and I'm sure your dying to start assembling, as I know I would be. Matt
-
1 pointpicked up another batch of plated parts, this one took about 3 weeks, I've been itching to get some of these parts back so i can get going on the build. my helpers were ready to inspect the quality of the plating...... guess i got some work to do now.......
-
1 pointMr. Motto...WOW If that horse runs, I could cut my yard with it...it is very, very small (about 1/25) Fantastic thread...thank you for sharing this with all of us.
-
1 pointAre you talking the transmission or the suburban 551?? That transmission is the Wheel Horse #5007. It was also used on the 1961...701 tractor...the first front engine horse. In 1962 they went to the 2 piece #5025 transmission. The only difference I found between the #5007 and the #5025 is the drain and fill plugs. The plugs are the same size in the #5007...the fill plug (if I remember) is one size larger in the #5025. The transmissions are EXACTLY the same other then that...and would be interchangeable with no modifications. As far as the 551 being rare...I am not sure. Finding one with the correct Tecumseh 55D-2113 engine on it may be a neat trick. the #5007 the #5025
-
1 pointWell thanks Ken but I don't know about that. They are good kids and are a joy to work with. I hope they will continue to find interest in areas such as this as they get older. I have not regretted one minute of this........it has been a blast for me!
-
1 pointhi all England callin. help needed! Times is hard and I need my tiller to run on my Wheel horse 312-8 to plant the potatoes and stuff. But i need some help. When i bought the tiller earleyer this year, it had no rear hitch, and as their going for upwords of
-
1 pointTry this one it works good ooops like ekennell said
-
1 pointIt's a chain!!! A chain is supposed to have a rusty look. Take them off, hang them up, spray some chain lube on them, or throw them into a tank with oil, and hang them back up. No need to overthink this one.... Sorry but that is the farmer in me coming out. Just like disc blades. They get rusty because they get used, then sit in the elements with exposed metal. When they wear far enough change them, nothing hard about that. Rob
-
1 pointSorry for the delay everyone! Busy, busy evening tonight. Finally getting a chance to sit down, turn on some basketball on the tube, and hop on the iPad. The wind was blowing and the snow was falling, but it was nice and toasty in our building. I can't stress enough how this has become such a huge blessing for these kids. We are slowly settling in and becoming very comfortable with our new work shop. Tonight the kids worked on degreasing the block while getting it close to being ready for primer and paint. I still need to figure out where I am going to come up with a fuel pump for this engine, but we will figure that out in due time. Other club members were handed a paint brush and a tire from the tractor. I grabbed our bottle of tire paint from Miller Tire off of the shelf and made up a mixture of it and cut the kids loose. They really enjoyed teaming up and having a friendly competition to see who could do the best job. The kids really enjoyed working on something different other than sanding tonight. Another great night during club tonight. I did get to share with the kids that we will be going on a field trip next week. We will be piling in cars after school and heading over to our powder coater. He has promised to have all of the parts blasted and prepped for powder. He will then teach the kids how the process works and allow them to do the application themselves. They are ecstatic. I told them that once this is done we will start reassembly soon after. This is starting to get really fun! I am also trying to work with our local Fastenal to get some new hardware for reassembly of the machine. I am keeping my fingers crossed on this one! As always, thank you for following along. Your comments are greatly appreciated and from time to time I show the kids the thread and read your support. It means so much to them!
-
1 pointMike- I outgrew the small barn/shed before I even built it !! I plan on painting this wheels using the same gloss navajho white I already have. I will use a brush to give it the right look tho. It will look like the before and after of my 702 below.
-
1 pointDarn it, you had to go and do it. Made me hungry and I just ate a little while ago. Enjoy. I just love it when the family gets together like yours does. The sign in my kitchen says "happiness is a kitchen full of family". Marvin
-
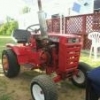
1 pointToday I was able to give the tractor a nice bath and clean out the fuel tank. I installed new fuel lines, cleaned carb and plug and fuel filter. When I went to start it somehow the wiring started to melt...OMG !!!! I was able to pull the battery cable off and stop the smoking. Seems the push button switch was bad. The PO added a "positive" terminal on the side which I think grounded so I got rid of that. I installed two new battery cables, and a new battery too. I finally got the wiring right and she fired up and ran nice. Now don't get me wrong this is not a new motor rather one of those that I call "breathing" lol. What is next .... yes it got the oil treatment and the patina looks great!! I will need to put a tube in the back tire and find a hood. The hydro lift works fine but the return spring is not working so I have to manually return to the handle to the center position. The mower deck spun over nice and worked as it should. I plan on painting the rims and tires and find a hood (hint hint)!! Overall I am really happy with this tractor and my son already claimed it as his and gave me "his" 953....
-
1 pointOr ,you could toss those rough rider 4 links and get some new 2 linkers. Much nicer ride!
-
1 pointI hang them in the shed.
-
1 pointWow! Great responses! There is something that all of us will need to watch for this Spring and Summer. That is "rocks"! The frost line was much lower into the soil this year than in many years before around my parts. We had very little snow cover to insulate the ground prior to Mid-January. I am betting that the frost is going to heave some big "goonies" up to the surface after the Spring thaw this year! Something to be careful of when we start to cut that stuff again. Oh come on! It's Green and has dog crap around it. I'll think of it sometime tonight! PS.....the Cubs haven't play in years! Why would this year be any different!
-
1 pointThere's 36" - 48" of snow in my yard, 10 degrees with not a cloud in the sky. I'll see grass in July maybe?
-
1 pointChains are a ""consumable"" item -- they do wear out so just use them and enjoy !! (Kinda like the owners that painted the bottom of the trailer or put burlap in them to keep them nice). Just use them and if you desire, put a coat of paint on it but they're meant to be used ----
-
1 pointRemember the ammeter only shows what is being drawn from or resupplied to the battery. If the current draw from the ignition system and lights can be supplied by the stator, no power will be drawn from the battery. The only time a battery should be noticeably discharged is when the tractor is started. The ammeter should show a charge when the voltage output of the regulator is greater than the voltage at the battery. Once the energy used by the starter motor is replaced back into the battery, the ammeter should read very close to zero. Also note where your ammeter needle points when the tractor is turned off. That reading represents your true zero charge. If the needle points to a -1 or -2 amp charge when turned off, that is the mechanical "0" of the ammeter. This is where the needle will point when the battery is fully charged. I have seen fully functional electrical systems show what appears to be a small but continuous negative reading if the mechanical zero of the ammeter is off. In the opposite, a mechanical zero at +2 or +3 when the tractor is off would give the impression the battery was always charging when in fact it is not.
-
1 pointInteresting thread, I bought a 1956 RJ35 and 1958 RJ58 with a snow plow from a guy in up state New York. when I went to meet him he told me that his farther ran a dealership and had given up and these 2 Wheelhorse's were in the barn. It was called. Fran Kehl Sales and Service. Route 20 A, Strykersville, N.Y.14145. and the two tractors still have the dealers decals on here in the UK
-
1 pointDecals happily received from mark (www.restorationdecals.co.uk) very fast dispatch and product has a high quality and looks like original. If anyone was thinking of buying some form mark do it it will really finish of your restoration project. James
-
1 pointFYI. Any after market "0" or "Limited 1" Should fit a wheel horse 3PT set up. Brinly, JD, Cub Cadet, TSC, and many others sell "0" and "L1" attachments.
-
1 pointCome on! Suck it up and pull the transmission and remove that tank and do it right!
-
1 pointFinally getting a chance to update our last meeting which was held Thursday night. It was a huge step in us moving forward as we are now able to use the new building. The building is not hard wired but we are able to run an extension cord temporarily so we have light and can run a portable heater. The kids were excited to finally be back in business. We focused on getting the engine torn down and we will focus on getting it prepped for some new paint. We also tore down another 12 horse that had a broken rod. The kids worked with dad and learned how important it is to do routine maintenance. Here is some photos of the club in the new building and back in action....... Of course a little more of everyone's favorite activity........sanding! Still working with the sandblasted and hoping to have the kids apply the powder to the tractor soon so reassembly can commence. Thanks for following our journey!
-
1 pointThis site might interest some of you. http://www.seltd.net/cgi-bin/ez-catalog/cat_display.cgi?account=X344897;search=16;search=Special%20Projects;limit=category;v=2.0 I just ran across it and they actually have resin copies of the Wheel Horse kit and implements to go with it. No photos of the implements so I don't know how realistic they are. Resin is trickier to work with than styrene is mostly because the traditional hobby glues don't work on it. It's usually glued with super glue or epoxy and MEK has some ability to glue it if you don't mind working with that stuff (take safety precautions for the vapor). Some model building experience is recommended before trying a resin kit. But here's what caught my eye for a possible future project. Maybe this: http://www.seltd.net/ez-catalog/X344897/16/SP-002 can be converted into something like this: Just saying - that's all. Right now I'm gonna take a break for a while and enjoy some of the Spring weather that's moving in and do some gardening, etc. When it gets too hot for yard work I'll probably start looking for another model project. BTW, I totally agree with the comment about the tires. I'm not at all pleased with those but correcting them seemed "outside the scope" of this build. There were enough problems to solve! If I build another tractor building some better tires will be job one but it won't be easy.
-
1 point
-
1 pointParisi motors Chrysler and wheel horse dealer in Hammonton NJ
-
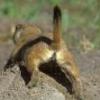
1 pointPartypooper. I just found myself a nice stick and had a whole bag of marshmellows all set.


.JPG.9f2ecb26065c66527b0730084ab7fc7a.thumb.jpg.7dc8a04d9a53d44ee2b23f26ee94496f.jpg)


This leaderboard is set to New York/GMT-04:00