
Leaderboard


Popular Content
Showing content with the highest reputation on 02/06/2014 in all areas
-
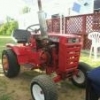
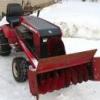
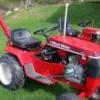
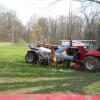
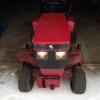
5 pointsHad to Shovel and I mean S H O V E L all day at work. We got 3 inches in 45 min at one point. Boss was begging us to stay late. Then the snow stopped and we got to go home on time. OH GOODY!! I get to go home and play on the Horses! Should have known better. First I got some brand new Carhartt Extreme bibs. Nice and toasty but slippery and stiff. Got out to the shop and fired up the 160. Warmed up the hydro and was cleaning around the dumpster and I tripped and fell over the blade and almost bashed in the hood. Then getting on my slippery coveralls plus a slippery seat I slid and nudged the motion lever. Plow hits my overhead door sensor. I fix that. Then I plow some ,take a video and decide I need to get out Marvin and the blower. Get it out and want to shoot a video and the phone dies. Charge the phone and blow the driveway. Shoot a short video blowing the frt. walk. Battery dies quickly. It would have been an epic vid as I got a good plume going. Got to the end and went to back up and the tractor stops and spins The bolt for the chain attaching the mower lift bar came out and now the bar is wedged into the walk and lifting the tractor off the ground. good thing phone is dead or I would have had to take an embarrasing picHad to go get a small jack to get the bar out.Replaced the bolt. Gloves are soaked. Finish up plowing. Went to lower plow and plow won't go down. Trip spring is hanging. A hitch pin came out. Replace spring and pin and I notice the opposite spring rod is falling out and missing a clip .! Never had this happen ever. Got it all done. Got Elvis out to pile it up. Almost didn't want to in fear of what could happen to that tractor. Couple of vids and pics. The daylight ones are what was waiting for me when I got home. The dark one you can almost see one of the piles Elvis made.
-
4 pointsWell the trailblazer 5 couldn't keep up and tapped out shortly after Christmas. So this week we finally drug the blower out of the woods and mated it to the C-175. Had to get a new belt and took 2 days to get turned around and headed the right direction. As every time we moved out by the shed we sunk in deeper or something would break. Tonight the snow gods smiled and across the yard we went fighting all the way. As you can see we chewed a path deeper then the blower by the end I dug through a 5' snow pile to get to the road. Unfortunately the battery died on the phone before I got that far. I will get some photos in the daylight of the path of destruction.
-
3 pointsgot some more time on #3 tonight. I'm waiting on a bunch of fasteners from the platers so most of the assembly has to wait until next week. some pieces can be put on with temp bolts etc. i had to pull the steering to get some small pieces plated so that had to come off again. got the rear hubs painted and put them and the wheels on. the tank sheetmetal/fender support looked a little tweaked so i mounted that up and had to bend and shape a little to get it to sit right on the transmission. the main piece always seems to be bent out of shape on the bottom where it bolts to the trans and the flat part of the trans isn't really dead flat. so you end up with a situation where the bolts are holding it down in the center, but the ends have a gap under them allowing sideways movement of the seat pan/fender when driver weight moves from side to side. the piece really needs a slight concave and when the bolts are tightened down it pulls it tight to the top of the transmission. eventually i got it sitting right and didn't even mess up the paint with c clamp 'persuasion'......... gotta love powder coat. finally its on four legs...... the dogs seem to like how its turning out.......
-
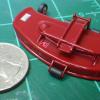
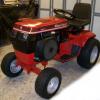
2 pointsHello! I joined this forum pretty recently and I'm probably not the typical forum visitor. I build scale models - usually 1/25 cars - and I've been working on an Electro 12 model. BTW, many of the model cars that I build are my favorite car and another South Bend native - Studebakers. I found this site while searching online for reference photos and manuals. It's a great place with a lot of excellent resources. Reminds me a lot of the Studebaker Drivers Club forum where the members have always been very supportive of my model building. Makes me want to have a real Wheel Horse (and a Studebaker). Anyway, this is where it all started: Probably not many people are more interested in the Wheel Horse than they are in the Indy Car but I'm building the tractor and may never build the car. The tractor in the kit appears to be Charger but after looking over this forum for a while I decided to convert it to the Charger's cousin - a 1969 Electro 12. I had already built the engine as it came in the box but I realized it wasn't correct for this tractor. This is what the first build-up looked like: So I stripped the paint off and did a conversion: The next order of business was building a mower deck since the kit didn't have one and what good is a Wheel Horse without it! I downloaded the manual for a 5-1422 (Thank you, Forum!) and started scratchbuilding. This has been a lot of fun! Here are a few shots from the build-up and the finished mower: The paint is Duplicolor Bright Red which is a GM color. I bought some IH Red at Tractor Supply but didn't really like the drying properties of the paint. The GM Red matches it very well and in fact I brushed on a little of the IH color as touch-up paint in a few spots and can't see the difference. Duplicolor is my preferred paint. It dries fast and hard. There's certainly more to come. I hope you enjoy. Most of the other major components are under construction right now and will be ready to post soon.
-
2 pointsAs we have had a few new members recently and as I have just been ordering parts I thought the following comparison might be useful to anyone new into restoring here. ($ converted to £) NOTES Ordering from the US there is no VAT to pay when goods in a package enter this country if the value of the goods within the package is under £15. The order listed above would need to be ordered and sent as the separate items shown to avoid VAT There is possibly a saving to be made on shipping if they were sent as one consignment but then there would be VAT to pay on import and carriers like the Post Office also levy a charge on top for collecting it. Delivery time from the US varies between 7 - 14 days and is generally about 10 days in my experience. Ordering from my local Toro dealer by phone and credit card took perhaps 10 minutes including the time taken for the guy to check prices for me and that they were in stock here in the UK with Hayter (which they were). Hayter hold and distribute Toro Wheel Horse spares in the UK but you cannot deal with them directly. The parcel arrived next morning by Fedex directly from Hayter but does need signing for. If a particular part is not in stock here in the UK it can take some time to arrive but my experience is that it is sent on as soon as it does arrive with no additional postage charge. I deliberately compared the overall costs of genuine OEM parts using an Outdoor Power dealer in the US but for individual OEM items there are times when private vendors in the US on ebay have specific parts to offer at some very good prices. It is important to do your research before you decide where to buy. Having the correct part numbers ready when contacting a Toro agent saves quite a bit of time. Unfortunately some of the part numbers given on the Toro lookup site have been superseded but they don't always update this. I use the 'Partstree' site in the US for this as their part numbers seem to be kept up to date. Unfortunately Partstree will not ship to the UK though. A lot has changed in the last three years since I started needing WH parts. Toro bought Hayter and used them to distribute parts here at more reasonable prices than they had been charging previously. There seems to be a better stock now in the UK and delivery is vary fast. I still buy stuff including new OEM parts from the US but less than I did. Finally worth mentioning that some OEM parts for older WHs are NLA on either side of the pond. Sometimes NOS stuff appears for sale in the US. Red Square is a good place for information about equivalent replacements when it comes to bearings etc though there are cases where no equivalent exists. Hope this is of some interest and help - I'm sure other UK members will chip in with other useful information Andy
-
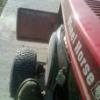
2 pointsUsed the Lawn Ranger and snowthrower for about the tenth time this Winter tonight! We had snow coming down about an inch an hour from 4 PM to 8:30 PM. I used the Lawn Ranger which worked better than I ever remember for an hour until I sheared off the pushpin/cotter key holding up the lift rod in the back of the snowthrower. I will probably find the washer that held it in place sometime this Spring or Summer! I used the 1963 Wheel Horse 633 and the BD-4262 snowplow for the last half hour! It worked great but after an hour and a half of fighting Old Man Winter I was ready to get warm again inside! This is the Lawn Ranger after the workout tonight! Photo of the lift rod hanging off to the right of the snowthrower. I will get a new washer and push pin on it in the am!
-
2 pointsOne morning a few years ago I was getting ready for work & was doing some personal hygiene ( cleaning ) of my ears. Well I was using a cheap-azz Dollar store Q-tip, when I may have gotten a little bit over zealous & broke the tip off in my ear Being a mechanic I figured with a pair of needle nose pliers would take care of this problem... wrong . Tried a pair of hemostats... double wrong Soooo, I ended up going to a Walk-In Clinic for some Professional help .... Well I was not only the laughing stock of the Nurses, but it was all the Doctor could do to keep a straight face as he remove the Q-tip . Then he proceeded to explain the danger of sticking a Q-tip that deep into the ear Lesson learned I guess the moral of the story... Be careful in the bathroom & Don't USE cheap -azz Q-tips
-
2 pointsI have removed broken Q tips, beads, a back of an earring, bugs etc out of ears
-
2 pointsHumm, just a thought... better be careful using any cheap azz toilet paper too.
-
2 pointsIf you use a tractor as a worker, then I agree that you couldn't have possibly overpaid compared to what's out there new. If you collect a tractor, then resale value means nothing, and you didn't overpay. If you do both with your tractor, then you're a double winner indeed!! If you bought high to sell low....then you're a loser!
-
2 pointsMan, that story needs a good sound track to go with it.
-
1 pointHello All, well as many of you know the (POS) 400 small block in my 1971 Nova SS decided to blow up after a fit of spirited gear throwing with the Muncie M21. I didn't build the motor and never liked it from the start.... After blowing it up I have had 99 different ideas of what I wanted to do to re-power my car. I always kept coming back to one nagging idea. Granted this idea won't be the easiest or cheapest but will be the "Coolest" at least in my mind and that's all that really counts. After looking at crate engines, used engines, rebuilding the 400, having LOTS of power versus having average power so I could let my kids drive it etc... I have picked up a 1968 Impala 250 Hp 327 Quadrajet motor. I have always loved 327's and there big brother the 427. Never had either..... but just didn't want to say "its got a 350...... siggggghhhhhhh" when people ask. I'm going to open it up a bit and see what it looks like inside---if its clean I will put in a timing chain, front cover seal, rear main seal, oil pump and whatever other gaskets I can. Motor has 96,000 and runs / sounds good. I just liked the idea that this motor is 100% complete and has all the brackets I need to run the non accessory bolt hole double hump heads, Plus I want to add after market AC at some point and the cool GM Frigidaire compressor and brackets are included. The guy I got the motor from pulled it out of the Impala to make room for a sick 572 cid 850 HP Big Block. Heres a pic of the engine.... yah maybe I'm crazy but its just plain cool. I expect to get all sorts of messages about "theres no replacement for displacement" and that's fine. This is enough motor for me at this point and if I want theres lots of room left to turn this into a Duntov 30/30 wannabe! Tony
-
1 pointWatched the 7pm news on WNEP Scranton PA. First one showed a GT-14 ( I think) with an FEL in Williamsport PA clearing snow. I was trying to make a note when they cut to another piece with a 520 (I think quick shot) and a blower clearing snow in Hometown, PA. OK who are the lucky TV stars???
-
1 pointWe got another 4" of snow last night. Went out this morning and blew the snow off my 1000' private lane I share with other neighbors. Got the lane cleared and started to clear individual drives when my 520h lost power to the rear cylinder. It still ran so I drove it to the shed, took the blower and chains off, and put them on another 520H I have. I pulled out of the shed and noticed the tire chain rubbing on the fender bracket so I backed up into the shed to try to slide wheel hub out a little. As I was backing up, the snowblower dropped to the ground. I looked under the tractor and found my lift lever snapped in two. So I took the blower and chains off this tractor and got out my 418A . Third times a charm. The 418A finished the job. I guess this is a good reason that there is no such thing as having too many Wheel Horses.
-
1 pointWell today I started out with the plow, but it got ugly real quick, so out comes the blower to keep the CUT in the barn! Actually I just wanted to play with the blower. http:// http:// http://
-
1 pointIt's hard to show any depth in these pic's due to the light, but it's a bit deep. My mutts are between 12 and 15" tall. The snow is about 4 1/2' in the background.
-
1 pointHes been selling them off one by one, i dont know if he has any up right now. I didn't have the cash either
-
1 pointThanks Guys...... I dunno why but it always seemed everybody talked about the 327 Vettes, 327 Novas (62--67), 327 Chris Craft Boats and on and on.... The Small Block Chevy was just perfection from day 1 in 1955 when the first one came to life (maybe it was 1954???). Yah the 350 is the most used, most versatile engine probably ever created. BUT.... they have become boring. Seems everything from your Craftsman lawn mower (lol) to trucks, planes, boats, hot rods used it and its just boring me to tears. Just saying I have a "327" is gonna put a smile on my face and heck the "283" is even a cool little motor. They didn't name it the "Mighty Mouse" for nothing. Tony
-
1 pointThat's what my mother told me. Never listened though. Ended up in an ER in Orlando, FL with wax pushed up against my ear drum. That was 10 years ago, and I have not had a Q-Tip anywhere near my ears since. Mom was right!
-
1 pointI have a niece that lives near you in Kingsley. I know the snows you get there from the lake effect. I remember in 86 we were up there and it snowed 3' in one night! I was 12 years old and it was up to my chest walking through it! I have just about ran out of room to use the V blade this year. I normally only use the blower tractor a few times, but this year that's all I can use in most spots. In the field across from me ranges from 12 - 24" deep and it is hard all the way to the ground. You can walk on top of it very easy. I plow a path for my daughter to get to the bus stop, but know I have to use the blower to get it over the banks as I cant bove them back any farther. In front of my place it is 4' deep and Gabby is having fun making tunnels in it. But I can't wait for spring! it will be a little soggy though.
-
1 pointThanks for the input. Switch is history. Bypassed and starts fine.
-
1 pointTHE ONLY THING YOU CAN POKE IN YOUR EAR IS YOUR ELBOW....
-
1 pointTrust me Dino... it's already in the mail.
-
1 pointSounds like you are trying to win back Craig's Hard Hat. What a tough winter...
-
1 pointWelcome to the forum,, looks like your eventually will have what you need . Nice looking from what I can tell. Good for you and good luck with your mower(s)
-
1 pointRegardless what you do, you should do nothing until you measure it out and make sure you are in specs and know what numbers you are working with.
-
1 pointWouldn't replacement or aftermarket be the same for both sides?
-
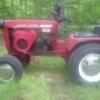
1 pointHey Guys! I am new to this site, but I absolutely love Wheel Horse! My Grandfather and Father both had them while I was growing up and besides being in love with them and keeping the tradition alive, at least one is a must. I have been searching for about a year and a half so I could get my own WH, but I have not been able to find one for a fair price that would appease my wife and the pocket book at the same time. Well, in my recent hunt, someone just GAVE me a running 312-8. That's right, gave! It does burn a little oil, it appears. Well, with the snow that was coming over the last few days, I knew I needed a plow. So, I found someone on craigslist that was selling a 312-8 with a plow, cleated tires and deck. He asked $300 so I got it for $150. I think th motor is shot, but I have been robbing parts and pieces to fix mine up cosmetically. Long story short, I have my plow installed, those tires on mine and have been plowing snow like a fool! Bought some chains and we are in business. Eventually, I would like to restore it top to bottom. it is a 1993 made in South Bend, IN.
-
1 pointGood story Mike! Happy to hear you did not break anything when you fell. Marvin looks good with the snowblower attached.
-
1 pointThat was some serious work!!! How long did it take you to get everything clear? Also, are there any differences between a KT17 series 2 engine speced for Wheel Horse vs. a KT17 series 2 speced for Cub Cadet? I am asking this question just in case one of those comes my way. I do reallyreally like those engines.
-
1 pointThis last one started dry but went down hill fast. It was cold enough but we had some warm air aloft that mixed in some sleet. Snow weighed a ton.
-
1 pointSure have, got 2 Ds that a payed more than I thought they were worth because 'I wanted them' on the flip side I have gotten several great deals to, so it all balances out in the end.
-
1 pointIn those pics Im out on the lawn clearing from the house to the shop and I have the shoes all the way down, so no gravel throwin. I did have it out on the drive and I did pick up some out there, it will throw the gravel pretty far.
-
1 pointNope. Did I say it was a bad day? No heat in shed ! Hoping it is just a spark plug on the 520H. Have not looked into it yet. Might wait till it's warmer out. Not much of a poster but plan on changing that. Plenty of nice people here!
-
1 pointDamn! That tractor was born before me and works harder than I ever care to... RJMcEachern
-
1 pointgehosky...open the pinned thread at the top of this Transmission Section...PDF #3 has a listing of all the seals and bearings for your transmission...if it is an 8 speed and not an automatic. You can dig out the seals with an awl, or by using a small sheet metal screw and then prying...they are only about 1/8" thick. Use a piece of plastic tubing that just fits over the axle to tap them back in.
-
1 pointIt is pretty amazing when I see these old tractors still performing.
-
1 pointThat's what I get for using the voice recognition on my phone when replying to these posts!!!!!!!! Maybe what I meant to say was - to be sympathetic to my tranny, I use synthetic oil...
-
1 pointThe tractor is starting to come together now. I had to build a few items that weren't in the kit like a taillight, lift valve, lift cylinder and neutral pedal. Oh, and a fuel filter, too. This is it on the tip of a toothpick. Detailing the battery always adds some extra visual interest. That's the kind of thing that helps make a model look real. I took a little liberty with the transaxle and painted it aluminum. I thought that would also give some visual interest - sort of an eye catcher - but I'm not really happy with it. Before everything is done it will end up being red! Now, this next part was fun to do. Wheel covers are an essential part of an Electro and I had an idea to make them out of a soft drink lid using a hollow punch. It worked like a charm! The horse decals didn't want to snug down on the shiny Alclad painted finish and a couple of them had to be redone but in the end they came out okay. After a little bit of paint, she was up on all fours and ready for some test fitting and even some assembly. I had already painted the fender unit but during test fit I realized that it needed a cutout for the hydraulic hoses. Now it's waiting to get repainted. The weather the last few days has been very rainy and I don't want to paint the "shiny bits" until the humidity goes down. That really affects the finish. In the meantime, it's starting to sprout wires and hoses and this is how it sits for the time being. Hope to make more progress soon but right now I need to check a weather forecast!
-
1 pointI don't EVER over pay for any tractors....EVER! My wife believes that my barn is chock full great deals!!!!
-
1 pointThe steering on my D-160 worked fine but was sloppy and it was interesting to keep it in a straight line at full speed, so I thought that rather than adjust it I would take the steering box apart and do a full refurbishment. The attached picture is what I found inside the steering box. As a rule of thumb, if your D has ever been left outside for a while and the top steering column bush is warn, yours will probably look the same. I found that the same or similar steering box was fitted to a number of JD’s and the ones I found were 140, 216 and 300. I have no idea what these tractors look like. If you really want to impress the JD parts person these are the part numbers you need: M45567 – Stud (the bit that turns the steering arm) AM31924 – Bearing kit which includes 2 races, 2 ball sets and 2 retainers (ball sets are essental for driving a D a full speed!) Optional bits are M45568 – Isolator (the large D shaped spacer) M43747 – washer (that fits under the race) A quick Google for any of these part numbers is likely to give you a JD parts diagram. Note. these diagrams may not look like your WH part but I think that is a problem with the diagrams not the reality. The job does not take very long, so no excuses for sloppy steering on your D To finish the job I fitted thrust bearings between the front axle and steering spindles to give me poor mans power steering. I would be really interesting in knowing the parts to fit for proper power steering. Iain
-
1 pointspent a relaxing afternoon putting together the 8 speed. i think these transmissions are my favorite mechanical item on these tractors to rebuild. simple and compact, i like doing them much more than any engine. this is my second unidrive, first was the 3 speed in the 1057. the 8 speed really isn't any more difficult, just a few extra pieces inside.... i used the manual and followed along step by step with assembly. when i stripped it down the manual was used as well...... before starting on putting it back together, all burrs from gears were removed, all shafts polished and everything was cleaned in diesel. heres some pics of the assembly and finally bolted to the frame. i guess i need to go spend some money on some tires now for the 12 x 8.5 rims, then the 416-8 will be on all fours for the first time...... axle bearing and seals going in. i ended up putting two 11050 seals back in, much the same as was previously except the oem seals were plastic and the 11050 seals are steel. the seals are approx 0.120 wide so i sunk the inner seal to approx 0.200 so that the lip of the outer seal wouldn't interfere with the inner seal body once the axle was inserted in it and pushed it open more. both seals in place...... input shaft was used to push in input seal. I've found sometimes these smaller seals are hard to get started properly, it helps to also file any lip off the leading edge of the steel part of the seal and also make sure the bore in which its going is burr free. the input shaft helps to get it started right and even and push the seal home flush. seals all in the right hand side of case (smaller half) ready to be flipped over and build the internal part of the trans.... trans all ready to be sealed up, gears and shafts all installed and all positions tested to make sure its going to be a successful rebuild. notice the stool is being used again, Steve..... left hand side on and ready to be bolted down. i couldn't find a torque setting for the case bolts in the manual, so i used the case bolt torque from the eaton 1100 manual, basically the same castings. that was 30-35 ft lbs.... transmission finally bolted up to frame....... all in all was a most enjoyable afternoon!!!!
-
1 pointI have parts blowers that have good augers I'm sure someone closer to you must also. I wouldn't even try to fix it blowers are cheap Theres a few on C list for $75 now
-
1 pointKilled a deere to save a horse. That's just...awesome!
-
1 pointWell with the lovely weather we are having here in Northern Indiana, school was closed. I heard that work was being done on the club barn and asked if I could come down to lend a hand. After taking care of some responsibilities around home I headed south to lend a hand. Here is where the building was as of yesterday afternoon. This building is 12x20 which will be perfect for the club. The steel roof is actually a chocolate brown and the trim is a tan. Here is a photo of the barn before the siding started to go on. Kind of cool to be building a barn inside of another barn! The guys started insulating yesterday and finished it up this morning. Once I arrived I helped put the last piece of plywood on the walls. You can see from this picture that the walls are done as well as the electric. The outlet receptacles need to be placed, breaker box hooked up and mounted as well as the ballast for the lights. The grand kids of the builder are going to paint the walls white and the floor will be painted grey. If you look at the ceiling you will notice that an I-beam has been placed which will support a hoist to help with those heavy jobs. After working for quite some time I was able to help put the metal siding and securing it to both sides. Here is what it looks like when I left. It is really taking shape and is simply amazing! Both ends need to be sided and the garage door needs to be placed along with the other things that I already mentioned. I need to get the heater down to them so that it can be mounted and ready. I am very grateful for this gift and pleased that I had the opportunity to lend a hand!
-
1 pointIt has been a very long time since I have updated this thread. I apologize for that. We are dead in the water right now due to the fact of not having a place to work. That will be changing soon I hope. As I have mentioned previously, our building is under way. I wish I had some good photos to share, but not yet. I do know that the walls are up and the trusses have been set. We are getting oh so close. The updates I have been receiving have been very exciting. I have learned that a hoist will be placed in the ceiling to help with removal of engines and for other various tasks. They are truly thinking of everything to make this a great place to work! Since time is going to be our enemy I made the executive decision to get this machine powder coated. After telling the story to our friend that powder coats our machines he agreed to give us a deal. On top of that he invited the club to come out and he will show them how to apply the powder and do it themselves! We will then push the rack in to the oven and in a short amount of time we will get to see the finished product. How cool is that?!?!?!? I am chomping at the bit to get cranking on this again! Hoping to update you all again soon!
-
1 pointFrom my experience, the edge of the blade will wear out before it can damage the driveway. The blade should be attached with a link to the tractor that allows for the blade to float up and down, so it should not be putting any more down force on the driveway than its own weight. You can check this by putting the blade all the way down, with the tractor off, grab the top edge of the blade in the center and lift. You should be able to lift the blade 6"+ if it has the link for float attached. There is a link that provides a solid connection between the tractor and the plow, and it is good if you need to generate down force to scrape or dig into the dirt a little. I have one, but don't use it very often. Keep an eye on the wear of the blade edge. Don't let it wear down so much that you are dragging the curved blade on the driveway. Most edges can be flipped over so you can wear down both edges before needing to replace it. Looks like you will get to make a test run later today. Rick
-
1 pointWith the temperature up close to 70 degrees, I took the time to make a new edge for my snow/dozer blade. I used a piece of 1/2" thick rubber cut from a 3' x 4' horse stall pad. It took a bit of effort and the one edge is not the cleanest. New 1 1/2" carriage bolts were used to attach it plus it wasn't expensive to do. I'm not sure if it will work and I wonder how long the edge will last. I am trying this as I have two neighbors with newly laid asphalt driveways that I plow that I don't want to damage with the metal edge. If nothing else, I can squeegee the driveways when it rains.
-
1 pointMore progress.......more issues...... Had a chance to tear it down a little more and take the degreaser/ cleaner. I knew the steering support was broken, but didn't realize the steering shaft also might have been damaged. What blows me away is they attempted to weld it together, but it wasn't welded together... Steering shaft had been welded in the past on both ends. This one was pretty bad... A few minutes with the welder on both parts and they are ready to go and fixed properly.... :up: Gonna shoot the primer and paint to it this afternoon and see how it turns out... One question I do have concerns the battery box...it appears someone cut on it in order to fix the steering...should this be a solid piece across here????
-
1 pointNext up was the big teardown of the tractor to the frame...... How it looked at lunch time... As of 3:30 Sunday afternoon...... Time for the pressure washer and sand blaster....


This leaderboard is set to New York/GMT-04:00