
Leaderboard


Popular Content
Showing content with the highest reputation on 01/18/2014 in all areas
-
5 pointsHowdo all, the time had come to give the GT a bit of love and attention and get done a few small jobs on her, I guess she didn't want any attention as she has been fighting me every step of the way! When I fitted the bigger engine in the GT I couldn't get the drive pulley off the original engine, so instead I fitted this slightly smaller one from a C-175.. A little while ago I bought a new pulley, not 100% correct size but I was sure I could sort that on the lathe.. The internal groove of the pulley is the same size as the original but the outer diameter would need 5mm trimming of it and the groove widened a bit. The trouble was although I could trim the 5mm off my lathe is too small to be able to widen the groove.. There was just no way I could get a cutting tool anywhere near it! As the pulley was only 5mm oversize I decided to fit it anyway.. Only one slight problem.. The belt guard which wouldn't go on because the pulley was too small, now wouldn't go on because the pulley was too big Oh well, I thought. I've run it without a belt guard for a while (not that I like doing it I should point out), so I can not have one until I can get the new pulley trimmed to size or get the original pulley off the old engine.. So my thoughts turned towards trying to get the snow plow to fit.. These thoughts didn't last long as the GT was needed for 6x6 rescuing duties. The engine which had previously ran not spot on but quite well decided it was going to be a pain to start and stall under any kind of load! So off came the carb for a good coat of looking at.. Other than a little bit of dirt in the float bowl it was nice and clean inside with no blocked holes. "Cough cough"! Yep it is running a bit rich.. and yes the carb needles were set to the correct "unwinds" before starting the engine! No matter how much I tweaked the carb settings it still sooted the plug up very fast! Out of interest I thought I would compare the main jet/needle thingy with the one from the original 14hp engine.. The top one is the 14hp. I can't decide the 16hp needle/jet thingy should be that shape or of someone in the past has snapped to very end off and reshaped it! Any thoughts on that Guy's? Out of even more interest I thought I'd try the 14hp needle in the 16hp engine... A big thank you to Stevasaurus for you help looking through your engine books while we were chatting on Skye the other day Now the GT has been known to back fire in a loud way, so time I was prepared Who would of thought it... Yep the GT is running in this photo.. No smoke and it revs cleanly. As it was raining Datsun cogs I didn't fancy going for a test drive and getting soaked, so I decided to make a quick "Red neck" belt guard made from an ironing board! Ok, it's not pretty but it will do the job for now.. And I also made a start on making a new shifter panel using some ally and a decal Mark gave me er... last year at some point.. To replace the rather shrunk and warped original panel. So yesterday was GT test drive day.. It started up just fine, no smoke... But once it warmed up it just struggled to rev with wanting to stall, and that was with no load of any sort on the engine!!!! Yep, the GT-14+2 is driving me nuts!
-
4 pointsJust a short uneventful video to prove that I'm still alive. Lots of over time at work plus on call this week. No heat calls and moving a surgical unit will wear you out. Did this before I finish the electric for the tankless heater. Maybe I'll have a chance to work on Marvin
-
3 pointsWhen you adjust the choke does the light dim??
-
2 pointsThank you Karl for giving the Euro section of other Brands , I will kick this off with my little collection of Trojan Toraktors Built in the early 60`s by Trojan motors . Thes tiny tractors are actually smaller than an Wheelhorse RJ 58 The have the Clinton 1290 engine. The story goes that Trojan bought a large amount of Clinton engine for a project that fell through & they were left with all these engines with nothing to do with them , so they came up with the idea of using the engines for a garden tractor & so the Trojan Toraktor was born .. They only ever made 500 of these tractors & theere were only 4 series of them ever made The MK 4 series was the most raest as they stop production of them during the making of the series 4 and so only a handful were ever built .
-
2 pointsThanks to Terry and Lola (Mr +Mrs Vinylguy) and Buddy, all RS Mods/Admin folks!
-
2 pointsYep plowing has always been fun. Makes you feel like a bull-dozer operator on a small scale! Mike.....
-
2 pointsYes I was. Steve says you need chatter on you vids.
-
2 pointsIan, Love the fishnet belt guard! "Honey, where is my ironing board?"
-
2 pointsRarely do you see them looking as nice as the one pictured above. I know of a few of them still hanging on buildings locally... but all are sun faded, and dry as a popcorn fart.
-
2 pointsI know this is an old thread, but I thought I'd chime in anyway..... I used to work for the Big Orange Box 10+ years ago... One thing about Ariens blowers was fact then, and may be still.... They manufactured 2 'lines' of machines... the "Pro" line (or whatever they called it) was not sold outside of independent dealers, unless you asked for it, and special ordered it, if you could even find someone in the store who knew about them, or how to order them.... I remember Ariens telling me first-hand that there were both quality and feature differences, such as a heavier auger drive gearing, and a true differential for the wheel drive... among other differences........ My point? Back then anyway, just because it was Ariens, and say 10HP, it was not necessarily the same machine as your neighbor's 10HP Ariens, and there might be a damn good reason someone spent a bucketload more $$ at a dealer for what SEEMED like the same machine. That being said.... I'm with Mike (Sparky) on this topic.... In 1974 my grandfather bought a new Montgomery Ward (by Gilson) 8HP blower..... Today it's mine.....I still run it hard every time it snows, and it runs circles around all the neighbors' machines!
-
2 pointsYep, I have to say it's good to see so many "Euro supporters", I think I can speak for all of us when I when I say how much we all appreciate how much goes on behind the scenes (Thanks Mods) and all the help/advice/great friends made we have made on RS. I think that the fact that becoming a supporter is optional has helped a great deal... Being "forced" to "pay up" is never a good move and will frighten people away as is happening elsewhere on the net!! The addition of the "Other Euro Brands" section is a great idea.. Thanks for "Making it so" Karl..... Captain Karl Picard ?
-
2 pointsYou'll find one. Next time you pass an old Wheel Horse dealer stop in and ask if they might have any old signs for sale, the worst they can say is no. I got this sign that way and only paid 20 bucks for it.
-
2 points220 400 600 grit emory and crocus cloth. Carb cleaner with spray nozzle. Air blast hose source. Kerosene as solvent / clean agent. PISTON & SLIPPERS: One by one, remove each piston from cyl block and progressively reface "wax on...wax off" the brass slipper until scars and scratches are GONE. A magnetic base stand-alone magnifying glass is a bonus to inspect finished surface. When done polishing one, spray carb cleaner to clear the tiny pin-hole in center of slipper. Set it back into the same cylinder and proceed to the next piston, full circle of the cyl block. Take care...be meticulous and don't rush. Also take care to NOT round the edges of the brass slippers (no radius on edges). As you work with each of 9 pistons, inspect the sidewalls of each. Some scuffing may be present but there should not be any chips or dents at all. The slipper retainer can't be twisted or any of the 9 holes slopped out. VALVE PLATE (swash palte). Using a circular motion, scuff the bass side it of first on 600 grit, just to show where the scratch and gouges are. With any luck, they will polish out using the 600 grit, but I've had some that took the 220 grit to start, the progress to crocus cloth. The base of the clyinder block spins on the brass side of this plate so it is IMPORTANT to make it perfectly smooth, or it will again gouge the valve plate. THRUST PLATE (sits atop the brass slippers). This is hardened steel and requires precision grinder to resurface. It likely has near micro-scopic scratches, which is enough for HOT oil to bypass. The 9 slippers spin on this so it must be perfectly flat for the same reason as the valve plate. GEROTOR assy: Both sides of it have to be smooth, and each of 2 parts the same thickness. This sits in a round cavity on the back of the Charge Pump housing and the cavity is only slightly deeper than the gerotor is thick. So, if you grind a tenth off of the gerotor assy parts, then you must also grind a tenth from the back of the Charge Pump housing to maintain tolerance. PUMP END CAP: Lay it flat on surface plate and slide back/forth on emory paper to remove all signs of former life. Remove (save) all the O-rings and backup rings, then resurface the top of it in the same. The gerotor MAY have gouged this and all signs of the scars have to be removed. That's about the extent of refinishing surfaces, now do it again with the HYDRO MOTOR. It has nearly identical parts and the surface refacing is about the same. Use the kerosene to flush parts clean as you are working with them and set components aside in a plastic bag to keep clean. These Sundstrand Hydro units a highly susecptable to dirt of any kind so it is of UTMOST IMPORTANCE to keep your work area clean, and to flush clean every part / assembly as it is reworked. When reassembling the pump and motor unit, have at-hand a little bottle of RED Engine Assembly Oil. Put a drop or two of this RED oil on mating surfaces just so they are not bone dry when the whole thing is given the initial test run. Also note the location of the pin in the Charge Pump Housing. It must be oriented down...toward the motor. It can be mounted 180 deg out of phase, then nothing will work. Enjoy Here are a few pics that MAY be of assist:
-
2 pointsanother place to get them cheaper http://crimpsupply.com/packard-delphi/packard-56
-
2 pointsSo you guys will miss me when I go back to work Monday?
-
2 pointsSing? Heck, I have 2 of his records!
-
1 pointIn another post there was conversation on buying American and how some try to do it when they can. I found this website and thought some others might appreciate it as well. I have no association with this site at all. http://www.americansworking.com/
-
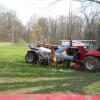
1 pointSaturday we got around 8-12" of snow here in western Indiana. The most my little Suburban has ever pushed in one day. Cleared the long circle drive twice plus the neighbors once. Here are a few pics of the little beast after the first run.
-
1 pointLooks like a good buy! Congratulations! You are in Ruckersville, are you Paul's friend Mike?
-
1 pointPrivate message. Click on the users name and then click on "send message".
-
1 pointDesko knows his sh#%! Use the Briggs model number and the TYPE number, (either one), and go to Repairclinic.com and see if that helps your cause!
-
1 pointGood vid Mike! The only way I get to plow any snow this winter is by watching your videos
-
1 pointDid a few things today. Also ordered a new amp meter and matching hour meter (my dash tower was nicely fitted with one before so I figured I'd keep it to help keep track of oil changes.) I'm kinda stuck until I get those in the mail.
-
1 pointI'd say go to repair clinic and type in you model number and code number off your motor and you should find every part for the motor. :)
-
1 pointIf you do not talk to yourself when plowing...you probably have cold feet.
-
1 pointI assume that the pump isn't locked up? I'd attack it with an EZ out. Remove the fender and maybe the wheel so you can get in there nice and straight with the drill. I usually drill the pilot hole with a left hand drill bit in the hope that the bolt will loosen itself as I drill it. Do your best to get the hole centered. Pray and swear a lot while you are doing it.
-
1 pointMike probably not a good example but here is the MK 4 next to my GT14 & my RJ58 Here is another pic that i found on the internet of a young boy on a mk3 Trojan
-
1 pointThis was in the auction at Newark Tractor show last year. Don't know what it went for.
-
1 pointUpdate, Finished the tear down and restoration of the L-l157. Put the new wheel horse belt on, but the tractor still grinding gears with belt cover off, input shaft still turning, INSTALLED BELT GUARD and all is well, input shaft stops when break/clutch depressed, gears shift with no grinding. I am truley amazed that the belt guard made that much difference, I tried to stop the belt from turning without the guard in place with no luck, the belt guard did the job. Thanks to all for your help and input.
-
1 pointThey are all wheel horses, GD mountfield were importers and distributors for 30 odd years. It is a C-81, but the importer badge will say mountfield.
-
1 pointAdd another to the NY roster.
-
1 pointGreat input guys. As a non-welder but someone who would like to lean, this is new to me. I had read this post when Neil first started it, and I happened to be touring a factory in Denver yesterday where they were welding, so the information was timely. I have a young neighbor who welds, I will be passing on what I have learned here to him. Thanks to all contributors
-
1 pointI can see it hanging in your living room right now!
-
1 pointAbout a year
-
1 pointThe BD-4267 is a short frame, but that would be 1967 with the "modern" angle lever. A BD-4262 would be a 1962 blade with the foot-release angle lock and the short angle lever with the round knob on top.
-
1 pointAfter being on order for a month it finally came in. Before After
-
1 point4th picture up from the bottom:
-
1 pointIgnition switch connector body: http://www.pcsconnectors.com/2973422.aspx The "3 in a row" 15AMP R/R connector body is Kohler p/n 236602 The connector body for the old 10AMP "L pattern" terminals is Kohler p/n 237429
-
1 pointToday is valve day. I took the block with the cam, tappets, and crankshaft installed, to the machine shop to have the valve stems ground. As you should know, the smaller K's do not have adjustable tappets, so if you grind or replace valves, the valve stems have to be ground to obtain the proper gap. Since I don't have a way to accurately grind my own valve stems, it's off to the machine shop. My shop has a policy that if you have machine work done to the engine, they will grind the valve gaps for you free of charge. I have done this on the last K161, and the K181 before. I was unpleasantly surprised today when I was presented with a bill for $47.50. Seems I didn't have any work done on this engine, so...I think I will start looking for a nice stem grinder. I brought the block home and began the process that I hate most in these engine, trying to install valves with my FAT fingers. I have yet to find a simple way to install the valve keepers without having them fall off at least 10 times before I have success. Anyway, just a note for the novice engine rebuilders here, read the manual...thoroughly. I made this mistake on my first rebuild, so I thought it important to point out one of things that might get overlooked. Valve springs have an up side and a down side. The exhaust valve and spring was installed with a few swear words intertwined with the sound of little valve keepers falling to the bench below. Finally I remembered that the last time I put a dab of oil on the inside of the keeper to hold it to the stem while I was trying to install the next one. So after completing the exhaust, it on to the intake. Just as much trouble with that one, but I got 'er done. Checked my gaps. .006 on the intake, and .017 on the exhaust. Ready now to start putting things back together and see if it runs again. That's a job for later. Now it time for a cup of coffee.
-
1 pointWell, I guess I know what I am doing this weekend! Good thing for heat in the garage! Thanks for the advice Dave. I am going to pick up the things I need for resurfacing and see how it goes.
-
1 pointIt's a major award. It should go right in the front window.
-
1 pointOn sencond look, I can EASILY see the swirls and scarrs in the swash plate you've shown. These MUST be polished out COMPLETELY. If you have one scar that runs full around the swash plate, HOT High-Pressure oil will escape and power won't be maintained. Don't forget, yuou need to open up the hyd MOTOR too, and prepare yourself for the same news. The thrust plates are hi-grade steel and have to be precision ground. Brass surfaces can be 'wax -on....wax-off" using 400 600 and finally crocus cloth.....part by part, on a surface plate, using oil as a medium.
-
1 pointSteve you are too modest you're a Natural. If you were on the Weather Channel, Direct TV would have no problem forking over the Benjamins to keep it on the dish!
-
1 pointHow about a K-91 powered blender for the big show.
-
1 pointWell that's one the wife won't pick up and throw at ya...
-
1 pointI use Aquaphor, it is a vasaline type product, different additive package, with gloves at night to protect everything from grease stains. I still like Bag Balm when working outside in the cold especially when fuel and or fuel systems are involved. It takes the sting and tingly feeling caused by the evaporating fuel away, also helps keep the cold wind off my hands when gloves are not an option.
-
1 pointi've had this more than once, due to the wrong glass in the welding mask my dad and mother tought me a remedy though, wholesome coffee milk, a few drops in both eyes and you're in less pain, because it's fat is stops the eye from drying out and causing the gritty feeling Koen
-
1 pointIf you don't feel like buying tires don't slime it. If you ever do break it down you will be buying wheels and tires. Just imagine someone blowing their nose to fill your tire.And then the rim rust. Not pretty to get clean.
-
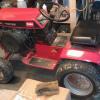
1 pointHeres a shot of mine. GT14 with 16 hp. It has the independent three point so that means I can operate the loader, use the mid lift grader blade along with a rear back blade.
-
1 pointMy grandfather had an old Ariens. I think around a 62 or so. When I I was in college in 77 I came home to see a new Toro in the garage. didn't think too much of it. A few weeks later, another new Toro show up. So now I ask him,what's going on. He starts ranting how the Toro's are junk and aren't half the machine the Old Ariens was. So I ask him why did he get rid of it and buy the Toro? He tells me he stripped the spark plug hole. So I tell him he could have fixed it for $5.00! Now he was really mad!


This leaderboard is set to New York/GMT-04:00