
Leaderboard


Popular Content
Showing content with the highest reputation on 01/11/2014 in all areas
-
4 pointsEveryone is aware of the bad rap Techys fuel delivery systems have... so, just wanted to give everybody a heads up to the brand new, $27 (gotta be)off shore manufactured carbs now being offered on Ebay. I took a chance, popped for one and I gotta say how great my little HH-60 is running now. These carbs are well made, and fully adjustable too, but no need, that thing purred like a kitten straight out of the box. Plus, they got them priced so cheap now...it's not even worth messing around rebuilding, then tuning one anymore. Seems there may be no excuse for a poorly running Techy with carb issues anymore.
-
4 pointsThanks, I mic all our crankshafts, most camshafts, and test any and everything that can be tested. I do sell a bad part occasionally, but not very many any more. I got pretty good at seeing a bad part. I can listen to an engine and tell you what is wrong with it (in person - doesn't work well over the phone or internet) and can look at a tractor and tell you pretty quick what parts are bad before even taking them off. I love what I do, I love tractors, and I love the customers (most of them - some not so much).
-
3 pointsI've started the rebuild of my RJ58 and the CBR32 sickle bar that fits it. I've been collecting parts for it for a few years so I thought I'd get started on it. I didn't take many pics of the tear down, mostly just close ups for reference. I've got the engine tore down and cleaned up, ready to go to the machine shop. This one will get bored .010 and the crank will be turned .010. I got the parts for the engine today so I'll be able to take it to the shop this week. While it's at the machine shop I'm going to have them bore and tap the exhaust port to 3/4" N.P.T. Any opinions on which rim is correct for the RJ would be appreciated I picked up new blades for the sickle at the show in Le Sueur last year, I finally got those changed. Now I need to get it and a bunch of small parts sent to be plated.
-
3 pointsI just use one of these:
-
3 pointsOnan engines are as good as any other air cooled engine when they were developed and initially manufactured. Like any other engine they have their particularities, in different applications some engines work better than others, Onan's mounted in WH long ways seems to create a cooling problem with the rear cylinder due to grass buildup on the fan screen as well as in the tins, in a D series or something painted another color with the engine turned cross ways grass build up and cooling don't seem to be as much of a problem so you have to ask yourself is it the engine design, the tractor design or a maintenance issue or a combination of things? the opposed twins run smooth and quiet for a long time in a fixed rpm application particularly in power generation, that being said if you run your Onan at WOT 3600 rpm and let the governor control the throttle the engine and hydro trans will last a long time with proper maintenance. Also remember that the good running engines get very little recognition , they just keep on running.
-
2 pointsFor those who have been here a while already know the benefits of being a RedSquare supporter. We have a high rate of supporters, continuing to support the forum financially when their current membership expires. We encourage our members to please support the forum you enjoy. Terry at ReDoYourHorse.com continues to not only support RedSquare and our members with outstanding graphics, decals and insight in his posts, but did you know that he also extends discounts to RedSquare supporting members? There's more too! Beginning 2014, Terry has begun to offer supporter only raffles, where he's GIVING away items from his store to some lucky supporting members. This month he'll be giving away a hat to a lucky supporting member. Want in on some of this, become a supporter NOW (don't forget to add the supporter magnet to your order! (click here) When you think about all the benefits to supporting RedSquare, does it make any sense not to support?
-
2 pointsHowdo all, yep that time has come for another blog entry, something that's a bit of fun.. Green Screening. For those of you that are wondering what Green Screening (also known as Chroma keying) is, it's a simple technique for making you appear somewhere your not on video. Anyone who has seen a weather forecast or a new's show on TV will have seen green screening in action... Or not as you can't see the green screen once the editing has been done.. Anyway, here's what a green screen looks like.. Or part of it as it is rather big being 3m x 1.6m. Ideally your screen should hang nice and flat with no creases showing... My screen was quickly hung in a way too small room just so I could have a quick play.. I've not told my wife yet that I want to turn the spare bedroom into a recording studio yet So having filmed your bit of footage, you now need to do some editing.. I use Sony Vegas Pro 11 for all my video edit (more about Vegas in a later blog entry), as you can do so much in it. If we zoom in a bit you can see me and the bit of backing footage I'm going to use in the time lines. You need to make sure your backing footage is below the green screen footage or this won't work. Now to add the "effect" which will make the green screen vanish. In Sony Vegas I click on the "Video FX" tab which brings up a whole host of video effects options.. Chroma Keyer is the one we want. As you can see you do get a choice of different types of Chroma Keying, you can do it using a red or blue screen, but green works the best which is where "green screening" got it's name I guess. The last 3 GS options are my own custom pre-sets. For this demo I dragged and dropped the "GS option" onto my GS bit of footage in the timeline. Which gives you this. The GS has vanished and been replaced by your bit of backing footage.. It's not looking that good however, the backing is a bit dark and you can see the folds in my GS (which is why you need them as smooth as possible). When you drag the GS option from the Video FX tab onto your GS footage this window also appears so you can tweak the GS effect. You need to tweak the Low threshold and High threshold a bit, I also add a very small amount of blur.. Until you end up with something like this. A close up.. So there you go, my short guide to Green Screening.. If your wondering why this blog entry is called "A stupid guide to Green Screening", this short video will give you an idea of what's possible.. The only limit is your imagination
-
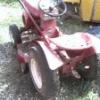
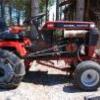
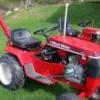
2 pointscheck this bad boy out... in the driveway with it... the inside gears and chain still have factory red paint on them... even the plastic cover looks good...(sorry for crappy pic) tag your it! So what's your thoughts on this purchase? I feel as though I literally stole it... RJMcEachern
-
2 pointsTurn the video camera back on and it should run fine!
-
2 pointsSquonk Start it up and as soon as it starts to die have someone spray carb cleaner in the air intake of the carb, if it picks back up it is a fuel problem, if it does not pick back up the problem is not any thing to do with fuel. I use this trick all the time.
-
2 pointsKelly has a more-recent post on here somewhere with better pictures of the blocks but I can't find it. (I think I remember a cut finger.... ) I did find this one from a while ago: The earless blocks were used on the iso-mount Wheel Horses.
-
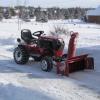
2 pointsHere's a short vid of snowplowing
-
2 pointsThe 1055 uses the small flywheel and the matching small bearing plate, you will have to swap both, and the shallow pan on the 1055 will fit the small base blocks but you will have to cut the dipper on the bottom of the connecting rod to the correct size. Back to the flywheel and bearing plate, they are smaller on the 1055 engine because the bearing plate and blower tin tin sit over the frame on that tractor, and with the shallow pan they would hit if not smaller, and on a side note you will have to swap the clutch cross shaft, trans pulley and belt guard from the 1055 to make it all work, also the tab from the frame to the belt guard will need a little work to fit correctly.
-
2 pointsWait.... what's this? Theres now MORE being given away? What could it be? What's in the box? 2 that's right TWO lucky supporters will find out soon!
-
2 pointsI'm thinkin', those hermetically sealed lids on military ammo boxes would make the perfect candidate for add on tool boxes. I just need to come up with a mount that won't require drilling holes into my sheet metal...then paint to match.
-
2 pointsOmen...I like that... five two zero...the new number of the beast.
-
2 pointsOK. Is that a piece of caramel being used as a shifter knob?
-
1 pointI bought the 94 520H that was listed on Red Square classified. Very happy with it. 350 hours. 48" SD deck. Should get years of use out of it. I have 93 520H with 980 hours. It is in fair to good condition. I can't decide if I should keep it for parts or sell it. It seems I've heard more bad than good things about Onan 20hp motors. I think the 93 520H tractor would be worth about $750-$850 with the 42" RD deck and mule drive. Feel free to post good stories and bad nightmares about Omen motors.....I mean Onan. I am curious.
-
1 pointI "drew" a picture:
-
1 pointrofl... no was in an ad but I got what I feel is such a good deal compared to other prices on CL that are over 150+ miles from me and this was 25 mins away... RJMcEachern
-
1 pointGee wiz Lars... cool video bro... sounds like you were burning rubber leaving the garage.
-
1 pointI've been thinkin about that line. That's one reason I want to see how much fuel that new pump is pumping. Haven't had the time lately to work on it. Putting in a new tankless water heater in and it's one of those square pegs into a round hole kind of projects. 200 yr old houses are great!
-
1 pointThe manual has step by step instructions for getting the trans off the tractor...as well as how to open up the trans case and rebuilding the trans. Have the shallow side of the trans on the bottom and remove the brake shaft side. You can then pull out the differential, unbolt the housing, open it up, find the old snap ring and pieces, put on new snap ring (the snap ring has a sharp side and a rounded side)...I believe the sharp side goes toward the inside of the differential. Bolt back up the differential housing, place back in the case (with the nuts of the housing bolts up), replace case half and bolt together. Boomshakalaka... If the trans needs cleaning out and new seals...now is the time. Here are some good threads with pictures of tearing into an 8 speed... Here is a thread with some videos...though not your trans...they are just about the same inside. This one does not have the hi/low gearing...
-
1 pointThis post is about K181 bushings but Martin provided some information on the big block bushings
-
1 pointIt's the 300 series, not the C series. Single cylinder / horizontal shaft engine, angle iron frame, Uni-Drive transaxle...... the same old (classic) design that was used in the beginning. Just a fancy way of saying "old school" ~ simple and reliable.
-
1 pointso far, I have used the threaded rod method on the plastic weights. I secure the rod by sandwiching it tight to the rim using a nut/washer on both sides of the rim. I then can hoist up the weight onto the rod and then secure it with a third nut/washer. having the rod secured allows it to be like a "lug nut" .
-
1 pointAlways thought Wheel Horse should have never given up the tool box. On are big farm tractors I would be lost without them. It's almost UnAmerican to be without a tool box on a tractor. I have often thought about bolting one on somewhere. We have got a lot of talented fabricator members on here maybe they will come up with some great Idea.
-
1 pointI made a lot of those first mistakes which is why my brother does the motors now!
-
1 pointI also live in Chesterfield. Please let me know if there is anything I can do to help with your purchase. I can go take a closer look at it for you and take more pictures, if you would like.
-
1 pointI tend not to bother with buying 'purpose specific' products. One product does a multitude of jobs for me. I use either Metal polish like Brasso, in fluid or Wadding form. Or 'T Cut' , a rubbing compound for Auto paintwork. It all does the same job and I've had great results after cleaning up the Steering wheels and Light Lenses after flatting with P600/1200 grade Carbon Paper. Bit it's your choice. With the Leather/wrinkle effect in the spokes, it is best to just scrub with Washing up liquid and warm water and a Nail or old Toothbrush to get any residue out.
-
1 pointman Steve,,,,,for an 8. Very very impressive indeed. Shows what good engineering and design can do. Thanks Glenn
-
1 pointI'm a bit surprised that there are so many NOS in PA. I picked up a 1994 314H 2-3 years ago from my local WH dealer. A gentleman had bought it new years ago. He passed away and the family sold it back to the dealer. It had 176 hours, was waxed regularly, and hardly used. I'm sure that there are many WHs in similar condition out there. Happy hunting! Almost forgot. There's a sweet 518xi on EBay w bagger and blower. As an Xi owner I can't say enough about them. More power, tighter turning, Faster mowing. You'd be very happy!
-
1 pointMIKE I AM ALMOST 85 AND STILL RIDE. I HAVE HAD OVER 8 SCOOTERS AND 50 MOTORCYCLES.I CAN NOT GIVE THEM UP
-
1 pointTHERE WERE TWO IN NORTHERN,OHIO THAT WERE ON EBAY. THEY WERE A TORO DEALER AND NOW A EQUIPMENT REPAIR SHOP ALSO . SORRY, I CAN'T REMEMBER THE NAME OF THE BUSINESS.
-
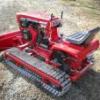
1 pointwet snow action
-
1 point59 is a Rj and straight axel.. 60 is a suburban 400 or 550 and cast front axel.. i think it was deck for suburbans that had 4 wheels on them.. did the 59 have the arched/notched lift?. Nope.. suburbans did..
-
1 pointNice "Man Purse"! One good thing about the 953 is the large built in tool box.
-
1 pointThanks Craig Nice pic. I love the duals on it too, but for a cap I think it would be best to stay with a stock round hood image.
-
1 pointYea, after the chocolate was licked off it.... :laughing-rofl: Chasm
-
1 pointI know of a 60th Anniversary 315-8 near Pittsburgh, but it has 62 hours. It comes with a 42" RD deck and the seller is asking $5000 I'll PM the info to you.
-
1 pointThe Sears tractors are what got me started. I remember n my dad buying a Suburban 12 brand new and I loved it. I was sad, like my dog dies when our garage burned down with it in there. My favorite tractors now are Sears Suburban, Wheel Horse D-250, and anything hard to find. I have a 1959 David Bradley, a Wheel Horse D-250 and a Minneapolis Moline that are my personal collector tractors.
-
1 pointJoe offers a valuable service particularly for those of us on the other side of the pond. You have to be on this side to discover just how many US companies refuse to ship outside the US whether they are selling new or used parts, the same is often true for ebay vendors. Since getting into this WH thing I have been given all sorts of excuses by said companies, none of which have made any sense given the simple paperwork that's involved. No different in fact to when we ship goods the other way. When I was restoring a D over here it was Joe to the rescue with the implement lift valve assembly I needed as there just aren't Ds available as donor tractors here. Take the point about feelings over what gets parted out but hey, each one 'broken up for spares' as we would call it means a life for several other examples. Thanks to the services of RS members who offered to help I have managed to get items from US suppliers shipped here but one company who I won't name deserve a Golden PIA award for advertising that they do ship worldwide but they then refused to accept my VISA card as it wasn't registered to a US address. Andy
-
1 pointWhile talkin' bolts on rear wheel weights, might mention lug nuts vs. lug bolts. I like to change over to lug nuts. 1/2" - 20 x 1-1/2" bolts and blue thread locker from inside the rear hubs. Then 1/2"-20 open ended acorn lug nuts. Makes it easy to change rear tires.
-
1 pointit amazes me that the little wheel horse tractors from 50 years ago can do more work than the pieces of junk we have now
-
1 pointIt took me 35 years to build this shop and fill it with tools. This picture of my Bridgeport was taken the other year while I was waiting for a new speed dial to arrive (the original's printing washed off during cleaning) and I was still getting the wiring sorted out, so the cover is off the breaker box. I was also in the process of rebuilding the "Y" axis power feed. Both machines also have a DRO installed now. I have a gas welder and a stick welder too, but I'm out of practice and need to "play around" some as though my welds "stick," they're a little ugly. Thanks for the kind words.
-
1 pointI like my rubber tire chains a lot. especially since I got them off CL for $15!!
-
1 pointHydro I am right with ya. I wish I would have sold my 2 stage earlier also, Now that I have and have the single it's just a way better fit for me.
-
1 pointThanks Shorts and Mike. That's something I'm not familiar with but glad you drew it to my attention. I will check that out on Monday. We have a national company here called Canadian Bearing. I did check there for some of the other parts but Toro oddly enough was no more money. I'm sure the shaft will be a lot cheaper though. It might even be cheaper to have one done at a machine shop. There are only two key ways so it's just a matter of length I guess. A full length keyway is no great deal is it? I called my Toro dealer and the shaft was $179.00 plus we have 13% tax here and the pulley is another $57.00. These things are not cheap to rebuild but on the other hand there isn't much left that can go wrong. They never break until you need them. Can't push much more.
-
1 pointLots of hammering and pounding on this one... the entire build is on YouTube (link in signature)... the ultimate goal was to clone the RJ tractor on the cover of Straight From a Horse's Mouth Second Edition and the original 1955 RJ advertisement. The sad thing about the project... my computer took a dump about a month ago and I lost every pic and vid of this project... at least most of the vids are on YouTube and the project its done, LOL!
-
1 pointThanks again for the compliments, I appreciate that. I did finish the deck and it seems to have a nice cut to it, I need to tighten up the motion control lever a bit so it holds it's speed better. That C160 can sure pull a wheelie , but that's enough of that, I don't want to break it now. I finally started on the tin work on this project. I liked vtspeed's idea about relocating the air cleaner and by doing so I now only need about 2" more height. So I made extensions for the hood and the console. The belt guard was real close so I just needed to make a spacer. There is a small crack in the radius so it will get welded up and I'll probably add a doubler or gusset there. I wanted levers to actuate the brakes so I added a 3/4" shaft and welded some collars on the inside for support. Some 5/8" rod, some collars and a piece of 1/4" to attach the clevis end to ( speaking of clevises, no one around here understood what that is even after I drew one, it's like I was speaking a foreign language. So I had to make some for the mock up, If they look ok after paint, I'll probably leave them.) I do have to trim/modify the fender pan some to clear the brake linkage but I get to have levers now .


This leaderboard is set to New York/GMT-04:00