
Leaderboard


Popular Content
Showing content with the highest reputation on 02/03/2013 in all areas
-
5 pointsSo... What's been happening on the project since the fun and games in the mud and snow?? Well, not much really.. I made a start on the fenders by making lot's of small bit's of angle into two bigger lengths. These were the "quick tracks" that Garry and I made in a rush just before the Ardingly last year. These will go here.. And here.. They will give the inside of the fenders something to bolt onto. Pete then turned up, so after the normal couple of coffee's Pete ground down a few welds. I had a bit of grinding fun as well.. Then it was time to try and work out "a look" for the stretched fenders.. I didn't like the look at this point... What's going on ere then? Thought I'd better check I could still climb on and sit down with the fender on.. Yep I can.. Who say's I drink too much coffee???? A view from the front. We had a good think about what to do with the fender during lunch.. The fender also makes a handy table After lot's of this and this we had the look sorted.. A gentle curve at each end and a gentle slope down from the back to the front.. That looks a lot better.. The next day I started measuring up for the extra steel needed to stretch the fenders, when this chap turned up!! It's been a while since Garry last dropped in, it was good to catch up dude. Despite Garry being involved with this project from it's very start, he had never actually had a drive of the beast!! I'm sure you can guess what's coming next
-
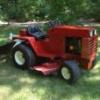
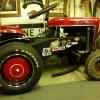
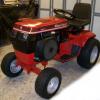
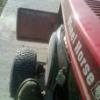
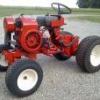
4 pointsAs some may remember I bought a1966 Lawn Ranger last year and he threw in a complete but otherwise abandoned 67 ranger parts.From all accord it was found under a tree on the property and been there for decades.I loved the 66 so much I got smitten on the 67.I really want a suburban or similar so I decided to create one.I began by changing hearts,from h60 to K181.The motor ran after tinkering and was put on a recycled ariens snowblower btw.I cut and welded the tins,added a tool box and fenders from an rj,put 6x12 rear tires on.I then had a couple 36" common decks givin to me and with all the smalls I had laying around and the wealth of knowledge learned here I continued.I fit a mid mount tach a matic.I added a front mule drive(early raider/charger upgrade)and custom made a pulley/pto assembly as the drive pulley/pto/clutch retainer sleeve doesnt exsist.I had the narrow stock front axle w/ 8" skinnys but they wouldnt clear the deck or mule drive so I had to swap for a wider electro front with 6" tires,tie rods and spindles to boot.I also incuded a pic of the relocated battery location and the best use of the other half of a tool tray!Only thing left to do is recondition the deck and wait for the grass to grow,then bring it to the big show and tell lies about how high the grass was that it mowed!
-
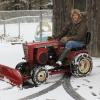
3 pointsLittle Snow can't hold us back!!!! Midnight Rambler was in town and boy what a good time! Got to see some old friends and make some new ones!!!
-
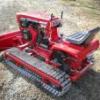
2 pointsA great friend of mine that only lives a couple miles away from dad's barn decided to strike up a deal with me this past week. I have had my eye on this machine since the day he picked it up, tore it down, refurbished it, etc.... He decided it was time to let go of a tractor or two and asked if I was still interested. Needless to say, I was stunned! We struck up a deal and I was able to pick it up yesterday afternoon after the chilly get together we had in Plymouth, IN. Had to help dad today move some things around in the barn and unload the enclosed trailer. Took the battery out of this little guy and rolled it out for a quick photo before it was tucked in for a long winters nap. My bucket list of tractors is getting pretty small and I am very thankful that this one is now part of the herd.
-
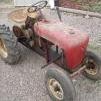
2 pointsI have purchased my first Wheel horse tractor ,after years of wanting one finally made a purchase.With Wheel horse tractors you learn there is probably the most loyal following of any brand,and deals are hard to come by ,unless you are lucky or(in the right place at the right time)wanting an early model doesn`t make things any easier.Over the last two weeks I have learned more about the RJ (through Redsquare) than I thought there was to know.Everyone here already knows these things,so onto my purchase.The tractor a 1955 RJ35 model came from a member here.I`ts mostly complete,but needs some work to be operable.Making it run is the fun part. Chuck
-
2 pointsHey guys, Just found these pictures today! these pictures were taken in november of 09 when I got my first wheel horse. This was my 401 before I restored it. Jake A couple pics of the tractor I never knew I had. The day I got it and had to use the blade for something! I spent many hrs in the garden pushing dirt and its something I'll always remember!!!! ( check out the smile of addiction! ) Wheel rusted off from all the hard work!
-
2 pointsQuestion...If those chain were on an Allis Chalmers garden tractor...would it be "Allis in Chains"??? Those are really neat...like the diamond pattern Lars.
-
2 pointsThat is a real nice start in this horse hobby. You did well. Don't put your tongue on that steering wheel in this cold weather. Welcome to Red Square.
-
2 pointsLet me know which lake you push them into. I'm a scuba diver and an electrician. Will be glad to salvage them!!!
-
2 pointsSo, the VP of the company I work for see's this little table I made and she falls in love with it. It winds up in the Presidents conference room and the President asks me to make another one. I mentioned I'd like to do something different. No problem. Apparently things like this are popular with designer's. Who knew? I did use some I.H. resto red on the rims of the second one. The company I work for is owned by the Knoll Furniture company, they have been around for a very long time. Maybe I'm onto something? Since these pics I lowered the gray table 2 inches. It was too high if it was going to be used as a coffee type table. Myself, I like my second table better, sooner or later it is going to come home to my house. I've begun making plans for a third one, I want to add glass to this one.
-
2 pointsPut a hitch on it and some "picnic table" seats and tow us around at the show in June ! :)
-
1 pointI can't believe what a difference loaded tires make for traction. Not only the weight but the momentum of the liquid rolling along give the tractor an "extra push" I all ready loaded the tires in my C 160. My Power King came with loaded rears but had CC in them and the wheels started rotting. I bought a pair of Farmall Cub tires and wheels but they where not loaded. Here's how I did it. I know it's not a but a tire is a tire and a tractor is a tractor. First the fluid of choice RV antifreeze. Got it on sale at Lowes for $2.98 gal. I know washer fluid is cheaper but I wanted non toxic for my pets and this stuff comes with corrosion inhibitor. First problem. I can't get the valve core out due to the 100 lb. weight that I DO NOT WANT to take off. The core tool will not go in straight. Problem solved. modify core tool Next problem. Fill adapter I got at Napa for $14.00 won't fit again because of the weight. Problem solved. Went back to Napa and got a RV dual wheel tire stem extension hose. $23 but still better than removing weights. Borrowed a small elec pump from work. hooks up with garden hoses or in this case washing machine hose. When filling I pump in a couple of gallons then bleed out some air. Shutting off the pump allows the air back into the bucket and out. There is also a bleeder valve on the fill adapter I used the floor jack to let the tractor down to force out the air faster. Used 22 gallons. :thumbs:
-
1 pointA little time saver to confirm an Onan ignition module is functional prior to installing it, reassembling the engine and keeping your fingers crossed. The diagram below shows how to wire up a standard tail lamp assembly and a few alligator clips to complete the testing. All the wiring and testing can be accomplished on the bench. One Caution - DO NOT TOUCH THE BLACK MODULE LEAD TO 12 VOLT POWER AT ANY TIME. IF NO LOAD (lamp or ign coil) IS PRESENT IN THIS LEAD THE MODULE WILL BE DESTROYED. The modules I have tested so far power have all powered up with the tail light on. When the trigger ring is rotated near the "nose" of the module, one of the two magnets embedded in the trigger ring will turn off the lamp and continued rotation of the ring will pass the second magnet over the "nose" and once again turn on the lamp. An ignition coil puts about a 3 - 4 amp load on the ignition module. A standard automotive tail light will also put the module under approximately the same load and provide a good simulation of the ignition coil load. This post has been promoted to an article
-
1 pointwell i had only one sett of chains so i had to get me another sett of chains.. and i found those chains here. was not the cheapest but i just had to have them, those are working really good whit agg tires.. got them in the po to day so i had to put em on and ill also put on some weight i had in my shop they are about 55 lbs each. Well here are some pict of them.. Those chains there are going to give a smooth ride.. cant wait to test em out.. just have to wait on the snow on sunday and monday Lars
-
1 pointJust wanted to say hi to everyone at Red Square and introduce myself.My name is Chuck ,from Ohio and have been collecting for about 15 years.I collect garden tractors two and four wheel versions,and have wanted an Wheel Horse for a while.A early 1955 RJ came up and I purchased it.The Red Square forums have been very helpful in researching the RJ`s many features and changes over the years.This site I am sure has the most knowlagable members on wheel horse anywhere,and have enjoyed the hours reading the forums for answers to my many questions.Look foreward to talking with many of you as I get this RJ back to running condition Thanks Chuck
-
1 pointI kind of like that hood weight! If you did use it as the nose, try to find a really clean way to attach it so it looks like the hood and not 2 pieces. Maybe add a flange on the top sheetmetal piece that can use machine screws on the underside to screw into the weight. No bolts showing and just a small seam like the factory had from welding the 2 pieces of sheetmetal together for the original RJ hood. Use what you have until you find a savable original RJ hood.
-
1 pointLooks great!
-
1 pointThe original nose weights for the RJ were smooth and fit in to the front of the hood. You were to drill two holes in your hood (the sides) and drill and tap the nose weight for those screwes. This is a RJ nose weight:
-
1 pointThose look niiiiice!
-
1 pointVery nice! Looks like a clevis hitch on the back of that tractor too! Good luck, Bill
-
1 pointCraig, after looking at that last x-ray it occurs to me that you could make a small fortune kicking field goals and/or punting that football...maybe for the Jets. Then you could buy a new truck every year and not worry about the mileage. I want to watch Don digging out that wart...how sick is that??? :bow-blue:
-
1 pointSome of my best tractors are conglomerations of pieces from the parts pile. Another perfect example of the interchangeability of decades of Wheel Horse parts. :handgestures-thumbup:
-
1 pointI see the area under the seat is sized appropriately Happy mowing :auto-layrubber:
-
1 pointI got some more good news!!! :) I did some checking around today and FedEx is now my primary shipper. I have a location near my parents house witch is a little farther to drive, but it will save you guys some $$$ It's just a little more then the old USPS prices and faster shipping!!
-
1 pointWe haven't had enough cold weather to completely kill the grass. It is keeping it short, last year I had to mow at least once even in January and February.
-
1 pointNow that is one excellent job! Time for spring shows! Great!
-
1 pointSeems kinda weird to see green on the ground!
-
1 pointLove it! :thumbs:
-
1 pointNice job. :handgestures-thumbupright:
-
1 pointwell i had a good time at WHEEL-N-IT's place yesterday. the tractor went together very easy. van will still have to do some more minor troubleshooting, but still two parts tractors came together to make one nice unit. likewise two tractor people came together to put it together! thanks for lunch & the sub at dinner Van. lets see the after pics, heres some before pics to jog everyones memory. Vans parts tractor has nice front tires that just need cleaned & tubed,cables that will go again & he has a spare 37in sd deck & mule drive & correct 6 sided belt to go on it! Jay
-
1 pointI think he was wearing shorts under his coveralls.
-
1 pointThis is really neat...I like how you adapted the newer style deck and pto . :)
-
1 pointSounds good. Another running machine. Cant wait for the Pics.
-
1 pointAlways nice to hear another one isn't getting crushed and sent to China. I got a call from a friend that an local guy had an old wheel horse that he was going to scrap the other day. Turned out to be a complete but rough 704. Now sits in the drive awaiting for warm weather so the rear end thawsout and I can move it.
-
1 pointCraig, it looks like you are doing remarkably well. I have seen people in their 20's with the same type break not heal nearly as quickly as you are. Congragulations!
-
1 pointThose look like they mean business.
-
1 point
-
1 pointLOL, Thanks guys! I would have got some pics while it was still daylight but about 4:30 I got a call from my Director at work, and had to go out on call. I drug Jay with me, and he got to see what a "Brainiac" I am professionally at my job. Then I had to feed him so he would not tell you all anything differently. So anyway, sorry for not having pics tonight but tomorrow I should have an opportunity to put the 310 on display here at :rs:
-
1 pointvan, you should know better than to tease us with words and no pics, whats up with that??? seriously though, great to hear another one is mobile, sounded like a team effort for sure......
-
1 pointScott didn't wear shorts? :ychain:
-
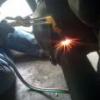
1 pointI thought it was a major feat to acomplish the kohler transplant!Just to fab the neccesary hardware to retain the stock gastank location nearly stumped me!It all fell together though,in one day!I have to say that this project has been so rewarding from inception,sleepless nights creating and right through to completion it works and looks like I intended!Thanks for all the insight!
-
1 pointThose look like they will be very nice lars! Never seen them like that before.
-
1 pointI preach loaded tires. Having been raised on a dairy farm I know the unmistakeable difference in having loaded vs dry tires. As soon as I get another tractor I stop by the parts store and get two cases of washer fluid, cheapest thing and ok to squirt all over the world from our cars must be ok to use in my tractor tires, that said, I promote that having loaded tires really improves the whole handling "attitude" of the machine. I don't see a reason not to load the tires if it's a worker of any kind. It bellies the tire out on the surface giving optimal use of the tread. Unlike expensive weights that add down pressure but doesn't spread the tread out like loaded tires. That's my experience anyway. Get rid of those bouncy baloons!
-
1 pointWhat are you packing Mike??? :)
-
1 pointHey guys, Got to plow some snow with the 702 again today! I would say we got about 3 inches here and its still coming down pretty good. Didn't have school today so I was very happy about that too! Here are some pictures, I don't have fast enough internet to upload a video but this is close to a video ~Jake
-
1 pointJust a friendly word of wisdom here (although I confess I've never personally used SeaFoam myself)... If you're going to add SeaFoam to your fuel tank, make sure you have a fuel filter installed somewhere between your tank and carburetor. The SeaFoam is going to dislodge small bits of dirt and rust, and assorted other crud, it's best not to get that junk into your carb. Zeek, your post is what prompted me to say something here. I think most of us have filters installed on our Wheel Horses, but I don't know if your bike has one, you should probably check and add one if necessary before adding SeaFoam to your tank. You may also be able to clear up that rough idle by just adding fresh fuel and running the crap out of it, it's a good excuse for a ride (maybe after the weather warms up a bit). :)
-
1 pointThanks Andy, Pm and email received. Thanks Stephen, lol yeah she sure has evolved since I started the build. The belt was coming off at the belt tensioner and occasionally the rear trans pulley when the belt decided it wanted to be even more of a pain! Good thinking about the L shaped bit of metal, I'm hoping it won't be needed now but your idea is stashed away just in case it is needed. Thanks Brad. After Mondays fun and games with the drive belt jumping off too many times, the time had come to get it sorted (again) so I could enjoy all of the engines power without the belt jumping off.. Part of the problem is the tensioner pulley.. The small lips each side work just fine if your using a standard length drive belt, but a belt that's twice the length is a bit different and bounces around a lot more.. I guess you can guess where I'm going with this A spare pulley had some extra lip welded on.. Cutting the two rings of steel took quite a while to machine to size and shape.. Sorry about the blurred photo, my brain must of been having a bad focus moment! Andy (the good chap that he is) sent me a couple of WH belt tensioner photo's to give me a few ideas.. Thank you Sir, you inspired me to come up with this idea.. Simple really, a bunch of bearings bolted above the belt with a strengthening bracket behind.. Now I know it's starting to look like I'm getting a dexion fetish, but I wanted to see if the idea worked before cutting up good steel These bearings do not put any tension on the belt, they are just there to stop the belt jumping up and down so much.. While this was going on Pete was busy working on axe head number 2.. It's almost finished.. Soooooo.. With the drive belt sorted and Pete finished playing "mad axe man" for the day there was only one thing left to do... Yep, go for a drive It's made it this far.. I might of got a bit carried away taking photo's at this point.. A couple of action shots And of course..
-
1 pointChuck, as usual, you explain everything in a no brainer way for us less knowledge d folks. While the Onan engine repair manual goes over a step by step diagnostic testing, you provide a legible, color diagram that is so easy to understand. perhaps you could re write the Onan repair book in your "SOI esque" style? you could name it "SOI's Onan Electrical Repair Guide or How I stopped pulling my hair out every time my 520 doesn't start and learned to love my P220G" :text-thankyouyellow:
-
1 pointThanks guys. When I get the steering wheel hub removed I will be able to take some additional photos, clean it all up and repalce the worn out parts in the sterring/worm gear box. Here is a photo of the repalcement parts:
-
1 pointThe table would look good with an old Hit N Miss engine popping away on it. Matt :flags-texas:


This leaderboard is set to New York/GMT-04:00