
Leaderboard


Popular Content
Showing content with the highest reputation on 01/16/2013 in all areas
-
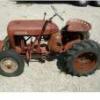
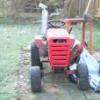
4 pointsI would like to nominate my 401. I got this tractor in early November of 2009 for my first garden tractor. I buddy of my dad's knew I was looking for a garden tractor and he ended up dropping it off to me. It still ran very good but she was a smoker. When I got it it had duals that were loaded and it would go through anything, It had a plow on it and I never caught it spinning its wheels. on Christmas on 2009 I decided to strip it apart and restore it. It spent the next year and a half restoring it. We began with getting it sandblasted, and because it was pitted so bad we had to use quite a bit of bondo on it. I had to of had at least 50 hrs probably a lot more than that sanding it perfect. The hood on the tractor we found nos on craiglist and jumped right on it so all it needed was scuffed and it was ready. The tractor was painted with base coat/clear coat car paint and a body shop my family owns.The wheels were powder coated. The engine and transmission were completely rebuilt by my dad's buddy who gave me the tractor. The tractor was finally ready to be assembled, we began spring of 2011 and finished just in time for Kelly's show in August of that year. I of course kept the duals and I added a polished stainless stack to really make it stand out. The only thing I would ever change on the tractor is I would like some tri ribs on the front, and some wheels that are not so badly pitted. Thanks, Jake a before shot This post has been promoted to an article
-
3 pointsThe fuse block holds three ATO/ATC blade fuses. A forth location is unused. This position can be used in the event one of the others becomes damaged. The manufacturer makes no cover for the fuse block so dirt and water easily enter. Individual pins are replaceable. You need to catch corrosion problems before the plastic fuse body (Toro part number 120930) melts. Contacts are not included with the Toro part. Normally it is the thirty amp contact that goes bad. My dealer has not been able to find a Toro part number for the contact. Keeping the fuse positions free of dirt and dry is important. I recommend removing the fuses and blowing out contacts with compressed air. Installing and removing each fuse five or six times helps improve the electrical conductivity of the connection. Glenn Petitt has designed covers for the fuse block. See photo for how they work. You probably have seen the decal that says, “Do not operate with battery disconnected. Damage to electrical system will result.†An open at the 30 Amp fuse is similar to having the battery removed as there is no load on the regulator. I have seen many tractors where the 30 Amp fuse is bad that also had a bad voltage regulator. These are costly and therefore, a good reason to keep a healthy fuse block. Replacement fuse block with contracts, PICO PN 0910PT, is available from Smith’s Auto Parts, P.O. Box 489, Norfolk, NY 13667, telephone (315) 384-4600. George Smith is a vendor at the WHCC show. The contacts are PN 1598PT in packages of 50 each. To remove a damaged contact depress the tangs and pull the contact out from the wire end. Crimp in place a new contact and insert it from the bottom. Make sure you are crimping to clean bright copper or solder the crimpted connection.
-
3 pointsThat's an age old question which seems to defy a straight answer - so I won't attempt one. However, a little advice distilled from years of trial may be in order. I only use spray cans in the winter when HVLP spray gun use is not possible. Over the last few seasons, I have met with increasing success following a few simple rules. Age Whatever brand paint you use, use the "freshest" cans available. If you have a choice of pulling the first 3 cans of Regal Red Rustoleum from the self or the last 3 - go for the last 3. They may be the most recent manufactured date. If you see cans with dust on the tops and cans without dust - go for the clean cans. I do believe Rustoleum publishes a FAQ on how to decode their date stamps imprinted on the spray can bottoms. Shake Well Pay no attention to the "Shake for 1 minute" instructions on the can. Shake the can until you say to yourself "this is stupid" and you lay the can down. If your arm is sore, you have probably shaken the can sufficiently. I saw a device on the internet that really helps in this step. Imagine a 12 inch long wood demo blade (teeth dulled) mounted to a sawzall. The spray paint can is strapped onto the sawzall blade and shaken for a few minutes on low speed. http://mixkwik.com/ IMO, this process makes a world of difference in preventing the paint nozzles from clogging due to clumps of pigment in the spray can. Surface Prep Most folks complain about spray can paint "chipping" easily. I also had several issues with easily chipped final coats a few years back. What I always noticed was the top coat would chip but the primer coat somehow stayed attached. This "chipping" turned out to be delamination of the top color coat from the primer coat caused by poor adhesion. Poor adhesion can be a problem at several stages of the paint process. Prior to applying the primer, make sure the surface is able to allow the paint to "bite" into the metal. Imagine trying to paint a pane of clean glass. The paint will peel off in a sheet from the smooth surface. Take that same surface and rough it up a bit with 180 - 220 paper, the paint will stick much better. Now imagine if you have a dusty, glass smooth, wire wheeled tractor part waiting for paint. What chance does the primer or body filler really have to adhere to a surface that smooth! I scuff all non sandblasted parts with RED 3M scuff pads (probably the equivalent of 220 sand paper) prior to washing them in water and Dawn dish washing liquid. After drying, wipe down the the washed parts with 70% IPA (isopropyl alcohol). I was amazed at the sand blast media residue removed by the IPA and Dawn cleanings. With all loose residue removed from the metal surface, the primer will adhere to the metal and not just lay on top of a dust layer on the surface of the metal. Note : wiping down a surface with Acetone or lacquer thinner does not allow the grease or oils to dissolve and float off the surface. Acetone will quickly flash off and leave the dried residue right back on the surface before you have a chance to wipe it off. This same concept goes when you scuff the primer coat prior to top coat application. I always wipe down scuffed primer with IPA. Again, you will be amazed at what comes off the surface. Egg Timer Get one. Best darn $3 I have invested in my painting supplies to date. I believe of all the modifications to my routine for spray can paint application, the consistency of WAITING THE PROPER TIME between application of multiple coats yielded the largest gains. As a first step for top coat application, SPRAY ON A MIST COAT. Forget about how it looks, you want a light mist coat, maybe 50% coverage over the primer. Set the egg timer for 30 minutes and WALK AWAY. Ding, Ding. After 30 minutes the mist coat should be tacky. This tacky coat will be a good bond between the primer and the subsequent top coats. Very important step to get right. Subsequent top coats should be applied in light applications. Enamel paint needs time to cure prior to being covered by another coat. If you spray on several thick coats 'cause it looks good, you will end up with what I call "pudding skin", a thin, dry layer of paint over a thicker, semi dry, oxygen starved layer of paint which may take weeks or months to fully cure. Enamel paint needs exposure to oxygen to cure - which is very different from "drying". Lacquer paint "dries". Solvent evaporates from lacquer leaving the pigment behind. Enamel paints harden thru chemical reaction - not evaporation. Takeaway point here is first layer of topcoat is a misty tack coat. Wait about 30 minutes and put on a light 2nd coat. Set the egg timer for 1 hour and leave the room. Come back in an hour and apply a second light top coat - set the egg timer for 1 hour, etc, etc until you are satisfied with the finish. The wait time is important as it allows each layer of topcoat a chance to oxygen exposure and a chance to cure sufficiently before the next coat. If you cram all the paint on in one or two thick coats, the first layer of topcoat will never dry - its oxygen has been cutoff by the 2nd thick layer of topcoat. The first layer of topcoat will then "chip" off easily weeks and months later. Temperature Personally, I have much better luck painting with spray cans at the lower end of the recommended temperature range for application. One of the secrets of a good top coat is to maintain a "wet edge" to the paint. As you apply strokes of paint across the piece, if the thin fan of paint produced by a spray can dries before you head back over it with a second stroke, the layer of paint may be uneven and dry with a rough finish. Lower outside temps allow the paint to dry somewhat slower and prevent the "dry edge" from showing up on your work. In summary, I'm not sure any spray can paint, regardless of the manufacturer, contains sufficient UV blockers and top quality binders necessary for them to compete with automotive paints. Those components are expensive and you are not going to get them in a $4 can of spray paint. Spray can paint manufacturer choice is your personal choice. I do believe spray guns are the way to go for even atomization of paint and a glossy finish "right from the gun". Spray cans lack the consistent atomization and fan width to provide any real competition for HVLP or pressure guns. But I still contend, you can swab paint on a tractor with toilet paper wrapped around a stick as long as you are willing to spend extra time, money and effort to wet sand it all down level. Once that happens and you polish it, the finish will look as good as produced by high end spray equipment. You will also learn quickly that every paint job looks "ab fab" (absolutely fabulous) in pictures - from 3 feet away. Up close - under curmudgeon scrutiny - well, that's a story for another day. You will need to decide if spending 3 days prepping and painting a hood is worth the investment. Good luck in all your efforts and Welcome To RedSquare !!
-
3 pointsOf course, I've gotta submit the favorite "worker" currently in my collection, my one owner, original 653. Here it is a couple years ago, the day I picked it up from the original owner... http://www.wheelhors...ing the torch ...and a couple, more recent picts of it from this past year. :handgestures-thumbsup:
-
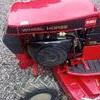
2 pointsim finishing up on my 1054 mower. the key switch up and down is on and it turned sideways is off. is this normal. or just turn the switch and turning the key left is on. the issue is, you cant take the key out when its off. its wired perfectly to the manual. any productive thoughts would help.
-
2 pointsVery good point. I should probably clarify some things from my previous post: First off, I would NEVER do this on a hydro. Just sayin... Several years back, this bearing x2 option was discussed at length. Most of us agreed that it was feasable, but with limitations. A worn bearing (diameter of the needles themselves), with no obvious wear on the axle, and NO other damage would be the only candidate for this procedure in any shop. The use of a hammer and punch or something like that would NOT be the reccomended tools to perform this. PVC pipe, or a large socket, or something similar used CAREFULLY with a press would be the only way to push the bearing in without damaging it. NEVER TRY TO PUSH AN OLD BEARING WITH A NEW ONE. The key would be to push it further onto the axle and keep it intact without damage. If, and I should say IF you can push the bearing in without destroying it, it has no way of entering the tranny. The differential end caps seat in the 1533 bearing and there is no way into the tranny beyond it. As I said, I have never done this- but I do recall someone else has. I wish I could remember who it was, but I don't. In a perfect world, we would all go by the manual to the letter. Unfortunately some of these transmissions have been forming rust welds around things like long 3/8 bolts and hitch pins, and splitting the case can introduce all new challenges that none of us would be thrilled to get our hands on. Sometimes, it's a good idea to know a few trade secrets (even the theoretical ones) for when you are in a bind. That is the non-disclosed first point of my post. On another note: I would seat the seals evenly with the opening for the axle ONLY if the axles extend out far enough to keep the hub from rubbing the seal. Some trannies have shorter axles, with only a tiny gap between the tranny and the hub. 1/4 inch of lateral "in/out" play is normal for these axles, and you don't want the hub rubbing through the seal over time. That brings me to my second point: With these machines, there are always little differences. No single fix works on everything the same way. You have to make the decision to use what you read -or not- on your machine. We all just try to help the best we can. Kevin
-
2 pointsI've about come to the end of this project less of course the paint and decals which will be a warm weather project, Below are two photos showing the Trojan Horse as it is ready to leave the shop. Thanks for your interest,
-
2 pointsOk this is my daughters tractor I put together last summer. 1966 Lawn Ranger. She wanted a little tractor to ride around on and this is what I found sitting in a field for several years. after getting it running and the bugs worked out. And all fixed up and painted with Gabby enjoying it.
-
2 pointsHere is my 1960 Suburban Hot Rod. She started out simply enough but has evolved into my absolute favorite tractor. Custom features are dual pipes, super fatties out back, foot control throttle with rev limiter, home made light bracket and an opening lid for the tool box to hide my goodies and the battery for the head lights. She is loud n proud and a little faster than stock.
-
1 point
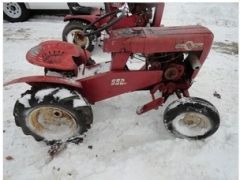
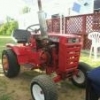
 I just got this 552 from PA,
 -
1 pointLooks really good, just goes to show where there's a will there's a weight!!! Mark.
-
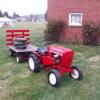
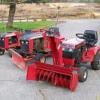
1 pointI just scored a craigslist combo, 74' C-160 auto, tiller, and a short frame snow plow. tractor only shows 460 hrs on the meter. guy said it would run but would shut off intermittently and he finally parked it out of frustration. In short, a quick clean up and some tracing with a volt meter, replaced the wire from the points to the coil, a new gas tank grommet and she purrs like a- well a horse. the snow plow is in incredible condition for its age. Looks like it was stood along a wall and slid around all its life with no signs of wear at the attachment points or the swivel points. And now the tiller, it appears to be tight and right with moderate wear, I got the tension pulleys and spring but no lift assist spring or belt. Any help with spring specs and belt info would be great. I want to use the tiller on a 414-8 this spring. Oh yeah hope no one hates me for this but the CL ad was asking $300.00 for all of it and the tractor had a 42" rd deck on it. As you can guess I beat feet for the 90 min. trip two counties over to get it and didnt hagle on the price. the poor guy was fielding calls on it as we were loading everything. thanks for any help, here's some pics.
-
1 pointCole is doing pretty good now. He is happy to have that sling off!
-
1 pointCharmin on a wooden paint stirrer works pretty good, is readily available, and doesn't leave little pieces stuck to the ***! Duff :ROTF: But seriously, Chuck, GREAT post! :text-thankyoublue:
-
1 pointPost some more photos of your 1054 restore project! I know you will have a lot of Red Square fans to see the quality work you are doing!
-
1 pointGoop....hmmmmm! I keep a supply of that stuff in my bathroom at all times - one of the best handcleaners out there. If I get to my seat before you get some Goop, TT, I'll report back! Thanks! ~Duff
-
1 pointthanks, it came with a light switch as an on and off. my dad picked up the new key switch up for me. i was just a standard two pole key switch. yes, with the key removed the coil will fry. will get the battery ignition. thanks again
-
1 pointyep, totally agree with scott. i had the same issue when i bought my 1054. replaced with a battery ignition switch and problem fixed. one other thing was i had a external resistor coil on mine (with no resistor) and if the key was removed (ignition on) that coil got very very hot....... replace the switch and your problems will be over, just make sure you get a switch for a battery ignition...... that 1054 of yours looks very nice.
-
1 pointSounds like the wrong ignition switch. Did you replace it? sounds like a mag switch that is open when turned on and closed with it off.
-
1 pointOK, I'm not the only who can't figure how the rig works? is it supposed to use a squeege attachment like some sterno bum on the side of the road.
-
1 pointYou probably have an odd collection of parts leading to your problem. There are several different styles of rear axle mount, several different styles of frame for the blade itself, and a couple of combinations of angle lever. I have just about every "wrong" part available on my 310 which has resulted in me building the most awful swivel arm in existance!
-
1 pointwell i have a nomine my 654 has new short block and duals
-
1 pointDoes anyone know the part number for needle and seat? I'm af a dealer and having trouble finding it.
-
1 pointVery good advice from Save Old Iron! I have an uncle who has had his own body shop for years.... he has ALWAYS told me that proper surface preparation is a MUST.. You need to paint slow (watch grass grow) and then apply subsequent coat (watch grass grow) and recoat...... Most people rush the painting process and ruin their paint job. Also, as my uncle proved to me, look really close at the paint job on even many new cars and you will see orange peel. (Paint on close inspection looks like an "orange peel", kinda pitted). That is caused by several different possibilities: Rushing job, Improper mixture of paint to thinner and hardener........ In the case of painting with whatever method you choose, properly prepare surface, clean clean clean surface, paint closely by directions, TAKE PLENTY OF TIME do not rush this part of restore.... When painting, its not a bad idea to carefully wet ground/floor with water under area painting so you do not stir up any dust while painting. BTW Save Old Iron, I need more advise on the toilet paper on a stick method....
-
1 pointWith the plow and snow blower, I'm guessin' around $600—$1000. That would depend on how much you want the . Without a deck, ummmmmmmmmm. I've hunted for a D-Deal on 'n off for awhile. Put that on hold when I picked up a 520-8 recently for a Spring '13 Project. No plow or blower but has a 48" deck. Maybe a D for a 2014 project?
-
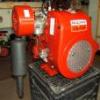
1 pointI disagree with Duke, respectively on the older Onan rods, Having that opening above the big end helps with the recprocating load and forces, Jaguar did this for years on thier high performance engines. Onan's loosing rods are the result of either being run low on oil to many times, allowing one or both jugs cooling fins to get plugged up with oily debris, the result being normaly being an overheating condition which causes the rings to loose thier temper with a resulting loss of compression on that cylinder. This in turn causes an out of balance situation in the engine, and the resulting harmonic vibration does bad things to rods. If the overheating goes on long enough and a rod doesnt let go, the hardened valve seat can pop out. But, the valve seat tends to be more prone to engines that dont get thier valves adjusted properly. Out of adjustment valves can also cause overheating, hard starting and leading to a loose valve seat. I do fully agree you need to get the engine checked out by a engine shop if you are unable to take the proper measurements yourself. DO NOT use those used piston heads till you have checked the ring grove clearance with a feeler gauge, there is a spec for it and if they are to loose, they will dig into the cylinder walls and in some cases, get ripped right out the top of the piston. Seen that one myself on a B48g in a 420 JD. Done properly, then maintained properly, Onans can live in excess of 2000 hours of operation. Duke's snow chucker will out live him by many years because he took the time and spent the money to have it done right. Piston and rod styles MUST match on both cylinders, used is ok if they are good parts and match. Onan made several styles of piston heads for the same engines, and you have the 2 different style rods, solid I beam and the older style with the opening just above the big end. Onans were designed for gen-set operation, so they are high performance engines by design and require the maintance to go with that performance. Sadly many didnt see proper maintance and were abused, overheated ect and we are now reaping the effects. Thankfully, word is that Cummins/Onan has released the rights to produce parts to the aftermarket, so rebuilding costs should come inline with overhauling a Kohler KT or Mag twin as Stens and others catch up with parts production. Stens already has parts like voltage regulators out, at about half the price of the OEM Onan part. Build it right, or set it on a shelf and put that Kohler on till you can afford to do it correctly. There is nothing like a Onan P220 in full throaty roar. The power and torque is hard to equil, and nothing I have seen has that throaty exhaust roar of the Onan twins. Good luck and great score on a free 520!
-
1 pointand I forgot - nothing looks good on top of a poorly prepared surface. The final coat of primer should look as good as you expect your top coat to look. Surface prep prior to topcoating is 90% of the battle to a show quality finish.
-
1 pointWonder what he'll collect from his insurance co? :eusa-think:
-
1 pointMy dad used his 1975 c100 with ten hp and blowed snow in lansing michigan thru out the neigbor hood and a apartment complex ajasant from his back lot he used it till snow blower wore out in 2005 and then he bought a new snow blower and it still going today just my 2 cents thanks
-
1 pointActually the wage issue is only a small part of it. The much bigger problem is the regulatory and taxation burden here that is absent in prc and other places. Deregulate and lower taxes and you'd see a big difference. The free market will work but not when it is at a huge competitive disadvantage.
-
1 pointWell, I went out and tried again. I lost about 1/4 of a quart or something and my seal was on the axle about 1/2" from the transmission. So.... I got a punch and tapped it in about 1/8" or less. It bottomed out so hopefully I did what I was supposed to. It didn't leak so maybe its ok. I ran it for about 15 minutes with the tire off and the transmission at an angle. Knock on wood no leaking. Either it was completely out of oil for it to not leak or I did it right. So for the third time did I do it right? Oh and the play was minimal from top to bottom. Maybe 1/16" if that. Hopefully it will last
-
1 pointWell i think I know what my problem is. How far does the seal go into the case? The seal I put in(which was new) was flush with the outside. It could go in more but members on here said to use a washer. ANd if it does go farther in, about how far? The seal seemed to have worked out just a hair so that could be my problem. And yes the axles are 1 1/8". As far as the bearing, lets hope this seal will do the job. if not, I will try what you have said and just try it on the outside since I am by no means mechanically inclined. Thank you all so much for the help! I need to send you all thank you cards! :laughing-rofl:
-
1 pointSeems many enjoy seeing a Horse workin. Jan 21st we had 3" of powder so I plowed the driveway with the C-125 / 48" blade as I typically do for small storms, leaving a row of snow around the edge. Then took the 312-8 with 42" single stage thrower to move the row onto the lawn. This predated my post on here about the high chute front cover to stop snow blowback (see that post for the cover design dimensions). In the linked video you can see the vertical snow leaking out the front when it first starts throwing left. Here is the 312-8 and Thrower. I think a cab would be nice!! Here is the 2:20 min youtube video. Nothing big just showing how well the single stage handles it. At 1:45 is a closeup moving a small pile back. No other snow around here so here is one minor storm that allowed me to charge the batteries!. Wyatt
-
1 point
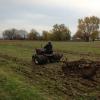
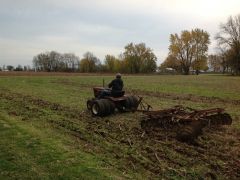
This is me on my commando 8 with triples pulling a 10 foot disk through one of our fields!
-
1 pointJust a little update. I've been doing a lot of parts chasing and repairs over the past few days. I've been working on the van after work thruout the week hammerin and tweakin. I went into work one day at 3:30 am and painted one of the doors and then hung it yesterday. Today I hung the new rear bumper and brackets I scored at a junk yard earlier in the day. Also scored a tire carrier today. Tomm. I'll paint the other door at work and within another day or so this thing is done, for under 500 bucks too boot.
-
1 point14 HP M 6 speed gear box 15" Jeep Wheels 42" snowblower its been alot of work thanks for looking.
-
1 pointI put a 6 speed in one of my 953s a few years back and redrilled and tapped one transmision hole and redrilled one frame hole, not too hard. I used rims from a FWD Ford mini van on the 5 lug hubs, just turned them around so they went outward. Hope this helps.
-
1 pointWell I opened it up again, I think that was it. I think i put together a half a dozen times but i got it. works great. thanks Ben
-
1 pointWell here goes this is not really mine but my Daughter Hunter's tractor, its a 1967 857 with a few tweaks to her liking, it started as a basket case I was stripping for parts, but she wanted a short frame tractor and picked this one, it was built in about 6 weeks from start to finish nights after work and weekends, she loves it, and has guys drooling over it at all the shows, so I'm posting this on her behalf. Here is what we started with. and what we had in 6 weeks.
-
1 point15" jeep wheels turned inside out
-
1 pointmore pics
-
1 pointI got 2600 out of the deal. When I got home after work I tore the one door and tire carrier off and replaced that door, I then fixed the other door and you can hardly tell that one was even hit. I also got most of the dent out that was under the right rear tail light. I have a line on a bumper for 50 bucks from one guy. Another guy has the tire carrier, ladder, class 3 hitch and rear louvers for 75 bucks. I'll buy the paint this week end and I'll probably paint the rear doors this weekend as well in my shop at work. I think for under 550 bucks It'll be back in shape. I was considering having the whole van painted but at the end of the day it is an 89, the paint on it is still in pretty good shape. I'm scouring C/L for a nice set of old school aluminum slot mag rims for it though....Maybe a few other goodies.
-
1 pointIf you scroll to the bottom of the forum home page you will see the Vendors section. one of them should be able to help you with parts. Here's a link for a parts break down for the H55 which is similar. http://whtractor.15.forumer.com/inde...2371&hl=lauson
-
1 pointI am not too sure if you would call this a lawn mower or tractor but it was free so I said I would take it. I know nothing about these, still learning my 75 No Name. But the PO said it runs great, battery dead, but the mower springs wont hold for the deck. I don't know what that means. He said he did something to the springs and it worked for a while If anyone could help I would appreciate it. Hope to get it running tomorrow. Jim


.thumb.JPG.1b2a1a39cdcedb1e001571713350b32c.JPG)


This leaderboard is set to New York/GMT-04:00