
Leaderboard


Popular Content
Showing content with the highest reputation on 01/06/2013 in all areas
-
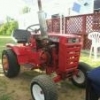
4 pointsfirst parts painted with primer a split in the hoodstand welded me cleaning the chassis more parts cleaned and primed chassis and front axle painted gearbox painted after my uncle and grandad fixed a broken hi-low shift fork and and put new seals in. lots of stainless nuts and bolts from the steam rally wheels after cleaning (note I was cleaning my little brothers lawn ranger wheels too) first wheel primed front wheels painted and fitted transmission bolted on rear wheels painted with carlisle cleated tyres from Jim (Mith) - thanks to my dad and grandad for fitting them and not scratching the paint back on all fours Ewan
-
3 pointshurry up ! I want to get my garage back so I can start the GT14 restoration :P
-
2 pointsA little time saver to confirm an Onan ignition module is functional prior to installing it, reassembling the engine and keeping your fingers crossed. The diagram below shows how to wire up a standard tail lamp assembly and a few alligator clips to complete the testing. All the wiring and testing can be accomplished on the bench. One Caution - DO NOT TOUCH THE BLACK MODULE LEAD TO 12 VOLT POWER AT ANY TIME. IF NO LOAD (lamp or ign coil) IS PRESENT IN THIS LEAD THE MODULE WILL BE DESTROYED. The modules I have tested so far power have all powered up with the tail light on. When the trigger ring is rotated near the "nose" of the module, one of the two magnets embedded in the trigger ring will turn off the lamp and continued rotation of the ring will pass the second magnet over the "nose" and once again turn on the lamp. An ignition coil puts about a 3 - 4 amp load on the ignition module. A standard automotive tail light will also put the module under approximately the same load and provide a good simulation of the ignition coil load. This post has been promoted to an article
-
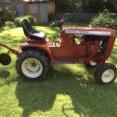
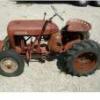
2 pointsHi, my name is Ewan I'm 15 years old, I got my first Wheel Horse 18 months ago from Neil in Somerset, UK. I have been working on it for the last 9 months, here are some pictures. btw, my dad is meadowfield, my grandad is norlett and my uncle is Raider10. I have already met a few members at the UK wheel horse meeting last year. When I first got it home. It was very very rusty as it had been parked for a long time outside. most of the bolts needed a lot of heat to undo more rot the front axle was broken I have been cleaning the parts in my dads e tank belt cover cleaned up - thanks to Stigian getting there - more rust than tractor the hub set screws were snapped off hoodstand in the e tank
-
2 pointsThat is the #5010 transmission...check out this video and see if something does not catch your eye...or ear for what it might be. The video is of the #5010 trans like what you have. http://s419.photobuc...TRANNYS0015.mp4 If I was to guess what it may be, I would say that you have a worn bronze bearing or 2 in the differential housing. If they are worn enough, the play could be enough to cause the pinion gears to bind and that may produce a click. The pinion gears are strong, the weak points are the axle gears, which chip, crack and/or break. I have been rebuilding some of Jake's #5003 & #5010 transmissions. We have replaced the axle gears in a few of them, and the bronze bearings were worn out in these transmissions. Try this...put the rear end on blocks and put into reverse gear and run. You can grab either of the tires and stop it's rotation...the other tire will continue to turn in reverse. Try it with each tire. Do you have the clicking when both tires turn and does it stop when just one of the tires is turning??? With a worn bearing, the force in the trans in the opposite direction could lift a gear enough to create a binding which may come across as a clicking noise. Let us know.
-
2 pointswhy not swap rear over into the b80, not sure if the 12 hp will fit in to the short frame thought. with the trans swap you could be back up and running in a couple of hrs. then find another wheel horse with a bad motor to put the 12 hp on eric j
-
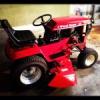
2 pointsSo I began stripping apart the $20 B-80 that I snagged on Wednesday to find that the engine starts and runs great! I was shocked...we began stripping parts and decided to try out the tranny. Funny picture below of how I rode it around my yard! Sadly, as I drove it around I blew the carb bowl gasket!! So then I got it back into the garage as it sputtered along spitting gas and began the complete pull apart. I will keep everyone updated as this will for sure be a weekend by weekend project. You can tell this tractor was kept outside...
-
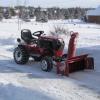
2 pointsGot my little round hood fitted with a snow blade today, it does pretty good for as small as it is, for small snow falls I'll play with this, but bigger snows I'll use the 520, the hyd lift on this is nice, I can pick the front tires up about 3/4" off the ground for good down pressure, and still raise the blade up about 6" off the ground.
-
2 pointsGot it mounted and tried it out, not much snow here, but enough to play in, it clears the front weight with tons of room, and with the solid lift link I can pick the front tires about 3/4" off the ground, and it still lifts the blade about 6" up off the ground. More pics in this post http://www.wheelhorseforum.com/forum/3-wheel-horse-tractors/page__prune_day__100__sort_by__Z-A__sort_key__last_post__topicfilter__all__st__30
-
2 pointsI LIKE THE ORIGINAL LOOK MYSELF. I DID THE MUSCLECAR THING IN THE 80's-90s WHEN IT WAS SOMEWHAT AFFORDABLE. I RESTORED THEM TO SELL FOR A PROFIT, THAT'S HARD TO DO NOW WITH THE PRICE OF NOS PARTS TODAY. THE WHEEL HORSE TRACTOR ARE EASIER TO DO AND PARTS ARE EASIER TO COME BY. THE ONLY THING I THINK IS EXPENSIVE IS A NICE SEAT. I HAVE BOUGHT AND SOLD 15-20 TRACTORS IN THE PAST FIVE YEARS. I FIX THE THE MECHANCIAL ITEMS,CLEAN,POLISH AND USALLY PAINT THE DECKS. I USE THE CORRECT FASTNERS AND PLATING. I RESTORE THEM THE BEST I CAN WITHOUT SPENDING A TON OF MONEY ON THEM. YOU WILL NEVER HAVE A BUYER WALK AWAY BECAUSE IT IS ORIGINAL AND NOT JUST SLAPPED TOGETHER . IT'S ONLY ORIGINAL ONCE AND KNOWN AS A SURVIVOR AND THEH A ORIGINAL RESTORED. DO WHAT YOU CAN AFFORD. TO RESTORE A TRACTOR LIKE A CAR YOU COULD SPEND $2000 OR MORE ON IT. JUST ENJOY DOING IT, I DO. JUST MY TWO CENTS. BOWTIE IN OHIO
-
2 pointsI had a B-80 that I was forced to cut the steering shaft below the dash housing to remove it. I then found a good steering wheel and steering shaft on eBay for about $40.00. I still have the old wheel and cut shaft hanging in the shed to remind me that sometimes, no matter how persistent you are, you will end up losing.
-
2 pointsThe first 314-8 was a 1985 model. (21-14K801) If you stand back far enough to see the big picture, it's easy to see what caused the demise of the "Classic" Wheel Horse GT..... they killed themselves. It's not uncommon to see 20, 30, 40, even 50 year old tractors still working their guts out on a regular basis. Sure - they require maintenance and some parts here or there, but it doesn't cost anywhere near the amount of an equivalent new machine. Now look at the "big box store" junk out there today. The manufacturers pretty much guarantee themselves return customers in 6 to 10 years. They know exactly what they're doing and people play right along with them.
-
1 pointSeveral years ago I built a Diesel WH by installing a Lister-Petters LT-1 into a 10-8. I just loved the darn thing. It would pull anything you hooked to it and the sound of the low speed single cylinder engine was pure music. Unfortunately the transaxle couldn't take the abuse and shucked it guts. Garden work with that tractor was a pure joy. Two things I longed for was more weight on the front to keep the tires on the ground and a hydro lift. I recently started a project that should take care of these wants. This is what I'm starting with this time. It's an electro 12 with hydraulic lift. No I didn't paint it blue. Are these WH wheel weights? This is the engine. The fly wheel is huge and very heavy. Lister told me the crankshaft weighs as much as the flywheel. That's a full sized alternator in the photo. And this is where I'm at as of this evening. I have had it running and will start on the wiring tomorrow.
-
1 pointCheck out what came with my C-160 that I just picked up!
-
1 point16 onan. Runs decent but could use a little work and mufflers. Starting to like bartering.
-
1 pointI have my tires loaded, weighted and hang suitcase weights off the rear hitch. With the two stage snow blower out front the extra weight on the rear helps to counter balance especially in reverse or if the front wheels drop over the edge of pavement as the AGs don't have much traction in reverse. For the few hours my tractor is in use during the winter I don't think the suitcase weights will do any harm considering the way I see some of these tractors loaded up.
-
1 pointI am definitely going to start it. Tomorrow I am going to spin the rope sheave for a few minutes again to pump the mystery oil through the pump some more. Next I will drain that out and pour in some new 30 weight oil along with a little fresh mystery oil. I'll put some gas in the tank along with some lead additive and see if I can get it to fire up. If it does fire i'll let it idle for 15 or 20 minutes to seat the rings and let everything get warm slowly.
-
1 point

© Yrbet Tjabalay
-
1 pointExactly - the main carb body is two pieces. The one-piece has the removable 'tin' float bowl. One-piece:
-
1 pointIt is. It's also a small two-piece Flo-Jet ~ not a one-piece. There isn't even a #296103 in the price list. The information I provided in my first reply is directly from my B&S dealer book. Here it is in .pdf ~> http://www.m-and-d.c...ms4258-0679.pdf No sir, that is considered a one piece flow jet. Here is a pic of a small two piece flow jet, which most of my old engines use. Matt
-
1 pointAbout 25 years ago I built 2 snow plows, one was a V plow and the other was a one way plow. What I used for the moldboard was a 60 gallon hot water heater. I just cut it in half the long way, for the Vplow I just started cutting material out of the middle but I stopped a 1 1/2" from the top and bottom, and kept pulling the ends back until I had a 90 degree angle, welded a piece of 1/4" steel in the middle to work as a divider. On the front of that I cut a 2" radius on one end to help it raise up over the bumps in the sidewalk. Then made some push arms to push it with. For the one way plow I closed up the left side of the moldboard and bent the right side up some for more clearance. On the left side I also made another piece of 1/4" buy 2" high stock radiused to go over bumps. For cutting edges I had some worn grader blades that I cut to the right length, and made sure the holes were spaced to be centered on the moldboard. I used these for a long time after, and they always worked fine. At the present time I'm trying to get my big snow plow dealer to get me a 3' to 4' rolled piece of steel to make a wing plow to put on one of my WH tractors, hopefully this year. I've got close to 60 miles of township roads to plow for the last 34 years, and when thats done I love to play plowing and blowing snow with my Wheel Horses. I have 4 tractors that I enjoy plowing with in my spare time.
-
1 pointI have started to put 1/4" bolts through the terminal tops with washers and a nut. Then I take a 1/4" wing nut to put the wire onto battery and when I need to take it out I just spin off the wing nut. No need for wrenches to pull battery. I do not keep a battery for every tractor, since I do not use them all at the same time anyway. I simply move a battery to the tractor with snowblower and plow tractor in winter and mower crew in summer. I have found when the batteries are used regularily to start and run tractors year round rather than sit without working for a season they last longer. I think they need to have a draw on them (Starting tractor load) and recharge regularily to function best. I have had issues with my boat battery sitting all winter but not any real issues with my tractor batteries. I don't buy top quality but seem to run them for 3-4 years at least.
-
1 pointI dont know what I do is called I call em a Refresh and Rebuild mostly because how can I do a restoration when I cant even get the exact paint Wheel Horse used which incidentally in the early years of the Round Hoods came from Niles Chemical Paint here in my Hometown (still in buisness here today) I have an old 78 year old friend of mine who is retired and worked in the coatings lab and was involved in mixing the paint. I was a stern believer of using Automotive Type paint Like Dupont or PPG but the past two tractors I spruced up 417A and the 520 Snow Chucker were done with 100% Valspar. Like Kevin, I have done some modifications along the way that I feel Improved the tractor. The way I feel about it with the condition I get most of my Tractors in. Anything I do to them is an Improvement. The main thing is like has been said already is, Just Have Fun and Enjoy Yourself. Cheers ~Duke
-
1 pointi take the shaft out complete like you did and then take to friend to put into a press some times it take in excess of 5 tons of force to remove them eric
-
1 pointThose are Deestone tri ribs, I love them, the center rib is taller like a true tri rib should be, little better pic just before I put the plow on.
-
1 pointThat blower's belt was in the outside groove and I cant say if it was the correct belt or not . I sold that unit a few years ago when I upgraded to my tall chute. I do recall when the short chute was on my C-125 that the belt would only work on the outer pulley because of the hood. Mike........
-
1 pointAll it really takes is a plastic tank (bucket/barrel/etc) some water and a cup of washing soda (not baking soda), a battery charger, and a sacrificial piece of steel. Positive goes to the sacrificial metal, and negative goes to the part to be derusted. I believe the smokestack site has some great discussion on it as well as other threads here. Be careful not to reverse the polarity as it will damage the part to be cleaned (I learned that the hard way). Also, be careful what metal you use as the sacrificial part. Never use Stainless steel as the reaction produces Hexavalent Chromuim. Sandblasters are not cheap as well as the compressor to run one. You need a lot of air. I got a barrel blaster mostly because they were not too expensive and made in usa. Also, if you are handy, I have run across a couple of sites where people have made their own out of plywood. http://www.smokstak.com/forum/showthread.php?t=13789
-
1 pointI was at his 50th birthday party. He was pretty sloshed and started ragging on the Packers. So I started busting on him calling him a Fair-Weather Queenie fan. He drops his drawers showing his tat (along with Big Jim and the Twins) to everybody that was there! :jaw:
-
1 pointKevin, I have not attempted a steering wheel removal. here is a hyperlink to a RS file on steering wheel removal plus doing advance search for previous posts will shed some light on a stubborn wheel removal.
-
1 pointWOW pretty soon they have to call you OLDBO HAPPY BIRTHDAY GUY :party:
-
1 point40 is when I needed glasses. 50 is when everything else started to go. You've got some time...but not much. Happy Birthday. Hope you have a great day.
-
1 pointI soaked mine with penetrating oil for what seemed to be weeks before I could start getting the pin to move. Just kept spraying it on daily and hammering with a punch until it finally started moving, then more penetrant and hammering daily until it came out. Not fast but worked. I would suggest antiseize on when replacing.
-
1 pointKevin: That drive does remind me of something -the Incline Railway on Lookout Mountain. About 70 degee incline even though you may have a little less! I kind think the rubber tire chains that I have been using might be an added benefit to the grade issue on your drive with the added weight. If you get ice or ice packed up on your drive sliding is an issue. I do not have a grade issue on my concrete drive but the rubber tire chains sure surprised me how well they grip. Here is a photo FYI. Just an added thought!~
-
1 pointFirst of all, check with Terry the VinylGuy. www.redoyourhorse.com. Once you have determined that he has the decals you want, make sure that the size is such that it will cover the area where the old ones will be removed. If everything is okay, try removing the old ones by heating them with a hair dryer, lifting a corner, and slowly pull them off. You may find that the paint under the decal looks better than the paint on the rest of the hood due to fading. Clean the surface with mineral spirits, let it dry, then apply the new decals.
-
1 pointI've followed this restore almost the whole way through and not commented but may I say how amazing and educational watching a true master at work! Cheers to you Duke many times over!!
-
1 pointNow if this was a 1969 Chevy Camaro ZL-1...then I would have everything part back to complete OEM. otherwise these are "drivers" or AKA "workers"
-
1 pointSeat wasn't bad at all but had Carhardt bibs and several layers on. Funny how when the little Horse started to get stuck....just put my feet on the ground like Fred Flintstone and away we went. Neighbor down the street had a 4x4 Kubota with blade and was spinning all four tires trying to push the side walk. Just laughed when I went by...wife said "what is so funny" My response..."all that money and can't push a little snow".
-
1 pointNope he needs to give it to me.
-
1 pointAs the saying goes "To each his own." ask 100 people you'll get 100 answers. I have a 655 done up about as close as I can get it to original but with SS fasteners and I am not ashamed to admit that I drive it around all year get dog crap on the tires and scratches on the hood, about a week before the MI show I drag it out give it a good bath and touch up the scratches. From 10 feet it looks great get any closer and you will see the worn and bent steering wheel, wrong dash decal, never did do the rims, a little rust on the hub caps and the deck sounds like hell. But it is still my baby and a trailer queen in my eyes. I also have a few others that go from workers to wrecks to rollers with no engine or non running and a ratty old puller. But the other tractor I bring to the show is my C-125 worker that is more of a C-175, it's ugly, mean, and nasty but boy is it fun to drive around all weekend. Will I ever turn it into a trailer queen..Hell No! And if you try to judge either one I'll probably tell you where to go. Point is this hobby is too much fun to get all technical and the documentation for such probably doesn't exist. Toro can't even track any of the serial numbers cause someone tossed the records out years ago if they were even kept at all. Each dealer did their own version of prep and installed options after they left the factory, and it wasn't as if they were made in the millions like autos or even close to the numbers that the more popular of farm tractors were. They were a smaller regional manufacturer with no distributors out west and in the deep south, yeah they made em under license in Europe but they didn't have the following or backing of a JD, Cub, or Sears. For a company that started out in a garage and was eventually buried and died under corporate greed it is amazing that they are collected and restored at all to the degree that they are now.
-
1 pointWouldn't it be nice to see an NOS RJ right out of the box without a single scratch on it? I'm afraid that every single supposedly correctly restored RJ out there would certainly be "over restored" if such a thing as an NOS RJ existed to compare all the rest to. I'd be willing to bet the farm that the paint jobs out of the factory looked like crap compared to what we see now at the shows that are supposed to be "restored correctly" (or even just an average paint job by today's standards.) Who is going to want to do a sub par paint job to try to copy how it was done back in the day? I can hear the comments from onlookers already, "man whoever restored this could have done a much better job on the paint job! That is what is great about Wheel Horse's and the guys and gals who own them. We don't get our undies all tied up in a knot if something isn't just so. Ask a Wheel Horse guy what color red is the correct color and more than likely he is going to tell you to paint it red and it'll be close enough. As far as points judging goes, no thanks. A guy can do a real nice job making everything on his tractor original and as close to the way it came out the factory's doors as humanly possible, rebuilding all components himself along the way, BUT, if he paints the tractor himself and he lacks the skills to do a killer job on the paint he'd fail miserably if there was a points system at our shows. And that would suck in my opinion. Fact is, most cars that are judged at car shows were painted at a body shop and the owners probably took out a second mortgage to get the work done.
-
1 pointTo me there is no right or wrong way of a restore. Like said before it's a hobby and it's up to the individual. Now with that said if a person wanted to get everything right down to factory perfect, they are going to have a hard time with a Wheel Horse because the factory used what was ever on the shelf at the time. Wheel Horse was famous for odd ball tractors at the beginning of a run and at the end of a run. I have seen them come from the factory with two different brand of tires on the same tractor. So to try and get a on the spot, dead on factory perfect is just about impossible with a Wheel Horse.
-
1 pointI think I know what's on your mind on this issue. Some people take more time and research as they rebuild their tractor than others do to make them as original as possible. But there are few "chalkmark guys" in the wheelhorse world. Some paint, others powdercoat, some stainless fasteners, some zinc. But it seems nobody gets anal about a tractor unless it's really rare, then they typically leave it alone or fix what is nessassary. The attitude is different, this is supposed to be a fun hobby and not become a job with ISO standards applied. If WH tractors were judged by some absolute set of "factory" standards dictated by "experts" , then me and my tractors would not apply.
-
1 pointMost anything is alright as long as you don't paint it Green & Yellow.
-
1 pointOr you can go totally of the wall the other way and do something like this
-
1 pointhears mine. click on the pic to watch the video
-
1 pointHere is a pict of my snow team.. Raider 10 whit blade going to order me chains to it.. and a 312-8 whit tall shoot blower.. here is a pict of the chains im going to order me..
-
1 pointif this is whats happening....... This last storm it started to squeak & stop under a load ( heaver snow ) . I'm not sure but it seams like I sheered a pin or something . Motor is still @ high RPM everything else stops until I back out of the load . , seems like either the belt is slipping from a weak spring or more than likely the pto clutch isnt tight enough when engaged and is slipping. when you say everything stops, is the pto bell (pulley that the snowblower belt attaches to up on the engine)still turning? the belt still turning?
-
1 pointI would do both if you really want a rust free part. My first RJ had sat out in the open weather for probably 20 years. Some of the parts were really pitted bad. I only had a sandblaster at the time. I sand blasted the parts and when I looked at the part under a magnifying glass I could still see rust in the crevices. I researched and built an E-tank. I let the parts sit in the tank for a few days. It was amazing evan after sandblasting how much rust was still attracted to the sacrificial steel plates I used. I think a lot of wether or not someones E-tank work well or not depends on their setup. I did a ton of research as well as talked to a friend who is an Electrical Engineer. I have a 35 gallon plastic garbage can and a 12 volt DC power supply that put's out around 15 amps. I also use 1/8" steel plates that are about 2' x 12". When the part is in the tank, it would be ideal to have sacrificial material surrounding 360 degrees. The process works better when the rusty surface is directly facing your sacrificial material. It also works better if the material has a lot of surface area. A solid steel plate will work far better than steel rods or mesh etc. I have four plates in my tank and try to make sure the surface I need cleaned is facing one of them. Sometimes I have to leave a part in place for a day, then rotate it a little for another day. When I cleaned out the tank after a year or so, there was over an 1" of sludge and rust at the bottom. The sacrificial plates where slightly black/rusty with minor pitting. The other key thing I noticed is you need to keep the sacrificial material clean. I remove mine after each part and scrape off any junk that may have accumulated. I have used the same steel plates for almost 5 years and they are still in great shape. Just my $.02
-
1 pointNice to see it in action Duke, even if it was light duty. Matt :flags-texas:
-
1 pointI guess it didn't take long running wide open to keep enough snow in it to blow.


.thumb.JPG.1b2a1a39cdcedb1e001571713350b32c.JPG)

.JPG.9f2ecb26065c66527b0730084ab7fc7a.thumb.jpg.7dc8a04d9a53d44ee2b23f26ee94496f.jpg)


This leaderboard is set to New York/GMT-04:00