
Leaderboard


.thumb.JPG.1b2a1a39cdcedb1e001571713350b32c.JPG)
Popular Content
Showing content with the highest reputation on 10/27/2012 in all areas
-
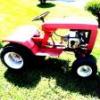
2 pointsHello All, my daughters 10th birthday is next weekend..... she wanted to combine Halloween (her favorite holiday) with her birthday party so we set it up to have a bunch of her friends over and go to the towns halloween party etc.... Here is what I decided to go as and figured I would make a fool outta myself and send a pic sitting on what I think Vader would prefer to mow the death stars lawn with.... Tony
-
2 pointsI recetly bought these two wheel weights from Chuck McColley (wheel -mule on Red Square) at Scott Mehlberg's Meet and Greet. I wanted to put some weight on the back of this RJ in order to try out the original snowplow I bought from Scott this coming winter. Thanks Chuck -they look and work great on the RJ! Here are the photos after painting and installing on the tractor. You can also see my real cheap but easy to install front red caps (taken from two Nestle FAT FREE Hazelnut coffee creamer bottles) with a lining of foam packing film! I will make sure to post some after i get the snowplow/dozer blade installed and operating in the next month or so.
-
2 pointsi got out on bond this morning lol.
-
2 pointsMoving on to day three, its getting close now. Its mostly back together now, and it has fantastic compression, and spark, so as soon as I get the carburetor, shroud, and fuel tank taken care of, it should run like new. I love rebuilding engines, their always the most enjoyable part of any restoration project for me, so it just made sense to start restoring engines! Anyway, here are a couple pics. Matt :flags-texas:
-
1 pointThe temperature dipped to 19.3 degrees (f) last night, so today I removed the mower deck from the 414-8 in preparation for the plow (another post). I have seen posts previously asking how to do this, so I decided to document the process: FIRST loosen up the mule drive, note to loosen you turn the knob clockwise SECOND remove the belt from the mower center pulley, this works best with the mower lowered. THIRD raise the deck and unhook the attach-a-matic holding the deck to the center hitch by pressing in the button and sliding the release lever over. Once unhooked, lower the deck slowly to remove the rod from the hitch. FOURTH Remove the front mule drive same as the center hitch ***CAREFUL*** as the mule drive will drop down, keep hands clear. FIFTH remove the pin holding the PTO engagement lever to the PTO spindle, then remove the rod and remove the belt. SIXTH slide the mower deck from under the tractor by first sliding the deck until the lift pin drops, then raise the lift lever and remove the deck the rest of the way and you're done!!!
-
1 pointhere's a few photos (i hope) of a 701 i'm rebuilding. got it last spring from a shed it had been in for years.
-
1 pointTake a look at this site if you are interested in old garages & petroleum info , its a historical insite of vintage garages. some of us older guys may find this interesting http://www.vintagegarage.co.uk/index.htm
-
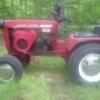
1 pointPicked up my first WH Thursday. Pics included. Pumped. Still want to polish it up but for now pulled it off the trailer put it to work on the front lawn and shot a few pics as the light was right. Attached. Now I've got to start getting it ready for the snow. Got the 414-8 with wheel weights, chains, and plow blade. Thrower is next. Family thinks I've gone nuts. They just don't get it. I did.
-
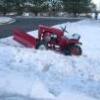
1 pointHere is a few pics of the 656 plowing snow!
-
1 pointIs that a costume or your work uniform? :laughing-rofl:
-
1 pointhttp://www.newhavenpower.com/toro_300_Series_Attachment_index.html Garry
-
1 pointWas lookin' for one last month, not sure what site as it scared me with the cost (just sheet metal no parts) $699, ran into used ones from good $ to high $ but shipping runs em up fast. Find the model number and do a web search and you may find a better deal than I did, but they will be NOS. Good huntin' , I finally decided to have mine patched up after ordering all pulleys and blades. Also not knowing which tractor or series it's anywhere in the park speculation but I went back and found some metal fof a C series (1974-76 type) 75-42ms01 mower: S/A 42 S-MWR DECK Part #: 105965 Substitution: 107992 Brand: Genuine Toro Genuine Toro Authorized Substitution : The part number 105965 has been changed to 107992. While the new part may look different, it is a manufacturer approved substitution. Our Price: $774.00 Qty: I think this is only the deck, but maybe this will put you on a better trail. Gerry
-
1 pointHI guys, finally got one of the rj58's going that I got this summer. I plan to keep this one all original. The motor has been completely rebuilt and it runs great. if you wonder why the hood does not sit right the hoodstand somehow got bent. We'll have to try and bend it back sometime. Its pretty much done besides that and it needs a kill switch hooked up, and I need to find a set of matching wheels. Here are a couple pics and a very short video. ~Jake click this link for the video. http://s1229.photobu...nt=DSCN0520.mp4
-
1 pointLooks great.
-
1 pointVery nice work Matt. Thanks for posting the pics. Those old B&S engines are really cool.
-
1 pointWe had our first touch of frost last night, maybe the grass will stop growing.... :handgestures-fingerscrossed:
-
1 pointWe weren't talking about those kinds of toys! Matt oops, Sorry!!! Sometimes I have a one crack mind.
-
1 pointI was mowing at full speed and the air screen was plugged with leaves. I had cleaned it once before this happened (20 minutes prior) and I was surprised it had clogged again so quickly. I am going to make a fixed attachment so I can easily brush off the debris from the seat. I stropped, lowered the throttle/speed to 2000rpm, and wiped the leaves and debris off. The light went off in about a minute. I was a bit uptight about it because I just decarboned the heads, installed new gaskets and re-torqued everything. I don't think it was on long, but I don't want to add unnecessary stress to the engine, especially after reading about valve seat issues. ....and that is I think how quickley it can happen! Before this investigation into valve seat failure, I never believed for a minute I did anything wrong. Now I think that was an honest statement but....all it takes is for your mind to wonder a bit while on the tractor with the flywheel screen plugged and before you know it, it's too late...the difference between hot and fatally hot,,,who knows exactly what that might be ....but it could happen that quick! Totally agree. I am often so busy trying to keep my mow lines straight I don't pay attention to anything else - lol.
-
1 pointCraig, thats the era I worked in too. I remember we had a magnetic sign we would put on the last car we could serve that day because we were only allotted so much gas for the day. We opened at 5:30 am and there would be 10 or more cars lined up on the drive waiting at 4:00am. When you had to cut off the cars it would get pretty hairy around there. People would actually remove the sign and put it on their car. When I started there in the spring of 1978, gas was .65 cents a gallon and smokes were .65 cents too. Pop was .35 cents and candy bars were. 35cents also. We had light gray shirts with black uniform pants, the shirts had the Clark logo over the left pocket and a glued on name tag over the right(so it could be removed and the shirt re-used for new employees). We used to carry "wads" in our pocket consisting of $25 in ones, $25 in fives, and $20 in tens. And a changer you wore around the waist with pennies dimes nickles and quarters in it. We made all the change right on the drive. When i used to order gas, we were allowed 1300 gallons of regular and 900 gallons of unleaded per day. The transports only came in at midnight. But, people would actually watch for them. Neil, I wish I could find those signs. Those would be something to have for me because they were professionally made and had the Clark logo with the words "SORRY- OUT OF GAS FOR TODAY". I do have some old gas signs around here somewhere, I'll have to try and dig them up.
-
1 pointThats one high tech , you have there Duke! Matt :flags-texas:
-
1 pointI love to restore these beauties. But I think even I would give that thing a good cleaning and leave as is. Great find!
-
1 pointIOWA AT NORTHWESTERN...........NORTHWESTERN MICHIGAN AT NEBRASKA...............MICHIGAN MICHIGAN ST. AT WISCONSIN........WISCONSIN (felt good picking that one ) PURDUE AT MINNESOTA................PURDUE INDIANA AT ILLINOIS.......................INDIANA OHIO ST. AT PENN ST....................OHIO ST. Steve and John, you two have a great time, sounds like a lot of fun. No sneaking in the Rock-n-Rye Steve.... -BK
-
1 pointNo Comment !!!! It Would Embarrass My Wife
-
1 pointPictures coming when you get out of jail...
-
1 pointI think that GUY is a girl??
-
1 pointI think that picture was taken in Illinois!!
-
1 pointIf it helps any...the Toro touch up cans clog up big time as well. IMHO, a spray gun is the way to go.
-
1 pointHey guys, have a great time and be safe out there. Hope you both enjoy the game, wish I could be there with you. :)
-
1 pointWOW . . . you did a beautiful job with that!! Love the pictures! Thanks for taking the time to post them :handgestures-thumbupright:
-
1 pointIf anyone is interested, I'm posting videos of the rj58 I'm restoring that I bought 26 years ago. First day I got it home, I blew a rod right through the side of the block after only one pass across the yard trying to mow the lawn. Shortly after a few attempts to repair it, I parked it next to my shed. This past summer after being buried in 26 years of dirt and grass I dug it out, and even had to cut down a tree that grew between the frame and pulley. I found out that this was the easy part, as my biggest challenge was to get rid of the rust and free up the parts that are supposed to be moving. This little tractor once again sparked my interest in Wheel Horse, and now own tow. So far I documented eight videos from the beginning to where it is now being painted. All these videos are on my you tube site called middyband or you can start with part one. There's about 18 videos on all kinds of stuff so you might have to look through the site a little.
-
1 pointThat's cool, but this guy freaks me out a little
-
1 pointLookin Good! :thumbs:
-
1 pointI'm running a Briggs Generator. Its 7000 watts running with an 8000+ starting capacity. So far so good with about 70 hours on the hour meter. I have a 200amp whole house transfer switch that ties it to my house. Mike..........
-
1 pointMake sure that the camper is tied down. I nicely equipped camper is no good if it's in the next county.
-
1 pointUUUHM, What's the point of having a Hot Rod if you don't Hot Rod it? IMO You need to prove it hauls ass once in a while or what's the point. Obviously not with the kids on board but I don't see how you can resist the urge to light'er up and be a little dangerous once in a while.
-
1 pointNot quite right. Nothing is pressing upward. If that were happening it wouldn't be weight adding traction! What's happening is that your wheel weight is in direct contact with the ground already through contact with the wheel/tire. So there's no additional down-force on the wheel bearings. (there is additional force added front to back though... you can't add weight and not have it be harder to push forward and backward!) Really nice job on the brackets maidenfan.... those are some cool custom pieces. I bet you'd sell a couple if you made some more!
-
1 pointAlot of those are nicer than some of mine....and mine are stored inside :hide:
-
1 pointNow for todays work. I soaked the block over night in my chem dip, and then bead blasted any surface rust off. I gave the cylinder a quick 5 second hone, as there was no wear. I installed new rings, lapped the valves, new gaskets, and painted it. Some of my engines, I just give a rattle can paint job, but I decided to use the gun on this one, like I did my 44 N. I also blasted, and painted all the other parts, with the exception of the blower housing which is going to take a little longer, as its going to need some body work. I'm also goint to have to get a gas tank, but I think I may already have that covered. Anyway, hear are todays pics. Matt :flags-texas:


.JPG.9f2ecb26065c66527b0730084ab7fc7a.thumb.jpg.7dc8a04d9a53d44ee2b23f26ee94496f.jpg)


This leaderboard is set to New York/GMT-04:00