
Leaderboard


Popular Content
Showing content with the highest reputation on 10/10/2012 in Posts
-
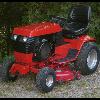
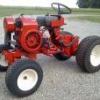
8 pointsI recently acquired this from the original owner's son. It had benn sitting in a garage for 15 years. Came with all original literature and has hydraulic lift. Took 15 minutes to get it running. Runs like a top.
-
2 pointsThanks! But wait! There's more!
-
2 pointsLookin good Duke. I like the view through the window of that cab door! :eusa-whistle:
-
2 points
-
1 pointHello everyone - really glad this group exists. It's hard to get other people to understand how well built the Wheelhorses are isn't it?. My dad bought this machine new in 1974, and I was 8. I mowed about 1/2 acre with this every week, plus in between his large stand of spruce seedlings for several years. He upgraded to a two cylinder and I don't remember the model number. It was a Wheelhorse though. That was in the mid 90's, which is when this one went into storage. I pulled it out of storage in about 2004, and pressed it into snowblowing. It has been real rough for me to see the surface rust go deeper each year, and I finally pulled the trigger for a full pro restoration, as it seemed the piston rod had failed. You may have read some of my other posts, but the jist is a full engine rebuild ~$500, and full paint at a car shop ~$1100. They matched the New Toro Red I supplied in spray can. They did some great sheet metal work on the hood and fender. I have the 'before' pix if anyone's interested. The white: I had them use the Oldsmobile White someone pointed out earlier. I had the exact year but I can't remember it now. Anyway ... I'll post the photos here. I am sure I'll be asking a lot of questions too.
-
1 pointWas checking out Craig's List today looking for an enclosed trailer amongst other things. I have wanted one for a while but the prices for even 10 to 15 year old ones are ridiculous. I found one on there that I had saw previously and the price was dropped down to $900. It said it included a spray rig that was inside. I called the guy and asked a few questions. Turns out he had a pest control business and had shut it down and the trailer had been sitting in the garage that it has always been stored in for the last year. He put brand new tires on it at the end of last year and the spare has never been on the ground. It's a 2000 Haulmark 6' X 8' with single barn door. The best thing is the spray rig that's inside. It's a 50 gallon commercial unit with a 5 hp Honda engine, spray guns and a Hannay Reel with hose. I checked and new this rig goes for over $2500. Need less to say I am going to clean up the spray rig real good, tune up the engine and list it on Craig's List. With any luck I will get back what I payed for the trailer and maybe more!!! The only thing the trailer needs is a good wash and wax, new caulking on the roof and a new roof vent. He took the vent out because it didn't let enough air through and when he was inside the trailer the fumes would begin to accumulate.
-
1 pointAbout two years ago I bought a rough Bantam 8000 with a very rare belly mower. I've stripped it down to every last nut and bolt and have been slowly going through it. The body has been totally blasted, repaired and blocked numerous times. The fenders were all hand dollied to straighten them out too. I had the body parts professionslly painted by a friend of mine and finally got all the orange parts back from him this week. He still has to clear the hood and finish the black items (seat, rear rims and all engine tins). It's 1968 Chevy hugger orange and urethane clear. The rear fender stripes were re-stenciled, sprayed and cleared in as well. The plan is to get it back together for spring.
-
1 pointJust a random pic I thought you might enjoy.
-
1 pointLast fall I got lucky at the bidding on eBay and over night went from owning 2 Wheel Horses, neither of which were any where near close to being anything, to owning a whole herd. For just over a $1000 I bought out a collection & brought home a B100, 856,1056,1046 2 Suburban partials and a load of parts and implements. I soon had the B100 and 1046 running, and in 6 months had sold enough implements and parts to make what was left free!! As I sorted through things and worked on tractors I noticed a lot of the stuff had fresh paint, and quite a few new parts. As I mentally kept track I soon realized, I had all the makings of a short frame , with no tags to tell me eggzactly what it was, but an extra K181 & I decided to throw together another 856 to just use Basically this is what I started on a few months ago. All I had done to it was bolt the fender and dash tower on, assemble the front axle and throw the rear tires on. Frame and trans were already together. <br />Then I stuck the 181 on it, but it was orange
-
1 pointAlthough not red. I though you guys would like it. 45cid Kohler Command. Roller motor. VM11 rear tires. Cub drive train. My ole mans ride. I build his engines.
-
1 pointOK fellas, I could not resist doing this....................
-
1 pointDenny, Yep thats not bad but I have a couple more views in the back of the garage of some staff members I need to show you! Well tonight I got after the steering wheel slop problem. The Taco Bushing they put in these things around the steering wheel shaft bis flimsey not long enough for support and also is cheapley pressed in and when it comes loose it wollers out gets loose there and also around shaft. The Flange bushing I got from Detroit Ball Bearing was flimsey also so what I did was use 2 3/4" Collars and welded one on each side giving over twice the thickness and support. Steering shaft is tight now! Its alot of work but Im too far along to do a crappy job now and not fis something right, which is what I should have done the first time. Heres some pics. ~Duke
-
1 point
-
1 pointLooks like a soccer van full of love right there... love that is.
-
1 pointWow, You made that look easy! Great job on the restore and I know there is a lot of unseen work and knowledge to get it looking that nice that quick! :bow-blue:
-
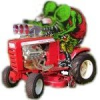
1 pointCan you say "Zombie Apocalypse" ? I can see it on the big screen now...... you on that awesome machine, barreling through a pack of Zombies with a sawed off shotgun on your way out of town! Others don't make it; their bulky 4x4s stopped by the masses of the undead. But not you! You're traveling lean and mean and low to the ground! All they hear is the fading sound of your machine as you barrel onward into the darkness towards freedom! Forgive me for rambling,that's one killer ride! :bow-blue:
-
1 pointHef'll be wantin' that as a centerfold. Wow US HAD SOME TOUGH BUILT LITTLE ENGINES. Great job!
-
1 pointYes that is the correct pulley, I havn't had time to run out back to see if I have a extra one. :banghead:
-
1 pointOK, here are some pics of the pulley that was on an 876 that I dragged home from the scrapyard. I have no reason to think this isnt the original pulley, but I am not 100% sure. OD of the drive pulley is 3.5"
-
1 pointIOWA AT MICHIGAN ST. (MICH ST.) ILLINOIS AT MICHIGAN (MICH) NORTHWESTERN AT MINNESOTA (NORTHWESTERN) OHIO ST. AT INDIANA (OHIO ST.) WISCONSIN AT PURDUE (WISC) Had a tough call on that Northwestern Minnesota game...........have a feeling the Gophers might give them a game. Northwestern in a close one..........of course I have been wrong at least once before. ipb.global.registerReputation( 'rep_post_322542', { domLikeStripId: 'like_post_322542', app: 'forums', type: 'pid', typeid: '322542' }, parseInt('0') );
-
1 point
-
1 pointIf the lugs are tight, you'll be fine, it's all the support you need.
-
1 pointYou know I've thought about this, gangin' three or so together. That's one for the poster! Ha,
-
1 pointSteve, Steve, I looked at your picks and had a thought that you has picked a 100% week but, then again there is a differance in our picks I see one wrong answer, Go Figure!! IOWA AT MICHIGAN ST. ( IOWA ) ILLINOIS AT MICHIGAN (MICH) NORTHWESTERN AT MINNESOTA (NORTHWESTERN) OHIO ST. AT INDIANA (OHIO ST.) WISCONSIN AT PURDUE (WISC)
-
1 pointTBSS!!!! THEY GOT A WHINY QB AND A COACH WHO LOOKS LIKE HE'S ASLEEP!! THEY HAVE GOTTEN MORE GIFT TOUCHDOWNS IN THE LAST 10 YEARS THAN THE REST OF THE LEAGUE COMBINED!! BUT AT LEAST THEY ARE NOT WUSSIES!!! THE LIONS ARE DUMBER THAN A BOX OF ROCKS! IT RELFECTS ON THEIR COACH. BUT THEY AREN'T WUSSIES. THE QUEENIES, DON'T GET ME STARTED. THEY HAVE BLOWN SINCE GRANT RETIRED. THEY AREN'T WUSSIES EITHER EXCEPT FOR THAT DOPE JARED ALLEN WITH HIS STUPID COWBOY ACT. CAN YOU TELL I'M STILL PISSED!! MY TEAM IS A BUNCH OF WUSSIES!! EVEN WHEN THEY WON THE SIUPER BOWL HALF THE TEAM PLAYED LIKE WUSSIES. I'M SICK OF IT. THE ONLY TEAM THEY KICK THE CRAP OUT OF ARE THE BEARS!! WE'LL SEE WHAT TEAM SHOWS UP AGAINST THE TEXANS. A BUNCH OF MEN OR A BUNCH OF WUSSIES. WE'LL BE WATCHING MIKE MCCARTHY!!
-
1 pointI don't have any guards for sale, and can't get to the two tractors that have them, but I think I have the correct pulley off, for that tractor and yes it should be the correct size to run the pump, a guess off the top of my head is 3" I'll look in the next day or so for the pulley I have, I do know it is a 1/2" wide belt.
-
1 pointWelcome to Red Square! It was Charlie (charlesd250) that was making reproduction fan screens. Sorry I dont have one to measure. But I think I can measure a pulley. I'll try to remember to do it tonight.
-
1 pointSo far so good Bro.. keep the good work up...
-
1 pointWheel Horse replacement belt 1978/79 : 7478 I have'nt had to replace even my Dad's B-80 drive belt, but I spent the extra couple bucks and bought a back up OEM belt based on past performance and various RS threads on the subject of OEM vs after market belts. V
-
1 pointGreat job, I cant even round up the tools I need in four days! krazy_horse
-
1 pointFirst is (2) 1955 RS83, second is a 1967 857, third is 1946 Pond lever steer
-
1 pointWow that was fast, my resto projects take four to six months, but guess that's part of the fun. Keep em comin.
-
1 pointNice work Pat, wish my rj looked that good!
-
1 pointNice job Pat, she looks great with new paint. :handgestures-thumbup:
-
1 pointJust thought I'd post this picture of me, I like it a lot.
-
1 pointWell worth the effort, and very nicely done. :thumbs:
-
1 pointHere's a few more in progress... Decided to go ahead and replace all of the nuts & bolts in the entire tractor so I had to make another run to town. After many hours and lot's of coffee, I decided I wasn't going to make my deadline so I didn't repaint the rear wheels. Here it is completely assembled. It's done enough to take to the show. Unfortunately it has developed another fuel leak, this time at the rebuilt carb. I ran it long enough to burn up the fuel in the carb and will just be pushing it around again until I can fix it on Sunday.
-
1 pointLOL LOL LOL :laughing-lettersrofl:
-
1 pointWOW! That's one nice lookin' beaver you've got there. :scared-eek:
-
1 pointHi All, Thanks Matt, Zeek, Lars, Mark, Jake and Neil - Yes, the Steering wheel is very comfortable (and there's plenty of belly room). The smaller diameter should not need any more effort to turn than the original (I never turn them unless the Tractor is moving). Should be very easy when I change over to Skinny Wheels and Tri Ribs later and put a Suicide Handle (or Brodie) on it. So, after playing with a Pencil and Ruler as mentioned in my last post, I made up the platework and machined angled faces of the 35mm square support posts for my replacement Fender support bracket. I'll be bonding a full length Rubber pad on , rather than the 2 Buffer Pads as on the original- I then had to learn to use my Welder. Over a couple of days and 3 Welding Rods later, the traditional test of whacking the trial joints with the biggest hammer I could find, proved resistant, so I went for it and laid the four important beads on the stressed (tension) side of the Bracket. With the seat adapter plate in place, I could fit the seat and trial fit the Bracket before welding up the front unstressed (compression) joints. Not fitting Springs yet, I prefer a low seat direct fit, as I'm only about 70kgs (155lbs) soaking wet with no back problems. Added the usual chrome plastic edging strip where I tend to lift the Fender up- It fits perfick and flush. So the Fender is now has about 4lbs of steel added and strengthed it enormously. As for the Seat Latch, the old original one was really tatty and the wire stop was missing, so I made new ones, The Latch now has a much larger Jaw and a smooth closing action. I'm still going to add a second safety catch using the vacant hole seen in the pic below- So, apart from cleaning up the underside of the rear Fender and checking the Earth (ground) for the rear light, I can tick this off the list- Before I go too far with the back end, I have to make a Lift Cable Conduit and a Cable, so the first thing I have to do is work out the travel and clearance height of my primary Attachment, then it's carefully loosen the Tranny to Hoodstand bolts and gently jack up the Frame to get the Cable Conduit in and clamped down. When I think back to seeing all the damage/dents in the back of this Fender and wondering if it would be better to find another, it's amazing what you can do with an assortment of hammers, bits of wood, a few 'G' clamps and lumps of steel if you put your mind to it Now at the point where I have just 'Odds n Sods' to finish off or sort out, so pretty soon, I might just be tempted to throw in some fuel, prime the system and turn the key....it's nearly 2 years since this Tractor was wheeled into my garage. Patience is a virtue !. Regards.
-
1 pointJust want to thank everbody who helped me with my wiring project. The tractor is done for the most part need a few cosmetic things done . A big thank you to SAVE OLD IRON the tractor has a lot more spark now, INDY W/H ( marshall ) for the parts, MARTIN for the exhaust port help, and KELLY for the advise on the brakes. Here are some pics of the tractor again thanks for all your help. Karl
-
1 pointHey Zeek , Matt ...Thanks. Martin.....Cheers, if you need any Dims to fab a Cultivator , let me Know. Lars....what a shame about the seat, sounds like it was a good one. Thanks anyway. Jake ...Thanks , and for taking the trouble to look in. Ian...... Cheers Mate. Hope all's ok. Will be in touch sometime this week. I've been playing with my Car and Van over the last 3 weeks with their Annual Servicing, repairs and Pre MoT Inspection etc. The Van was covered underneath with Dorset Mud from the Steam Fair and I couldn't present it for the MoT in that condition.....Passed with a clean bill of Health (again). So I got some WH time in over the last few days, but only managed to 'Tick Off' the Steering job on the list, so this is a very brief update. Before any of you who are Resto Purists and cry 'Sacriledge' , the Dash Housing is not the original and had a small crack in it (repaired). I have all the original Upper Shaft and Housing etc hanging on my garage wall still. This was something I had in mind to change and I suppose you could call it Exprerimental. The (Kelch) Steering Wheel is from a Homelite Tractor and is a little smaller than a WH. Adapting it was straight forward and uses the Roll Pin hole in the Upper Shaft where I used a close fitting H.T Shouldered bolt to clamp it all together- I obtained an Automotive Universal fit C.V Joint Boot, cut it to length and fitted it so that the lower end would just press against the refurbished Bearing. The Bearing was a quick fix for the little 'Play' in the Old Dash Bearing and Shaft. 2 holes drilled and tapped 3/8" UNC for the S/S Bolts and the Nylock Nut/Washers fitted with just enough clearance inside. Plenty of grease in all the moving bits and is now pretty watertight and oh so smooth and strong with no play at all. Look's reasonably tidy I think. Seat is going on next when the paint on the fab'd adapter Plate is dry and I've just finished drawing up the Fender Stand/Latch Plate dimensions, then it's time to play with the Welder. I reckon I can adapt an old narrow 4 1/2" front Rim that Fordsonmajortom (Michael) kindly gave me to match the one I had on this Tractor originally (Offset is different and the Hub Tube is shorter), so I will be hopefully looking to go with Tri Ribs on the front. I've been searching for decent quality replacement front bearings (HEIM), but they are pricey if you add the shipping and import duty, so if any of you Guys in the U.S know of a quality alternative brand and good retailer that ships worldwide, I'd be grateful , as I can't tell what is quality on the Auction Sites. Regards
-
1 pointyes. Re-ringed and running sucka! I pulled a big ole railroad tie out of the dirt, It was awesome!
-
1 pointHi Matt, Your right with the positioning. In the pic, it is perched on a piece of Ali Tubing resting on the floor. The height will be dictated by the minimum 90 deg bend radius I can get. Should be a bit lower hopefully. Over 2 weeks of C"*p weather here in UK. They actually lifted the Hose Pipe Ban in my area yesterday !. So for you guys over in U.S. who are tired of the heat and drought, regular torrential rain look's like this- Needless to say, it has put paid to my outdoor progress on prepping and painting the Hood and Fender, but have made some advances- Still have to do a final prep & colour coat, then Laquer. As I've had to divert from painting, I decided to clean up the three Blades for the rear section of the Cultivator Attachment- (I found some new replacement heavier duty Cultivator Shovels while out in France last year, perfect size and fit, so I got 5 now + the 2 originals it came with . .....just have to clean the Green Paint off them in favour of red. These 2 'Ducks Foot Blades' had been 'E-Bucketed' initially (3rd one is currently immersed and simmering)- Not sure where these are from and don't think they are WH, but they will be fine for 'Ridging' prior to seeding/planting. Hopefully the weather will improve at the end of July when I get my hands on a Welding Kit which should speed things up a bit. Stay cool and dry ! Regards.
-
1 pointHI Matt, If you get one , you'll wonder why you didn't long ago , great piece of Man Gadget Gear !. Thanks for looking in. Token effort on progress I'm afraid, and because several posts have been eaten, I've put a few pics back in this post just to give an idea of what I started with. Pics are sympathetic to the condition. That Seat had completely rotted away at the back, and yes, that PTO Clevis is a piece of bent Ali in the pic below!. Nearly finished the Stirups and Belt Cover, lots of prep and staightening as the P.O. had hacked them about because they were fitted incorrectly . I fitted them up to check alignment was still ok before they come off for 'Flatting Off' (Wet) and a final coat. Putting aside the fact that my Camera can't seem to reproduce the Correct Red Hue, I'm happy that the paint colour is pretty close compared with the original found under the old Hood Decal I'm also tempted to drill out the outer holes in the Footrests-Fender Support Beam for extra support with 3 bolts each side!. I don't like drilling extra holes usually. Ignore the temporary fat nylon washers. I've decided to make a new Rear Hitch Pin to the WH spec with S/S Snap Ring retainers. I have a piece of old 3/4" Silver Steel that is a much closer fit than those (metric) Lynch Pins. I've still got some tweaking of the Hood to do before I'm happy for it to go for Blasting and Powder, mainly the front Grille panels. I started with a 'Multi Dent' front end. I had already tapped out a few when I took this pic Nearly finished this job. I shall throw some white paint over this area to see the defects clearly , then apply the Hammers and homemade Dollies. Have to bush the worn pivot brackets and remove a bit of a twist from the Hood top. Front Hitch bits also done. PTO Clevis is going to be machined from solid H.G Steel and beefier at the Pin bores, so the Pins wear out first (easier to replace). I've actually found S/S UNC Flanged & Coach Bolts (grade 5) available in small quantities, not cheap though. these are for the Visible areas like Belt Guard, Rear Fender and Gear Selector Plate. Despite this not being a Resto, more of a Refresh, I claim that no Metric Threads have been used, molested or mistreated in the building of this Wheel Horse. .......Totally Unified !. That's all for now. And Hey !!........Lets be Careful out there !.
-
1 pointZeek Ole Buddy! Thanks for one heck of an invite and real glad you mentioned the last bit!. I'm now suffering with Aching Ribs from . I'd love to head West, but wouldn't make it past 'Lands End' in a Car and Trailer!. Being a fully qualified amateur in back yard mechanicing, self taught from books and practice, I could play around on the Lathe all day (yep!, I'm a Sad Ole Git). Bye the way, I almost forgot ...... I've decided to leave the Grass Screen Bright Laquered Steel for now. It cleaned up well and I can always paint it later- Gotta be careful not to overdo the Bright Shiney bits.
-
1 pointI have to agree there though a pair of shades might be needed when servicing the engine Great work as ever Richard Any more updates? Hi Ian/All, Yep!, I agree with Bob's suggestion of Brushed Chrome effect. Problem would be the blemishes and pitting, so I'll be painting it. Not much in the way of progress, except for refurbishing and making a few parts. I've had a week in France and 6 days down in The West Country. I've stripped out and repaired the original Solenoid. A simple job. The PO had chewed up one of the Terminal threads, so I had to sort that (the Washers shown all came off the term'ls). Battery Cables had also suffered at his/their hands- The Contact Flats on the Copper Terminals were crooked, so the Actuator Disc only touched the edges. Lots of Arc Spark residue around the inside and close to Tracking and possibly burning out the Energiser Coil- All cleaned up and ready for another 30 years of use with the Contact positions correctly set- Battery Terminals now bonded to new Leads, made up new Throttle Pivot Linkage, Seat Latch Bushes and Carb fully re built. All the ignition parts are now good and ready to fit- Re-wire cables on order and welding up a few bits and painting this week hopefully.
-
1 pointIt's been a while since my last progress report, mainly due to my attentions having to be directed elsewhere. I targeted the Hoodstand, as it required a lot of work to repair and prepare. Both lower plates and one side wing plate that bolt it to the Frame were rotten- Below- This side (Brake Drum side) had not been Spot Welded when Manufactured and the Rust had 'Blown' and swelled the joint. The other side was done and ok- These areas were cut away, cleaned up and rust treated. I obtained the steel the right thickness and made up new pieces and TIG'd them in place. I managed to get it sandblasted while I waited, got it straight back, Zinc sprayed and began filling/blending. Took 2 days to smooth off as nearly every surface was heavily pitted. It's now had the first coat of red primer to highlight any spots I missed and fitted it for 'Spotting Through' for the bolts. I'm adding 2 more fixing points for rigidity, the last 2 holes in the Frame before the Tranny Plate- Old side Wing piece and the new one welded/blended and snug fitting. The Lift Arm Bearing bore has a nylon bush fitted to prevent grit ingestion during blasting- The Tank Support is done as well, but have to re-align one of the side plates when I 'Mock Up' the Hood, Dash Housing and steering. Then it's 'Paint Time' and start on the Brake and Clutch Linkage . That's all for now. Regards.
-
1 pointWell it's been a while and my attentions have been concentrated on family things, so progress has been slow really. I've done the main frame and married up the Tranny, machined the Woodruff Keys and set the Hubs on. I placed a Nylon Washer on the axle behind both Hubs, just in case the Hub(s) move in without me noticing to protect the Oil Seals. Wheels were finished last week and had the tyres fitted yesterday. Purchased a new Clutch Idler Pulley from U.S as the bearings were sloppy on the old one. When I checked the new one on the Tractor, I found the Spacer Boss was too big and was out of line by 3/32", so I had to press it out and machine it down. As you can possibly see in the pic, it lines up correctly now (Aftermarket purchasers beware). The piece of Railway Track in the background is going to be a universal Weight Front or Rear (36lb as it is) Brake Band took some work to refurbish, but now good-as-new and fixed with S/Steel bolts. I've yet to make the 'Stand Off' brackets for the Clutch Spring so it clears the Rod and keeps the Brake Band straight- On the front end in the next pic , I've had to replace the Spindles and Axle (thanks Michael) due to excessive wear on the originals. New S/Steel Lock Nuts on the Rods which I have refurbished to eliminate the 'play'. Also refurbed the Flange Bearing and sealed it with a foil gasket behind to keep dirt out. I also found out why this Tractor had adjustable Steering Rods fitted. The lower Steering Rod end plate (the Rods fix to) was welded out-of-line with the Quadrant on the back end, so fixed length Rods would not fit, or would not allow equal lock/turn limit !. With the Offset of the Post '76' wheels fitted, it may give me a problem with Lock limit on left turn. When I find some narrow Rims, I will replace them and maybe chop/re-align and weld the Lower S/Rod- That's it for now, so not much progress. Hopefully get more done soon.
-
1 pointFront Wheels done ( on left in the 2 pics).... Another reason why this is not a Resto. These Refurb wheels are Post '76' (compared to my pre 76 on the '72' Raider> right). I had one 6.50" x 8" and one 4.50" x 8" on the C-120, so I'm using these for now, until I can find another 4.50" x 8". The Refurbs will increase the Front Track width by 2 inches due to the Offset, so I'll see if it's an issue later


This leaderboard is set to New York/GMT-04:00