
Leaderboard


Popular Content
Showing content with the highest reputation on 10/05/2012 in Posts
-
4 points:text-thankyouyellow: AlI I am truely humbled by the work I see on here that all you guys do! Stig, Massey, Buckrancher, Jake, Martin, Bob, Denny, Scott just to name a few. There are so many of you its hard to count. We all push each other to excellence and yeah we all have a lil competitive nature and when ya get a Kuddo along the way I dont know about you but it makes me wanna try that much harder. Does a chucker need LED lights NO, Strobes NO, Stereo NO, Oil Press Gauge NO, Cab NO, but it sure the hell is fun playin with this stuff! I think its all you guys fault you all pushed me to it! Thanks for driving me to this madness are we having fun yet? ~Duke
-
2 pointsDid some swapping with Jim M awhile back and brought home this RJ. Numbers on the trans indicate it could be a 59 and it also has the solid pan seat. I've just been pushing it around the shop hoping to get some spare time to fix a fuel leak so I can use it around the yard. Monday afternoon I was messing around with the vert getting it ready to take up to Scott's M&G and decided to mess with the RJ. Fixed the fuel leak and putted around the yard a bit. Tuesday arrived and I got this brilliant idea to do a 4 day refresh on the RJ and take it to the M&g also. Started tearing it down around 3pm and started acessing the damage. One of the previous owners had done an excellent job of protecting it from rusting, unfortunately for me. The roll pin in the steering wheel had become part of the wheel so I spent over an hour heating and beating till it finally gave in. Now the wheel was another story. Damage acessment for removing wheel: 1 three jaw puller, a tank of O2 & 2 hours. I finally said to hell with it and cut it off. Had to go ahead and fix it. Wed. I got home around 11 and started pressure washing, blasting parts, grinding parts and dipping some in the E-tank. I spent the biggest part of the day with a hammer and dollie in hand doing sheet metal work. This was an all day ordeal so that's all that got done, but when I went to bed it was all ready (except the hood)for paint...or so I thought. Thurs. dawned bright and early. In the shop by 8. Removed the frt wheels from the E-tank and found one had 8 holes in it. Have you ever tried to weld a soda can? An hour & 1/2 later all the holes are welded up and both sides of the wheel dressed & ready for paint. The hood had the standard cracks from the tank straps plus two of the mounting point were broke out. Back to the welder.... Finally got the hood welded up and and a coat of mud on around 12. Worked with that until I was happy with it...3 hours later! Started spraying around 3:30 & got half the frame done when one of my daughters shows up to pick up her Blazer I've been storing for her. Of course it wont start, has a flat tire and the radiator is empty. Finally got back to spraying an hour later. I found a few spots I missed on the hood before spraying it so back to the mud. 9pm finally got it in primer. Finally got some color on it around 11. Today I'll reassemble, just in time for the M&G
-
2 pointsLike anything you do Duke, she looks awesome and can easily pass as a brand new tractor. I'm sorry, but I hope you get BOMBED with snow so we can get a good video of that sucker in action.
-
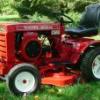
2 pointsFor your consideration are some pics of my 1977 B-100.
-
1 pointi got this kohler k241 from marshall (indywh) at scotts meet and greet last weekend. i was after either a good runner or something i could rebuild for a future project. i figured i would get it running or tear it down and post my findings as i go. im no expert but know a little about how these things work and can usually get most of these things running without too much bother. i aim to show how somebody with limited knowledge such as myself can hopefully get a decent runner out of something not running. i dont really know much about this engine other than it was originally off a 1057,1067,1077 (spec 46333D) and it spend some time out side in the weather......... the crank was free and turned over fine, but it wouldnt go more than 1 1/2 revolutions before coming to a stop. it would then turn the other direction the same amount then stop again. i had to work out what was stopping it from turning over before i could go any further towards getting it running. since it was going more than the one rev i figured it had something to do with valve/ cam as it turns half speed to crank revs. i figured id start with valves and see if i had something seized there. marshall mentioned that it had spent some time outside so i figured at least we had some valve stems seized in their guides. removed carb and checked out the intake...... yummy....... carbs gonna need a rebuild too..... removed head and checked that we had no dramas with the piston/connecting rod assembly as it was being turned. everything was good and felt ok, didnt sound like there was much play in the big end, and the bore although a little glazed didnt look scored. fair bit of carbon and crap there, this concerns me a little......... anyway intake was stuck, but nothing a bit of blaster didnt fix. intake wasnt stopping the cam though, as removing the cam gear cover verified. exhaust cam follower seized in bore and was stopping cam lobe from actuating exhaust. it would touch and then just stop the cam dead in its tracks. managed to get the follower free, but still having trouble with the exhaust valve tight in guide. so i will work on that. i would like to get the valves free and get it back together and at least get it running to see what its like. it already has a .020 piston so the bore has been opened already. if it does need boring then i hope i can save it and until i get to the bottom end i wont be sure what im dealing with there. if you ever need to remove the exhaust on one of these things the safest way is to just cut it off within 1/4-1/2 inch of the block and deform the pipe like in the last pic with a cold chisel or drift then the collapsed pipe can then be easily removed without damaging the threads in the exhaust port. this is as far as ive got at the moment, plan on getting the exhaust valve free if possible and cleaning the bad areas such as the ports and valve cover/spring area, then we will try and get it decent enough to run. i guess thats my best case scenario. if the exhaust valve guide wont free up im not going to push it and will just tear it down and rebuild it.
-
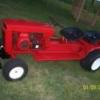
1 pointAlmost done with another not normal tractor. This the engine that i coverted from pointless to points 12hp kohler. Hood and steering towerand frame are from a 68 raider. 6 spd tranny out of a late 70's tractor, front axel , fenders,and tool pan from 654. Tires are 27.5-10x15 hoosier dirt track tires (painted with miller tire paint) , rims are 10"x 15"from summit racing, harley davidson seat, butterfly steering wheel. Going to change pulleys to speed up a little . For now 1 1/2' muffler pipe going to get dual pipes out the back if can make it work. My granddaugher calls it the bat tractor. I had a lot of help from a lot of people on here to make this happen thanks to all of you. Karl
-
1 pointI wouldn't leave my house for a year.I would develop an oil habit,cheat on my wife with a red roundhood and lose the respect of my peers.Good thing they landed in trustworthy responsible hands.No pressure.:)
-
1 pointOMG!!! Now you've done it!! :violence-duel:
-
1 pointGood one Mike. Takes me back years to the "old" red square days when you could pull out your smokes and run around half naked I'm not ignoring the comments or questions all you good folks have generated so far. And in no way am I advocating anyone make their C series dask look like the cockpit of a Blackhawk helicopter. I would like to fit a few gauges to answer a few age old questions and statements. "You must run your engine full speed for proper cooling". "I prefer voltmeters over ammeters." "I prefer ammeters over voltmeters." "My engine runs a lot hotter since...." "Are 520 belt guards mods actually helping any?" I'd like to put some numbers to all these questions. And most of all I would live to get rid of that gosh darn awful maintenance sticker on the hood of my 416!! Maybe I can blast out a quick readout for someone who wants to test the benefit of holes in a 520 belt gaurd. I could easily put together a readout which displays both head temps at the same time or even a differential reading. If anyone wants to be test bed, let's talk about the sensors you would like to use and we can go from there.
-
1 pointIf you're wondering about the odds of winning a book, at this VERY moment we have sold 93 chances for 3 books. So on average you have a 1 in 92 chance of winning (right?) and a 100% chance of helping!
-
1 pointthe PLASTIC hoods on late toro wheelhorses & johndeeres ar so much junk that they should be set on fire and the corp.beancounters should have to breath the fumes till they see the light! just my opinion i could be wrong , Jay
-
1 point:ROTF: Matt :flags-texas:
-
1 pointvery nice job wanted to let you know toro still sells the mounting brackets and frame for the aux fuel tank / vac bagger they just don,t sell the tank part no 115124-03 115131-03 115130-03 i fab,ed up suitcase wt bracket,s useing these brackets works great 300 lb,s wts so far nice part about it i put the lh and rh brackets on all my tractors and just bought 3 quick attach brackets fab,ed 2 for wt brackets an 1 for fuel tank so i can switch any of them around any time i need to for what ever im doing at the time plan to show pict soon as i got time to take them good luck keep on fab---n looks great
-
1 pointWell...I would.
-
1 point1970 Wheel Horse Safari 295 1968 Wheel Horse Indy 500
-
1 pointThis is a fall picture of my 1964 604 . :)
-
1 pointHow's that Tecumseh running?
-
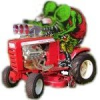
1 pointWell did some work today on the 520 I needed to work on the Battery Area. I was thinking of glueing down som rubber and decided to cut a piece of floor board material and glue down. I also used a piece of delrin bar stock for the strap that would hold the battery down. Delrin is a very tough composite material that can actually be machined. I used two long 1/4 20 SS threaded rods to secure the battery. The postive cable is very long and is going to connect to a 200 amp digital Xscorpian amp gauge in the Snow cab. I springs under the seat needed some attention so I cleaned off all the loose plastic rubber on them buffed them with a wire wheel and then used some plastic dip and recoated them with three coats and let them harden overnight. Under the springs on the Seat Pan is a clear plastic that is glued in place to keep the springs from marring the finish. I glued down some thin rubber for this purpose. In the engine compartment there was the rear heat shield that needed some attention because of the change in the exhaust. After giving it a haircut it was painted and installed. I moved on and installed two new front wheel bearing covers. I then took it for a spin and later took some pictures. I would say as far as the tractor goes it is completed I did find a glitch due to a cobble job wire on a PTO switch that I will fix soon but did a temp fix on it for now. So how she look? Its been about a year since she has seen daylight. ~Duke
-
1 pointone for ya
-
1 pointI used four 1/2" threaded rods, the bottom of a 5 gallon bucket, and a bag of concrete mix. Use the wheels as a template to drill the 4 holes in the bucket and as a jig to position the rods while pouring the concrete. Dbl nut both sides of each wheel. Wts. are 35 - 40 lbs. Mine have been working for a year with no problems.
-
1 point1998 314-8
-
1 point1963 753 1954 Pond RS 83 1963 753 1970 Raider 12 1954 Pond PT 20 Walk Away 1960 Suburban 400
-
1 pointHere are a couple of shots of the 401. Thanks, Jake
-
1 pointduke; it's looking real good, i like the oil filter mod aand the cab upgrades as well as the rest of the rebuild. the inside hydrostatic trans cases were painted to lock down any casting sand particles that might possibly come out of the castings during normal operation heat/cool cycles that would cause damage to the internal parts of the hydraulic pump and motor pistons and slippers. shorts
-
1 pointGary Quit playing games and get serious!!! I think you should go the route of a kubota 4x4 with a loader and 3pt blower. You'll be done in record time! Then we're gaurenteed no snow this year.
-
1 pointDont mean to highjack this thread but here is a pic of my RJ35 , I just bought this tractor from US and is now awaiting shipping to UK
-
1 pointThe breather gaskets are simple ones you can cut from a roll of gasket material that will cost you about the same as what places charge just for those two gaskets. Just use the breather plate as a template and cut around the gasket sheet with an X-Acto knife, then cut the center out to make a 1/8" wide rectangular gasket- make 2 and tack them in place with RTV. Make sure the drain back hole in breather plate is not covered with gasket. The middle sections of the gasket that go through the stud don't do a thing as far as a gasket goes, so you don't need to bother with that as part of them. -Mark-
-
1 pointThat paint is an electrical paint called "Glyptal" . http://www.eastwood.com/glyptal-red-brush-on-1-qt.html It's use is for exactly what you said,oil drain-back.Snow Chucker is looking great BTW! That machine will run like a Swiss Watch with the care you've taken to assemble it. :handgestures-thumbupright:
-
1 pointFirst I'd trtry some PB blaster as it works much better than WD-40. I run into this often, and if the won't come out, I cut them off about 1/2 inch from the block, and then using a sawzall or similat tool, I cut two slots into the pipe. After this you can smack it with a hammer, and break it to loosen it up, and remove. This usually doesn't take more than 10 or 15 minutes. Matt :flags-texas:
-
1 pointI didn't watch the video. but I will say throw the balance gears away, I'm sure many will agree.


This leaderboard is set to New York/GMT-04:00