
Leaderboard


Popular Content
Showing content with the highest reputation on 09/08/2012 in all areas
-
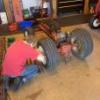
4 pointsToday me and my dad,pulled apart my tractor the 875.. it took about 2 hours to do but we got through it...... Heres some pics of the work today...
-
2 pointsHere's what I did to reduce the grass blades from blowing up from under the tractor (312-8): That piece of rubber is just a $2 48" x 4" piece of kitchen kick-wall, cut to 3' and bolted to the back of the deck. The square holes are already there (the WH factory did offer a metal plate to solve this problem in the 80's, discontinued). And an underside shot. When I scrape and clean the deck: (1) Rust converter, (2) Aluminum primer, (3) White gloss paint (easy to see). The black you see is after the first use, I was in a hurry to use it. The blades are: "Gator Blades" on first and then the original regular blades, at 90º to each other. The rubber extension is only about 2.5" out, but it does make a big difference in directing the grass down quickly, I get no blow-up inside or on me while cutting even dry grass. This thin cheap rubber will last me about 50 hours of cutting, got it from a box store (Menards), better quality rubber would certainly last longer. Comparing a RD (Rear discharge) deck to a SD (Side) deck (a very dirty one). I prefer the RD for a nice cut, not having to think which side the chute is on or having to allow for the wind direction, but the RD is not effective in very long moist grass, the SD works much better for that. The dual blade (6 blades = 12 cutting edges) gives me a much finer and shorter pieces on the cut grass, which disappear quicker and reduce the clumps, plus I like the even distribution look of the cut grass thrown out.
-
1 pointHi all, just wanted to add my name to the list of new to me Wheel Horse owners. I've lived over at MTF for several years and have one of those green and yellow LT thingies. I've always lusted for a true GT, with the WH classics, Case, and IH Cubs high on my list. Last week my neighbor approached me with an offer to buy his '88 312-8, with 42" rear discharge deck and a single stage snow blower. For just $300 I jumped at the chance, picked it up on Tuesday and have been searching the net for info every since, which led me here. steve
-
1 pointWell its been sixteen years and over 200,000 in my last new truck. So I broke down and bought a new truck. I think this will pull just about any trailer filled with horses. I am already planning a trip est to the big show. I will have to see what kind of trailer I end up with but I really don't think I will have to worry. Let me know what you think of the new ride.
-
1 pointWay to go Kent! glad yer getting into it Lord knows you can drive them everytime I looked over at Yer campsite at charlotte Dad was filling the tank I know Pop's gotta be proud of you! Keep up the good work! Cheers ~Duke
-
1 pointWell today I worked on painting the frame and rear and front end. I had been degreaseing and wire wheelin for the past week and finally got everything cleaned up enough to paint. Everything covered well but was alot of masking and covering intricate parts and everything it is drying now along with a bunch of small parts. I used Valspar Restoration series IH Red and the Black Is Restoration series low gloss Black. I Will start assembling tomorrow. heres some pics. Cheers ~Duke
-
1 pointLooks like somebody is lying down on the job in a couple pics... Are you sleeping kent?
-
1 pointIm going to build it just like dad!!!
-
1 pointThe thing looks brand new, think we'll see an action video at some point Matt?
-
1 pointI second the "Bravo." Quite a 'freshen up' project! Looks like a real machine, know you'll get used to the rear wheel steering in short order. Wow! Very nice! I still think I can't drive on the right side of the car. How does one do that? Congrats, job well done, good price. Should serve well like us old Jarheads! :laughing-rofl:
-
1 pointBravo!!! Nice Job!!!
-
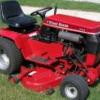
1 pointWell, other than one hood decal thats on back order, its done. This thing will mow a large area in a hurry! It mows great. I even added a chrome exhaust pipe. Matt :flags-texas:
-
1 pointWell, its time to wrap this thread up. I had it out mowing today, and this thing will cover some ground in a hurry! What a Beast! I even added a new seat, and a chrome exhaust pipe. One of the hood decals is on back order from Toro, but other than that this refresh is done. Matt :flags-texas:
-
1 pointIve used a product called "Never Dull". Comes in a small can and its cotton wadding with something on it ????? worked great for me on bumpers and what not.
-
1 pointdont even bother trying to loosen the pipe or undo it, if you damage the block or strip threads you will be sorry...... i just cut it off like matt does but then i collapse the pipe with a chisel.... the first post in this thread shows how i do it.... very easy and no risk of damaging the threads in the block....
-
1 pointFirst I'd trtry some PB blaster as it works much better than WD-40. I run into this often, and if the won't come out, I cut them off about 1/2 inch from the block, and then using a sawzall or similat tool, I cut two slots into the pipe. After this you can smack it with a hammer, and break it to loosen it up, and remove. This usually doesn't take more than 10 or 15 minutes. Matt :flags-texas:
-
1 pointI hoped the singin on the phone from me and MJ put it over the top! I want ya to know we dont do that for just everyone only our faorite Dinasour Love ya man! Yer a true friend and am proud to know you, Ya just need to wear a lil more BLUE! Cheers Duke
-
1 pointBetter late than never! Happy B'DAY ! Stay off of ladders in the future so we can celebrate more with you! We speak the same language , Basic ILLINI.....Thanks-Al
-
1 point:occasion-cake: 63???? In 2 more years you can REALLY RETIRE!!!!! Then you will be too busy to do anything. (At least all the retired people I know tell me that! )
-
1 pointHappy Birthday Steve. Hope you have many more. You probably will if you stay out of trees.
-
1 pointHappy Birthday, old friend.
-
1 pointHappy birthday your a great friend and I 'm wishing you a great day Brian
-
1 pointWhat do you guys think of this? Building and Using a Leakdown Tester by Mike Nixon A Better Way Everyone remembers how to do a compression test: screw in the tester, flip the kill switch to "off", hold the throttle wide open, and press the starter button. The cylinder takes in air and compresses it, and the tester traps it. The maximum is reached when the gauge holds more pressure than the engine can produce. The weakness of this test is that throttle position, engine temperature, ambient air temperature, and a host of other factors can make the results vary considerably. What's worse, a compression test checks too many engine components at the same time. A poor reading can indicate so many things, it's hard to tell which engine part is at fault without doing a lot of other tests. A leakdown tester avoids this difficulty. Air is pumped into the cylinder from an outside source, and the gauge reads the percentage that escapes, which not only eliminates all of the aforementioned variables, but as a bonus, makes it a simple matter to pinpoint the source of the leakage by wiggling and rotating engine parts while the test is underway. "That'll be $1,500, and uhh, it still smokes." But how does it work in action? Okay. Let's say your brother-in-law rebuilt your engine. You've suspected that the guy is mechanically challenged, and sure enough, the finished product smokes like a chimney. But he's your kin, so... Finally, you have a shop look at it. A good compression test combined with the smoking leads them to a diagnosis of trashed valve guides. Seems reasonable and you approve the work. And the engine still smokes. Now you really have a problem, not to mention the shop, and your brother-in-law. Enter Mr. Goodwrench, who produces a leakdown tester, and performs the following test. On each cylinder in turn, he sets up the tester and reads the percentage of leakage. They're all good and low. Hmm. Undaunted, our hero retests each cylinder, but this time he lowers the pressure setting on the instrument, and, rotating the crankshaft a smidge each time to slide the piston down the bore a little, picks up the problem, plain as day. On the #4 cylinder, the gauge now reads 60% leakdown when the piston is partway down the bore, indicating cylinder damage, which the teardown verifies. Seems your brother-in-law didn't get one of those pesky wristpin circlips all the way into its groove. It subsequently popped out, and the wristpin wore a handsome trench into the cylinder wall. Why didn't the shop find it when the head was pulled for the valve job? Because two of the four pistons were at TDC. Why didn't the compression test pick it up? Because despite the trench, there is still plenty of cylinder area (the pin is more than an inch below the deck) in which to build adequate pressure for a compression test. WHOOSH! Leakdown testers are way cool. Not only does the amount of air escaping from the cylinder register on the gauge, it can also be heard, enabling the source of the leak to be pinpointed prior to the teardown. For example, high readings accompanied by hissing in the carburetor indicate burnt, tight, or carboned-up intake valves; the same thing in a muffler points toward--you guessed it--exhaust valves. A breeze coming out of the dipstick hole on the other hand indicates worn or heat-softened rings. And air escaping from an adjacent spark plug hole pinpoints a blown head gasket. Not For Everyone There's a catch, of course. You need an air compressor to use a cylinder leakdown tester. And, you need to now how to find TDC (top dead center) on the compression stroke for each cylinder that is tested. Can you do it? Sure. If you can adjust your valves, you can use a leakdown tester. Rolling Your Own Ready-made leakdown testers are easy to find today. You don't have to mortgage your house to a Snap-On dealer. So, if you are concerned about the condition of your engine but aren't into making things, or don't have the time, you can buy a leakdown tester for about $75. If on the other hand you have an air compressor that sort of implies that you're a certified tinkerer. You're probably also into making things, and for you, throwing together a leakdown tester is no big deal. Here's the rundown: The pressure regulator This is designed to be screwed onto an automotive paint spray gun. Grainger's is probably the cheapest, followed by Sears and Ace Hardware. The gauge that is often attached is, unfortunately, the wrong kind for our purposes. The pressure gauge Get a quality, back-mount, 0-100 psi gauge. As of this writing Grainger has the best deal. For the professional touch, carefully pry off the bezel and cover the faceplate with a copy of the label shown here. The spark plug adapter Make this by clamping an old 12mm plug in a vise (protected with wood or aluminum stock) on the hex--not the threads--and whacking off the porcelain with a well-aimed lateral hammer blow. Then grind off the rolled-over seal above the hex, grind off the ground electrode, put the plug back in the vise and drive out the remaining porcelain with a drift (if hard, the rolled seam hasn't been sufficiently removed--on some plugs you must grind partway into the hex to completely remove the seal). Tap the hex end with a 1/4" pipe tap (NGKs are hardest to tap but seal the best afterward). Screw the bugger onto a 1/4" to 1/2" pipe reducer, and that onto a 12" grease gun hose (about $5 at Wal Mart and just about anywhere). The damper valve This necessary part is merely a restriction between the regulator and the gauge. The easiest way is to plug the middle pipe with epoxy and afterward drill a 0.040" (#60 or 1mm drillbit) hole. Using it Adjust the cylinder to be tested to TDC compression (all modern inline fours firing orders are 1-2-4-3). Plug your tester into an air compressor line and adjust the regulator to get a "0" (or 100 psi, if you didn't remake the face) reading. Screw the hose into the spark plug hole. Connect the two. If the crankshaft turns or you hear all the compressor's air rushing out of an obviously open valve, the cylinder wasn't set exactly on TDC compression. Try again. When you get it right, the piston will stay put and the tool will indicate the amount of air that is escaping from around the rings, valves and head gasket of that cylinder. All cylinders leak a little. Large ones leak more, smaller ones less. Racing cylinders lose only 1 to 2%. Production multicylinder engines in top fiddle pass 5% and less, and no more than 10% regardless of the mileage. More than 10% leakdown means there's something wrong. YOWIE! In the event of a high reading, first take the time to double check that you are in fact at TDC on the compression stroke, not on the exhaust stroke (where both valves will be open). If that checks out, and the leak is (as it is usually) a valve, remove the valve cover and, with a hammer, carefully tap on one or both of the rockers for that cylinder, watching the gauge as you do so. This will often loosen carbon from around the valve and the reading will drop to a reasonable level. Parts List


This leaderboard is set to New York/GMT-04:00