
Leaderboard


Popular Content
Showing content with the highest reputation on 08/29/2012 in Posts
-
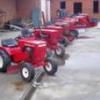
3 pointsGot some of the boys out for dusting this weekend and my wife took a picture of the line up. the guy's at work would rib me about how big was the one I had tried up for this years hunting season Brian
-
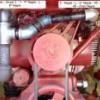
3 pointsWork has kept me from some very needed projects. Here is where I am now with this WH...the rear tires are just spares to help me move around the garage.
-
2 pointshey i sold the 210-5 , i paid $ 275. kept the dump cart, 81 redbricks & poulan leaf blower. put her out by the road & 20 min. later it sold for $350. this is what the $350 bought, lucky me ! it's a 310-8 with 42in. sd. mower deck, clevis hitch, brinley plow & disc. has 10 hp kohler magnum engine runs great. saw it on cl. sun. before last ,saw it after work monday, paid him & took the deck,plow & disc then. i went home and put 2 decks together to make the one on the tractor, i will rebuild the original deck soon but it is missing the baffles& guage wheel assembly. the tractor came with new drive & mower belts + all the manuals. the things it needed were a front tube, rear tire had a bead leak, the plastic is broken on the gas guage [ new one on the way ] & it is missing the choke cable. it also will need a new mule drive belt when it breaks. it is a very nice tractor & i have already mowed 2 acres with it. i'm so happy Jay
-
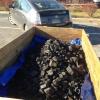
2 pointsGot an idea what you can do with them......
-
2 pointsOK, now it's seriously getting out of hand with these Wheel Horses! I have gone from getting my first Wheel Horse back in June, to now having 5 of them! So far, they're all 200 series, I need to keep an eye out now for a garden tractor!! Anyway, I saw a rough looking 208-4 on craigslist for $75. I offered $50 and the rest is history. Turns out, this is a diamond in the rough! The motor runs great, doesn't use a drop of oil, steering is tight, spindle bearings feel great! It runs like a dream. Here's a little video clip I put together!
-
2 pointsNahhhhhh....... it's just a Jacobsen that's painted blue & white.
-
2 pointsCould be a taint........
-
1 pointI picked up a mower this weekend that was described as a "candidate for the scrap heap" by the previous owner. My thinking when he called me was that it MAY have been a Wheel Horse, because most people don't know the difference these days. It does indeed need some work, at least as far as the deck is concerned. I'm always amazed at just how few people understand that the covers to the spindles MUST be removed at least occasionally and cleaned out, but that's just a personal grip of mine. Anyway, after removing the seat, panels, and fuel tank- then a good pressure washing, the old P220G sputtered it's way back to life. Replacing a spark plug and wire made her purr like a kitten at idle and scream like a banshee at WOT. Of course, this was after completely bypassing the entire wiring harness and making up a new one. Start, run, and off are the only three settings with no safety interlocks working just yet. I do plan to re-wire the seat and PTO switch, so that when the deck is engaged a body must be on the tractor, just because I've seen what happens when an unmanned tractor gets a mind of it's own... A quick change of an idler pulley made the deck quiet again (which just happened to be an exact duplicate of the hydro idler on any other 500-series Wheel Horse), and the blades turned again for the first time in years. Even with blades that are as dull on the front as they are on the back, it has a beautiful cut, and 62 inches on every pass will definitely reduce the amount of seat time I assure you... My only complaint is the fuel economy. I put $5 worth of gas in it and got about 25 minutes run time. I guess now I know why it has a 6.5-gallon fuel tank! At least I can let my beloved Wheel Horses take a break now. They will only be used as a backup if this one is out of service. It's not pretty, but it sure does do exactly what it was built for. Yeah, that's a temporary battery strapped on the fender. I didn't have another one small enough for the battery box... The seat is on loan from the parts pile, just until the suspension seat is fixed for it.
-
1 pointI have a bunch of tires I need to mount, etc. so I thought I would spring for one of these mini tire changers at HF http://www.harborfre...nger-34552.html I know you can use screwdrivers, pry bars, hammers or whatever, but I got this on sale for $33 with coupon so I thought what the heck . . . I'm a tool guy. Started out with these two front tires on my lawn non-WH tractor. They both had leaks and needed filled every few days. If I have to go to the work of dismounting, I'm not screwing with a tubes when the tire itself is worn out anyway. Dismounting was a breeze and both tires were off no time flat Bead breaker works great. I mounted the whole thing on a bench and the top of the mounter is removable. Fix-A-Flat worked good for a year or two, but I would not recommend it because it gums up your rims and is a pain to clean off. I got these tires from eTires.com for $15 each. It's a non-WH turf only tractor, so durability/quality/etc were not a concern. Their shipping method is very simple, which I guess offsets the cost. The down side is they are hard to get re-spread for the bead to seat. At first I thought this would work good after watching YouTube videos (straps didn't do anything - Maybe if the tire was in a regular shape) MOV06359.MPG Maybe I needed more starting fluid or more ball$ (or perhaps God did not want me to die in a furious garage fire at the tender age of 47 before Olde Tyme Days) . . . so I decided to give them a bug hug while pushing air in with the valve stem core removed and eventually got them seated. After researching several forums I found that 303 Protectant (or the Turtle Wax version) was an excellent lube for various reasons. If your rim is clean you will not need tubes for the same reasons your car does not need tubes. CLEAN rim seat+good lube=leak free seal. Check it with water when done to make sure there are no bubbles. If so, beat the tire with a large poly or rubber hammer near the rim a few times. That may do it. If not, break the seat/CLEAN/lube/re-seat. Dip the whole works in a tub of water and make sure there are no leaks, Bottom line is for a little money if you want another tool to play with, it works pretty good. I think there is a YouTube video showing it's use too. I saw some reviews about bending the mounting bar, but I think if you have enough lube and are using it for it's intended application in the manner it's supposed to be used it will work. Hope this was helpful. Before you ask, if you have rim that is large enough to be placed on a regular garage tire machine . . . don't use this. I take mine to a local garage and have the tires on/off in minutes for few bucks (or free if you have a friend) :orcs-cheers:
-
1 pointHere's a couple of pictures of a bead breaker I cobbled up today. I didnt want to buy one (partly no room for more tools, partly lack of funds!) so I looked around the internet for pictures of home made ones. A lot of motor-cycle guys make them out of 2x4's attached to a stud in there garages. I almost did this, until I had the thought of anchoring the thing to the reciever hitch on my truck. A couple of pieces of steel, one lttle weld, and 30 minutes later I had both rear tires from the lawn rangerbroken free of the rims. (I just want to pop the beads to paint the wheels - with the shape these 45 year old tires are in, Im sure I'll destroy them if I try to dismount them completely). The "lever" is a piece of 1 1/2 x 3/8 thick steel flat bar, the "ram" is a piece of 3/4" square steel tube, with a 1/4" thick foot welded to it. The ram pivots on the lever on a 5/16 bolt, the lever pivots on the tow ball reciever on a 1/2" bolt It works great, much easier than wrestling with squeezing a tire in a vice!
-
1 pointOn my 314-8 there are 4 Phillips head screws holding the shifter panel on. I'm not fond of Phillips head screws, and thought it might be a good idea to replace those with either hex recessed cap screws or hex head bolts. My question would be, what size thread are these Phillips head screws? I could find out rather quickly, but I'm sitting here this morning at work and this occurred to me. So if I knew what size thread they were I could run down to our lab here at work and get the kind of bolts I want.
-
1 pointAs many of you know, I have a B-80 I recently restored. Some of you have also heard me whining about how hard I've been having to work it keeping up with over 5 acres. Well not any more! My dad likes watching a local online auction we have down here, and he told me the other day he saw a couple of mowers I might like. Well, to make a long story short we bought 2 of them for next to nothing. We went and looked at them before bidding, and neither one had a battery, and we were not allowed to get them running or mess with them at all. We bid very little for them, because their condition was unknown, and we ended up getting them for less than half our maximum bid! Got them to my shop, and I was out mowing with the 1993 Toro 325-D groundsmaster in under an hour. I had the 2010 Snapper SC2142 ZTR running great in a matter of minutes, however all the deck mounting brackets are bent up, and in need of repair. The Snapper is OK, but I really like the Toro, it has a 25hp Mitsubishi Diesel that runs great, a 72" deck that needs new spindle bearings, and it shows 3800hrs on the clock, but its very solid. I'll spend some time repairing anything that needs repair, and slap a coat of paint on it and put it to work. Sweet relief for my B-80! I don't know if I should have posted this here or not, its not a Horse, but it is a Toro. Probably should have put it in other brands. Matt
-
1 pointFor some reason, I am not allowed to start a new topic under Mechanical Tips????? I posted this in another forum and got several "Thanks"------- I bought a set of 23 x 8.50-12 lawn tractor tires off eBay. When I received them, dismounting and mounting instructions were included. Instructions--- All rims are desighened to have the tire removed and replaced from either the inside or outside of the rim. Before mounting the tire, be sure the rim sealing area is in good shape. Use appropriate size 2x4 or other method to spread the tire bead app. 1"-2" inches wider then the bead surface of the rim. Leave overnight if possible. Use a rubber lubricant or dish soap on the bead surface. I have mounted many small tires and always had to use a strap around tire to spread the bead to the rims. Not after following these instructions I could not believe how easily the tires were to mount--very little tire tool usage while mounting the tires, I simply added air--with valve core removed---tire beads were touching rim all around
-
1 pointWell I don't know what I got myself into, but I just couldn't pass this up. No spark at the moment (PO says it used to run till he parked it 2 years ago). Came with 3 different sets of tires. Dual spacers (not so sure I'll want duals on it) 36" deck 48" front blade Chains 2 seats Fenders (that were removed to accomdate the larger tires) a few other misc. things
-
1 pointWheel Horse was well represented at Olde Tyme Days this year. Here's Buckrancher with his horses... As I drove my Commando 8 around the grounds, I saw lots of Horses...and of course lots of Deere. Too many little and big tractors and oddballs to mention, so just look through the pics and enjoy... Mr. & Mrs. Rancher enjoying the day... Zeek checking on the burgers, brats and dogs... and of course the wine...we all enjoyed the wine. It was a great day.
-
1 pointyes that was mostly in my younger days now I mostly hunt horse's
-
1 pointwell i put it all together and she runs and drives great.allready started making her look better by adding some tri-ribs up front.
-
1 pointThats gonna make one nice worker matt! ~Jake
-
1 pointSo Brian, where's the Stainless Steel buck?
-
1 pointHoly Crap! Things are bigger in Texas! That thing is a Beast!
-
1 pointThought I'd finally give this thread an update. I've been busy, so it took awhile for me to actually get to work on it. First off, this is not a resto, its just a freshening up. I resealed the hydro, engine, and replaced anything that showed more wear than allowable. This thing is going to be working hard for a living, so the paint is far from perfect, but it will look alot better than it did. Its not done yet, but I've been making progress. Here are a few pics. Matt :flags-texas:
-
1 pointThanks Matt. Ta muchly Don. I know it won't be long until test drive time, I'm starting to get butterfly's thinking about it After yesterdays fun and games playing with the drive belt pulley, I decided to start again with it... The small pulley I had fitted really bugged me!!! So after lot's of ing, cutting, drilling and welding I came up with these.. They bolt on like so and even have a small amount of adjustment. Ta-Daa, the bigger mule drive pulley fits. Now without any belt to belt clearance problems Best get on with fitting the chains and sprockets on the right and side then... So off came the outrigger. To have some slots made longer.. One cut later my grinder stopped making a "cutting steel" kinda sound and replaced with with a "motor whirring" sort of noise!! Best crack it open and have a look.. "That's your problem right there"!!.. The beveled gear had decided give up it's grip on the motor spindle.. Which means one dead grinder... Oh well, four years use out of a grinder isn't too bad for me, I do tend to work them quite hard The good news is Pete will be turning up with his grinder tomorrow, so the slots can be cut, outrigger and chains etc bolted on... Then the engine can be fired up and drive bench tested..
-
1 pointI can beat that I got a pair of WH cast front weights from a guy at work for $20 and he approached me :ychain:
-
1 pointWell,very small update. No pics yet,but the front axle,clutch and foot rests are painted now. The rear wheels are blasted and need glass beaded. I've been working on sanding the frame,it needs a couple more hrs but its close to being done. Also got some goodies for it . frame needs a little more sanding and it will be ready front rims glass beaded guess I'm just gonna paint these black,not gonna spend a ton of money on getting them chromed the goodies, also have a set of hubcaps and decals for it in the house LOL
-
1 pointI have a 1973 12 automatic with the electric PTO.I got it new,and when the tractor was about 15 years old the electromagnet in the PTO quit.I went to Wheel Horse and the parts guy told me it would be about $200.I thought that was a lot of money for a coil of wire,but the parts man told me that he wasn't selling me a coil of wire,he was selling me a changeover to the manual PTO.I kind of liked my electric setup,so I took the magnet part to a motor rewinding shop here in town.They told me that rewinding the coil was a tiny job but the real time would be in making a mold to wind around.He described what he required and I went home and made it.They didn't expect that,he said most people just give up when they have to do a little work themselves.They charged me $50.and $30.of that was for a high-impact vibration resistant epoxy that he insisted on using for my application.This was in 1987 or so,and the clutch is working just fine today.It never sees weather though,it is always stored indoors.Friction material?I don't have any.Just a slotted steel friction disc.If I wrap a piece of hose,fan belt,fence wire,or anything around the blades the belts will smoke off before that clutch slips.I also have a C-160 with a manual PTO,I don't care for that anywhere as near as much as the electric.
-
1 pointHey Matt, nice saying Yep you should get a lathe, they are such a handy bit of kit to have about the place. Thanks Bobie. Your welcome Brad, I'm hoping that in a few the beast will not only be able to move forward, but turn as well!! Yesterday I had a look at getting the main drive belt sorted as it's a tad long.. A bigger pulley might do the trick, I thought while looking at the mule drive on my Raider!!! A quick dig under the bench later, a spare was dug out and pulley removed. It looks like it might work.. Ah... Maybe not.. And that's with the pulley on full height adjustment! It would be so much easier to sort the pulley out if the oil filter wasn't in the way.. I guess it had better stay though And then I spotted it hiding in the spares department .. Maybe the solution to the problem?? A C-175 belt tensioner thingy.. A bit of cutting and drilling later, the new brackets were bolted to the engine and the larger mule drive pulley tried.. It would be nice to be able to use this pulley as a bigger diameter puts less strain on the belt when it has to bend back over it's self. It almost worked.. If the belt was half inch longer the tensioner would of gone all the way down as it should, instead the motion lever hit's and won't go into full reverse!! A change of pulley later and the belt is nice and tight and no problems with the motion lever hitting anything.. I just wish the pulley was a little bigger! I was about to take the new belt tensioner thingy off the engine for welding when a large packet arrived.. Yippee more chain.. And the correct size (I managed to order right this time) half links.. A quick test fit of the front left side chain. A previous test fit of the chain using a bit of phone cable instead of a half link showed I needed two chain guides to take up the slack.. With the half link fitted enough slack was taken out the chain only to need one guide! Even stranger, when I test fitted a rear chain I found it didn't need a half link or a guide!!! Quite what is going on I don't know... The axles are the same distance apart.. Even though I knew they were I measured again just to check!! Err.... On the upside it means I don't have to turn any more skateboard wheels on the lathe or drill any more holes in the outriggers :thumbs:
-
1 pointfind thing for you to say mister sneek into NY to buy your wheel horses try staying on your own side of the boarder
-
1 pointI have a pair of new old stock ones I picked up from a wheelhorse dealer and paid $20.00 for them
-
1 pointunfortunately I do not have a money tree, so it does not have a wing.....but if i ever win the lottery, that's on my short list of things to buy, i saw a super bird sell at a local auction 20 years ago for $33,000.....seemed like a lot of money then, but think of the return on you're money now!!!!! Anyway, it's not a factory hemi car (had a 383 in it) which it comes with, but under the hoods sits a 528 crate hemi putting out 640 hp!!!!!!!! It needs to be completed, entire body work is done and painted professionally..... The winner is.......a tangerine pearl colored..... 69 Road Runner I'll get some pics asap
-
1 pointMan, you gotta stop putting pictures of my relatives in the forum! :naughty:
-
1 point2 weeks back I found a raider with a 12 brinly plow him there I just put it in the workshop was torn in several places The next thing I have found is an original neon sign of wheel horse pics here I have finally found a sickle bar, it is unfortunately not complete the gaerbox for sickle bar to drive was not there it's a Haban if someone can help me how I should confirm ??????
-
1 point:hilarious:
-
1 pointWell....I do see the correct answer above :eusa-think:
-
1 pointWhere I come from this takes up very little room......
-
1 pointVery nice work Kelly! Looks like a factory-made setup! A perfect example of why I keep things my wife thinks I should throw away: What a fabricator sees in the junk pile is impossible for many to understand!
-
1 pointThe groundsmaster mowers are a great grass cutting machine I was using an older model 52 and loved it yours must be a model 62 since it has a 60" deck they also made a model 72. These go around trees and obstacles like a zero turn and you can get attachments (snowblower, sweeper). I recently upgraded and got a Proline 120 which is just a newer groundsmaster with a 20hp kohler twin this one came into a local shop and the owner said the blades turned slowly rather than getting it fixed he purchased a new zero turn when I got it home and removed the covers the grass/dirt was packed so tightly that it was causing the belt to slip and the blades would barely turn I cleaned it up and gave it a good greasing now it mows great and the deck is quiet. Since I am the only one using this mower I leave the deck covers off for easier cleaning. Parts are easy to find new or used from a Toro dealer or ebay.


This leaderboard is set to New York/GMT-05:00