
Leaderboard


Popular Content
Showing content with the highest reputation on 08/22/2012 in all areas
-
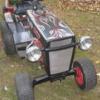
3 pointsI have a Kwik way loader on my C-195 I use it a fair amount, but the bucket does not suit my needs, I need to move dead tractors, decks, snowblowers, engines ect.... stuff my old back does not like pushing or lifting any more, I've been looking for a set of forks to mount on it for a while, but most are WAY to big, I was at the scrap yard last week and they just got a little fork truck in, so I pulled a few parts off it to make my fork set up, I needed a set of side plates to mount the mast head to the loader arms, I looked and looked about ready to give up I spotted this pink looking brush guard for a truck in a pile, quick check with a tape measure I think I can make it work, so I loaded that up also, after getting home I did some closer measuring, and the mast head was 1" to narrow so I bought some 1/2" thick flat stock to make shims, the mast head already was drilled and tapped on the ends, but was metric so I had to buy bolts for that, and I picked up some 2" angle iron 1/4" thick to make the inside brackets. First I cut the brush guard down to size, no fancy tools just a cutting torch, and a grinder, when I had them looking pretty good I welded the two plate together so I could grind the profile of them and they be the same when done, and when I drilled all the holes both plates would be the same and it saves lay out time, but when I got done with the grinding and hole drilling I found out I welded them together better than I thought it took a little grinding to get them back apart, I drilled the spacer blocks out but not before scraping a 5/8" drill bit glad it was under warranty, but had to wait a day to exchange it, but the bolts I ordered had not came in yet so it was not a big rush, I used long stainless bars to line the inner brackets up when welding, it is much easier to line up the two bars than the short pins, all together this took about 4 nights after work to do, I still want to weld some grab hooks on the top of the side plates to hook chains to, and take it back apart for paint, I have about $175 into this project with buying everything, the forks are a bit on the heavy side I'll keep a eye out for a smaller set, 90% of them are universal fit, these have a 25000 lb rating I don't think I'll need that much. Brush guard I cut the sides out of, the sides are 3/8" thick. Mast head before I trimmed some extras off I did not need Side plates about done and welded way to good after grinding them apart shim blocks to make the mast head wider, this is before final drilling and cutting to size test fitting Where I'm at right now, need to buy hooks to weld on the top of the side plates and paint it all
-
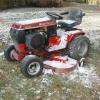
2 pointsI love 's to death but 2 things bug me. 1st is the seat bolted right to the fender pan with no springs. What's up with that. I feel like a circus bear on a tricycle when I get on one that someone hasn't all ready put some springs on. Easy fix. Get some springs. The 2nd is the puny hydraulic lift lever on my C-160. You have to reach down and find it while plowing snow. I decided I needed something better. The first pic is the first one I did. It worked great but the bottom part that hooked to the valve was well worn and it flopped around too much. Plus it looked way modified from normal. The 2nd pic is my new one. I made it from a Hydro control lever from a parts tractor. The part that connects to the valve was made from a chunk of scrap and it fits good. The 3rd pic shows how I can keep my left hand on the wheel and still pull the lever back for plowing. This allows me to control the trans with my right. :thumbs:
-
2 pointsAt last, excellent, understandable, worthy, justifiable reasoning, "That's why I 'need' more than one Horse!" Should I fake a breakdown, have the "woman of the house" come out and push? Great advice! I need a D-Horse, just in case! Insurance! With the D, need chains, weights, plow, snow blower, wide deck, trailer, wagon, new boots, lunch, dinner, oil, more paint, spare belts, another five gallon gas can, more time on the world wide web, videos of tractor pulls and two fishin' rods! :ychain:
-
1 pointI had this 1954 Dodge Red Ram Hemi engine laying in the garage for many years. I wanted to build a power unit out of it but I tripped over these 1959 Copar Panzer parts and thought, hmmmm! So I have it mocked up so far but I'll have to make a new frame and weld it together. It looks pretty beefy so far! Should I do it or what? Looks like a done deal to me! KJ
-
1 pointWas able to snag this 753 from C.L. this week. Complete and in pretty good shape. Was able to get good spark. Motor will turn over pretty good. Carburetor throttle shaft is siezed and broke. So, gonna need a new carburetor...hint hint and help locating one. Came with the rear bracket for a snow plow which is a plus. Back rest is in pretty good shape considering the age. Really excited about this one. Hope to get it running soon. Sorry for the bad pictures. Hope to get better pics this weekend.
-
1 pointI had a few of the herd out last weekend. Had a few different one's out this time. around. My 8 year old Grandson stayed over night so we rode tractors out in the woods a few times! He was checking out my vintage bikes(yes I collect old bikes too!) hanging from the rafters and wanted to get a couple down to ride around the yard, cool, here ya go Son! We had a good time all crammed into 18 hours.....Papaw Jones
-
1 pointMight want to change the hand throttle on the hood though.....LOL....Hemi stuck full throttle could do some damage.....
-
1 pointI have been a conductor, switch man, maintenance of way for Junction Vally Railroad (1/4 scale) for several years. does that count?
-
1 point
-
1 pointNapa Brake and electric motor cleaner works great for bees. Shoots a long way and non-flammable. My father was allergic to bees and I gave him a case for Christmas. He asked,"What the hell is this for?" I said for bees. You can stay in the house and shoot them thru the window. He called that summer and said it was the best bee killer he ever used.
-
1 pointStart here: http://www.wheelhorseforum.com/files/file/1839-kohler-k91141161181241301321341/ Electrical is section 8.
-
1 pointTa muchly I'm guessing the switch is still working as "something" makes a loud buzz sort of sound when I turn it on, so the cap it must be. Much to my shame I've not done anything on this project for quite a few days, but I did find time yesterday to have a look at how the drive chains would run in the outriggers.. I've still not got any 1/2 chain links so a bit of phone cable had to do. If I could take out one chain link then life would so so much easier. But as I can't, and can't move the axles a 1/2 link is needed.. I was quite amazed at how much "slack" just a 1/2 link produces! Which means I now need 2 chain guides/rollers per chain to deal with the slack.. One up top.. And one below.. And that chaps is all that has been happening!! The good news is I will have some money again on Friday, so I can order that last bits needed for this chain conversion... Yep... Test drive 3 should be under 2 weeks away :D
-
1 pointGreat example of why we need multiple horses. If one takes a break you just hop on another one and keep mowing.
-
1 pointHi Toad !. Good to have you here. Post some Pics for us when you can. Regards
-
1 pointDavid, Stop the engine and place the ignition key in the run position. Measure DC volts at the B+ terminal of the rectifier / regulator unit. You should read battery voltage at the B+ terminal. This step assures you have a good electrical connection between the rectifier / regulator and the battery thru the ignition switch. Battery volttage should also be present at the "B" terminal of the ignition switch and (in the run position) the "R" terminal of the ignition switch. If you do not measure battery voltage at the B+ terminal, we will have to troubleshoot wiring to the RR unit or possible issues with the ignition switch. If all this works out OK, measure the AC voltage between the two AC terminals on the rectifier / regulator unit. You should measure in excess of 30 VAC with the engine running at 3/4 throttle or above. If you measure below 30 VAC, we may have an issue with the stator assy.
-
1 pointscott, what? another one already! boy youre running circles around us slow tractor building folk out here.... its looking real nice though, steve, the bondo i use for filling is just the regular stuff. no. 265 i think. ive had it a while and it was sort of used as an experiment to see if it would work or not. it handles the temp of the ovens fine. one thing im not sure of is if it 'gasses' in the oven or not. sometimes when painting porous materials,when in the cure process they will emit gas and if you have a gelled over coat of powder paint on the part, the air is going to escape through the paint, causing tiny bubbles. cast iron is the worst for this. one way to reduce amount of gassing is to preheat the part, run it through a heat cycle. 400 deg f for 45-60 min. then let it cool and then paint it. what ive been doing with the bondo is preheating the part, let it cool. then when im ready to paint it, put it back in the oven for 5 min at 400,( time varies on thickness of part). this should get it to about 100-150. then paint the part. you dont want it too hot, it gets too hard to regulate how much powder you are getting on the part as its glossing over when your painting it. just want it hot enough to 'stick' the paint and provide for the lack of ground charge that will occur with non conductive bondo or previous powder coat on the part. powder is more forgiving on small defects, but if its a hole or small cavity big enough that you are painting over and you manage to get air trapped inside when painting, guess whats going to happen to the air when curing in the oven? like scott said, its a one chance deal to get the metal right, if you miss anything, you need to just deal with it or strip it and go over it again. scott, does your powdercoater strip parts as well, if you need to redo something? not sure how big a coater you have? if theres enough interest, i can start a thread on this stuff. i dont want to hijack this thread with my ramblings...... im no expert at powdercoating but ive been around it for the past 12 years and put in roughly 20,000 hours at any of up to 5 booths/ paint lines spraying this stuff. im still learning, the biggest challenges are painting the old tractor stuff with the rust and what ever else is lurking in the metal to screw you over. my 20,000 hours of production time is a walk in the park compared to doing the old stuff, because new parts is new, no rust, no dents, no bs to deal with. sure theres rework, wash machines not washing oil good enough and screwing with the powder, or hundreds of other things that can happen, but you can go weeks without any problems, and perfect parts...... but throw some old stuff in there for a customer, or my own red stuff! and just wait for the trouble to begin. i guess im being pessimistic as its not all bad, dealing with rust pitting is definitely a learning experience though.... hope this answers a bit of the curiosity, like i said i will start a thread on the subject if theres enough interest and i will try to answer all the ?s there, if anyone has anymore. maybe some pics of the lines at work too. right now though, i want to let scott get on with his tractor, theres probably another 3 or 4 he needs to get done before the summer season hits.... :)


This leaderboard is set to New York/GMT-04:00