
Leaderboard
.thumb.JPG.1b2a1a39cdcedb1e001571713350b32c.JPG)


Popular Content
Showing content with the highest reputation on 08/19/2012 in all areas
-
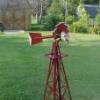
2 pointsI just finished my tater digger and thought i would share some pic. , I'm going to paint the old cast iron Clinton next, This has been a fun project but I've been told I might be nuts, Cause I only got two 18 foot rows potatos
-
1 pointMy intent here is to show lots of pictures so if anyone is rebuilding one of these or some of the others...you can do it without fear and I am adding some very helpful information. I had a post that lead up to this that has some information in it also, and while it overlaps, I wanted to do the rebuild separate. This post is meant to be used with the manual...the pictures help explain better then the pictures in the manual. Now I want to share what I learned as I rebuild this...I realize that some have done this, but this was my first time (transmission virgin) and I know I am not the last one to do this. If I can help or make this easier, then I have given back a little from all the help I have received from this site. Here are a few shots of what this looked like whee I opened the trans. Notice the 1/4" ball bearings on some of the gears. Those are from the #1533 bearings. This is a shot showing gear placement in the left side of the case. Notice the bevel of the reverse gear (front right). The left side is the shallow side of the transmission halves. These are the parts of the differential..the 2 casings on the outside, the 2 axles, the differential bull gear, the 4 posts and the pinions that go on these, and the bolts and nuts that hold it all together. I can't get enough looks at the gears before I tear it apart...next 2 pictures are for future reference. I found a good assortment of 3/8 and 1/2 sockets that made fair to good arbors for pounding out and tapping in most of the bearings and seals. These are the bearings and seals you need to do the R&R. You can get all the stuff from Toro or the site that Jason gave in the related post. One note...the Toro#1303 seal is discontinued. This is called a cup seal, because it has a cup shape. I replaced it with a kind of match (SKF #7410) same dimensions but more like a regular oil seal...it will work. This place used to be Berry Bearings in Elgin...now it is "Motion Industries"...the web site MotionMRO.com...they can match up any bearing or seal. Excellent info. and prices were very good. Shot of the bearings and seals removed, cleaned and sanded. Used Valspar Restoration series...I like the red match with my 702 and I like the hardness of the paint. Showing bearings and seals installed...notice (arbors on right). Putting differential back together...show axle in place with bolts in place. Added pinion posts and in 2nd picture...added pinions (alternating one up and one down). Added Bull Gear Added other axle and case and bolted together. At this point, make sure you can rotate the axles...they should rotate in opposite directions. Placing input shaft and gear (one piece) and the reverse idler shaft. Installed the 2nd & high shift rail and fork. (one on the left). Also installed both ball bearings, spring and stop pin, and low & reverse shift rail. The 2 sliding gears were then placed...the grooves face each other and the smaller gear goes on the bottom. I had a pencil magnet that I used to hold the 2nd ball bearing, while I took an Allen wrench through the hole to hold the bearing out of the way while I placed the low and reverse shift rail. the picture also shows the reverse idler and brake shaft in place. Another view showing forks and gears. Showing reverse idler (bevel up...I hope) in front. Splined shaft installed through the shift fork sliding gears. The cluster gear is then installed( 2 wood-ruff keys here...one on each end). Also, the differential and axles are placed (note the nuts are facing up). different angle yet one more angle Put together..old 5 gal wood create works great as a work bench (all shafts fit through and keep work level). Used a hard rubber hammer to tap halves together. No leaks when I filled with 90wt gear oil...approx 1 1/2 qts. Checked shifting and started to put the 702 back together today. A final picture or a video tomorrow (hope). I want to thank Rickv1957 Fan, MikeRJ, Buckrancher,Suburban550,IndyWH Smokin'Joe, the Helmett and Charlie for all their help and advice...a huge thank you guys.
-
1 pointSome show pics! The famous rmaynard and I (me left - Bob right) . . . I think I saw a "For Sale" sign when wife my snapped the picture Chillin at Brian & Jo's (buckrancher) set up . . . Mrs. Zeek on buckrancher's tractor . . . by the way that's buckrancher's sweet NEW trailer . . . hope he doesn't mind me sharing his nesting quarters , it's too nice not to see. Nice to share dinner and Steveasaurus's wine (good stuff Steve!- I believe Bob has the winning picture ) Bob had his Commando there as well, but it was just out of view in the picture. An old Bonanza . . . my dad used to have one when I was little and I remember riding in the back behind the drivers seat Bruce's tractor with the factory chrome wheels jimt1971's setup This bad boy was featured in an issue of LAGT . . . wish I could lay my hands on one of these for the PA factor At first I thought this guy was a psyco killer and was gonna stick a knife in me until he smiled and said "Can I hold your dog?" (He was actually a very nice guy that was a friend of someone else we knew there) It's a little screwy how multiple pictures post with spacing, etc. and it's late so hopefully they turned out in the order they are supposed to be. I'm sure Bob and Brian will have some good pictures posted as well. I know I met some other members like Eric from New Oxford and some of their pics are in here. Just not sure what belonged to who :eusa-think:
-
1 pointThis was a show truck at the big rig show in Buckley, MI. Too much time on thier hands, but like the mother in law seat.
-
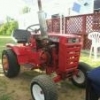
1 pointOK OK I get it, you want pics...I went out to the trailer and snapped a few pics, didnt get any great ones, but here are a few...
-
1 pointno comment until i see pictures..... lol
-
1 point:text-worthless:
-
1 pointThat is correct Craig . Part No 4837 in the May 10, 1963 Wheel Horse 953 Manual.
-
1 pointHere is a link to some additional information on these Hyraulic Pumps:
-
1 pointI have not made the change in a 1054/1054- A hydraulic pump like you are contemplating but I had the same thought when I repaired two Hein-Werner pumps last year. The old style return spring on legs and the newer style butter-fly wing spring have different setups in the cylinder that is in the hydro pump housing for the hydraulic fluid. Some of these photos I took may help you or others that would be interested in this. I would encourage you to take lots of photos of a rebuild and any changes you make we would all appreacaite learning about! That is what makes Red Square a grat place for tractor owners to keep them going -50 or more years after they were made in a lot of cases! Photo of two of the newer version springs for the 1054 and 1054-A standard Hein-Werner pumps: More 953 old style and early HY-2 Hydraulic Pump used on the 953 Wheel Horse Garden Tractor (Serial No- 62-580). The Hein-Werner Hydraulic Pump Metal tag lists the Model No. as A-4 00WH and the Serail No 1305. Also here is another variation on the Hy-2 pump that was only used in the very early models of the 953 Wheel Horse tractor. This came off of a tractor we have that is (Serial No: 62-580). NOTE that the handle is not flat like all the other 953/1055 and 1054-A's that I have seen - it is a round rod and extends out past the housing. Also the container or housing for the fluid and spring and cylinder is wider by about an inch and a half in this photo. The port for refilling the hydraulic pump is also on the end of it and built into the housing unlike the screw in port that was in the middle of the housing on later models. When installed on the tractor, this pump has a rounded frame covering the pump housing that was molded into the left side tractor frame guard where the clutch/brake pedal is located. Photo of longer cylinder and the port for refilling with the cap off: A good photo of the whole pump:
-
1 point
-
1 pointLooks really good Steve...just testing to see if my thought worked with this. Do you have any work lined up for that little guy?
-
1 pointThe 8 pinion differential can be "locked" by changing the alternating pinions from this: To this:
-
1 pointThe use of "Gator Blades" with the high-lift fins on the back really improves the throw and spread of clippings, especially on 42" RD without the baffles. Also, consider leaving the original blades on, lower and at 45º, so you'll have six blades cutting with 12 edges, equals finer clippings.
-
1 pointMy regular mower (a Simplicity) took a dump a couple of weeks ago (hydro went out), so last week I mowed the entire acre with a push mower. Wife laughed at me 'cause I have 8 horses in the barn and none were ready to use for mowing. Well, yesterday I removed the snow plow from the 654 and put the RD mower on it for the 1st time (in my ownership) and proceeded to mow the lawn. I was amazed at how well it cut the grass and how nice the grass was spread out the back. I did borrow dads lawn sweeper and ran over the lawn and most of the grass was cut so fine that I didn't get that much in the sweeper bag. I was pleasently surprised, and will use it for the mowing.....guess I need to take the tire chains off of it now!
-
1 pointWell I think your Dealer is full of it. I have been a Kohler Dealer for 20 years, and no company backs their products better than Kohler.Parts are still available for the K-Series going way back to the 1960's. Check around, you can find them.
-
1 pointHow about Operator (Randy)...you going to make it this year??? :) Hope you make it Terry...was great meeting you at Charlotte.
-
1 pointCorrect tank and straps, just in the wrong place of course. Are the wooden blocks still there somewhere for the tank support? Wrong ignition switch, missing headlight switch, has a GT-14 tie rod, shouldn't have that tube coming from the oil bowl on the filter, missing plate in front of the shift lever and of course missing hood thumb screws. I'm very interested in the engine pulley if you want to part with that one piece. It is for a snowblower or sicklebar mower. Message me if you are interested in parting with the pulley. CONFIRMED- Based on the belt guide near the pulley, this this the pulley and belt guide from a ST-374 snow thrower.


.JPG.9f2ecb26065c66527b0730084ab7fc7a.thumb.jpg.7dc8a04d9a53d44ee2b23f26ee94496f.jpg)


This leaderboard is set to New York/GMT-04:00