
Leaderboard


Popular Content
Showing content with the highest reputation on 06/17/2012 in all areas
-
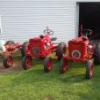
3 pointsHere is yesterdays haul a 56 and 57 Rj 35.
-
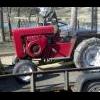
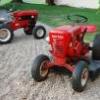
2 pointsA couple of weeks ago, I joined the Forum to get some info on a 414-8 that I was buying from a buddy at work ( really, his MIL). you guys pointed me in the right direction for a lot of info, but the biggest request was for pictures. Well , I brought her home yesterday (HAPPY FATHERS DAY WEEKEND TO ME!!!!!) and snapped some pictures before I mowed the yard. This is my first tractor ( at least I went with the best right) and like a few of you said in my first post, it wont be the last....I want a bigger one ya see that the tire on the cart is flat...no hole just neglected. put the compressor to it and good to go with very little weather checking to the rubber. the blade is a bit rusty on the face and on the cutting edge, face will clean up with a wire brush, the cutting edge will take a bit of work to clean up though GreenMntRanger
-
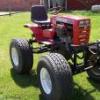
2 pointsWell its totally done woohoo and man does it shine. A many thanks to everyone in wheel horse land that made this project possible. Without all of you this fathers day would've been complete. Thank you all so much and now the pics.
-
1 pointWell I hit the Wheel Horse jackpot a couple weeks ago! I outbid one fellow WH collector(sorry if it was one of us Redsquare guys!) on these first year of production Bug Eye Head Lights in mint condition! I believe they were built in 1962. These are the rare one's that are rounded and stick out about 1 and a half inches from the base! The glass is perfect and the chrome is the best I have ever seen on these types of lights! I put them by the other style of WH head lights for comparison, they have less of a protrusion than this set. How do they look fella's??? Hammerhead
-
1 pointIf the grand daughter can't at least go for a ride in it then to me it is a waste to even have it. If you don't go hauling rocks and dirt with it I think the NOS status is safe.
-
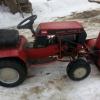
1 pointI had serious doubts that this one would get finished in time for the show. If you remember, this is what I had on April 20 when I started this thread. Now, here is my progress as of 8:00 PM tonight. I think I'm going to make it...seriously.
-
1 pointI am not a collector, so I have a different opinion. Just like our tractors, the implements were designed and built to be put to work. If you want to keep it NOS, put it away and never use it. That's what NOS means. That's all I have to say about that.
-
1 pointDon't get me wrong, I like the look of the Miller tire paint...but I think it's counterintuitive to the preservation of used tires(drys them out even more). I think most people are aware of RuGLYDE, you mostly see it being used in tire shops when mounting up new tires...it's what they dress the bead with before mounting the tire on the rim. This stuff is amazing, actually remoisturizes the rubber. Those little dry checks, and cracks actually seem to close back up, and are virtually unnoticeable with regular applications. I too start cleaning old tires with Wesleys Bleach White, then I put the RuGLYDE into a old spray bottle and use full strength. Spray it on the tires liberally, place them in a large plastic garbage bag, and let them sit...the longer the better. Keep turning them over every day or so, so they remain wet in the bag. After about a week, take them out and give them a bath...you'll be amazed at the results. Cost is about the same as the Miller's, but it's a gallon size container, and when used like this, lasts forever. Available off the shelf at your local NAPA dealer. Just another option, that's all.
-
1 pointI like those 400 series tractors.And the 300's.And the 500's.And the B's.And the C's.And the D's.And the round hoods.I guess I like 'em all.Good luck with your new toy.Looks like you got lots of good stuff with it.
-
1 pointWell you have the Wheel Horse curse already,( I need a bigger one or at least another one), That isn't a bad thing though, just ask anyone here! Seriously, you have a nice start there. Nice that you got the blade and cart too. We will be waiting for your new pictures of the next one.
-
1 pointChange your brand of beer, that buttwiper is enough to make anyone sick. LOL. Maybe that's a Heineken bush you got there Kiwi. :ychain:
-
1 pointTwin54 the lift cable has been a place of concern for me. I'm not a huge fan of the way it's currently routed and think I may replace it entirely with either a solid link (need to prove if this is feasible yet) or a different cable like I did on my other tractors using a 1200 lb rated cable with D rings and cable clamps at either end. I machined the holes for the sphericle bearings now. Just need to put the bens in the arms. They are 1/2 inch thick and I tried a torch at work this morning but it didn't seem like it wanted to get hot enough. I may just make a V notch with the grinder, bend to the correct angle then wel the seam back up...
-
1 pointHiya grumpy.... I'm in fort wayne not far from ya.. Welcome to red square... The place where guys know these tractors better than the guys who designed them... Need questions answered, this is the place, and yes we like to see pics of tractors......
-
1 point5am!?! Its a tractor show not the second coming of Christ.
-
1 pointRather than stretching the spring i would put in a shim(s) between the spring and the cap. I would think the ones used on the implement relief valve should work.
-
1 pointPut the 16 Kolher in the 125 while you rebuild the 12 Kolher and restore the 160. " I love it when a plan come together."
-
1 pointI'll be there during the day on Thursday with the CT crew in the back corner, LOL!
-
1 pointTry removing one (or both) of the fender bracket bolts next time:
-
1 pointAnd make sure you don't drop it inside the tranny. The same thing happened to my ranger, couldn't get the f'n bolt out so had to split the case, only to find out that I pulled half of the case where the shift balls were, and now can't get the brake drum off so I can put it together.... :D
-
1 pointBefore inserting shift lever, make sure that the forks are aligned in the neutral position as shown below:
-
1 pointYou don't really need a drawing, you just need to look for the dog-point set screw / jam nut at the front of the hole where the shifter enters the transaxle. Place the shifter back into the hole until the hole in the front of the pivot ball aligns with the end of the set screw and tighten the set screw gradually while moving the shifter. Once the shifter starts to feel snug but still moves freely, hold the set screw while tightening the jam nut.


This leaderboard is set to New York/GMT-05:00